Asus PRIME H770-PLUS Users Manual English - Page 14
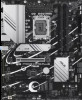
M.2 slots Key M, SATA 6Gb/s ports, USB 3.2 Gen 1 headers, USB 2.0 headers, Addressable Gen 2 headers
 |
View all Asus PRIME H770-PLUS manuals
Add to My Manuals
Save this manual to your list of manuals |
Page 14 highlights
6. M.2 slots (Key M) The M.2 slots allow you to install M.2 devices such as M.2 SSD modules. • Intel® 13th & 12th Gen Processors M.2_1 slot (Key M), type 2242/2260/2280 (supports PCIe 4.0 x4 mode) • Intel® H770 Chipset M.2_2 slot (Key M), type 2242/2260/2280/22110 (supports PCIe 4.0 x4 mode) M.2_3 slot (Key M), type 2242/2260/2280 (supports PCIe 4.0 x4 & SATA modes) 7. SATA 6Gb/s ports The SATA 6Gb/s ports allow you to connect SATA devices such as optical disc drives and hard disk drives via SATA cables. 8. USB 3.2 Gen 1 headers The USB 3.2 Gen 1 headers allow you to connect USB 3.2 Gen 1 modules for additional USB 3.2 Gen 1 ports. The USB 3.2 Gen 1 headers provide data transfer speeds of up to 5 Gb/s. The USB 3.2 Gen 1 module is purchased separately. USB3+5V IntA_P2_SSRXIntA_P2_SSRX+ GND IntA_P2_SSTXIntA_P2_SSTX+ GND IntA_P2_DIntA_P2_D+ PIN 1 USB3+5V IntA_P1_SSRXIntA_P1_SSRX+ GND IntA_P1_SSTXIntA_P1_SSTX+ GND IntA_P1_DIntA_P1_D+ GND +5V DC Data(negative) Data(positive) Groud 9. USB 2.0 headers The USB 2.0 headers allow you to connect USB modules for additional USB 2.0 ports. The USB 2.0 headers provide data transfer speeds of up to 480 Mb/s. DO NOT connect a 1394 cable to the USB connectors. PIN 1 Doing so will damage the motherboard! USB+5V USB_P5USB_P5+ GND NC USBE5 PIN 1 USB+5V USB_P6USB_P6+ GND The USB 2.0 module is purchased separately. 10. Addressable Gen 2 headers ADD_GEN 2 +5V Data Ground The Addressable Gen 2 headers allow you to connect individually addressable PIN 1 RGB WS2812B LED strips or WS2812B based LED strips. The Addressable Gen 2 headers support WS2812B addressable RGB LED strips (5V/Data/ Ground), with a maximum power rating of 3A (5V), and the addressable headers on this board can handle a combined maximum of 500 LEDs. Before you install or remove any component, ensure that the power supply is switched off or the power cord is detached from the power supply. Failure to do so may cause severe damage to the motherboard, peripherals, or components. • Actual lighting and color will vary with LED strip. • If your LED strip does not light up, check if the addressable RGB LED strip is connected in the correct orientation, and the 5V connector is aligned with the 5V header on the motherboard. • The addressable RGB LED strip will only light up when the system is powered on. • The addressable RGB LED strip is purchased separately. 1-4 Chapter 1: Product Introduction
-
 1
1 -
2
-
3
-
4
-
5
-
6
-
7
-
8
-
 9
9 -
 10
10 -
 11
11 -
 12
12 -
 13
13 -
 14
14 -
 15
15 -
 16
16 -
 17
17 -
 18
18 -
 19
19 -
20
-
21
-
22
-
23
-
24
-
25
-
26
-
27
-
28
-
29
-
30
-
31
-
32
-
33
-
34
-
35
-
36
-
37
 |
 |
