Asus Pen User Manual - Page 1
Asus Pen Manual
 |
View all Asus Pen manuals
Add to My Manuals
Save this manual to your list of manuals |
Page 1 highlights
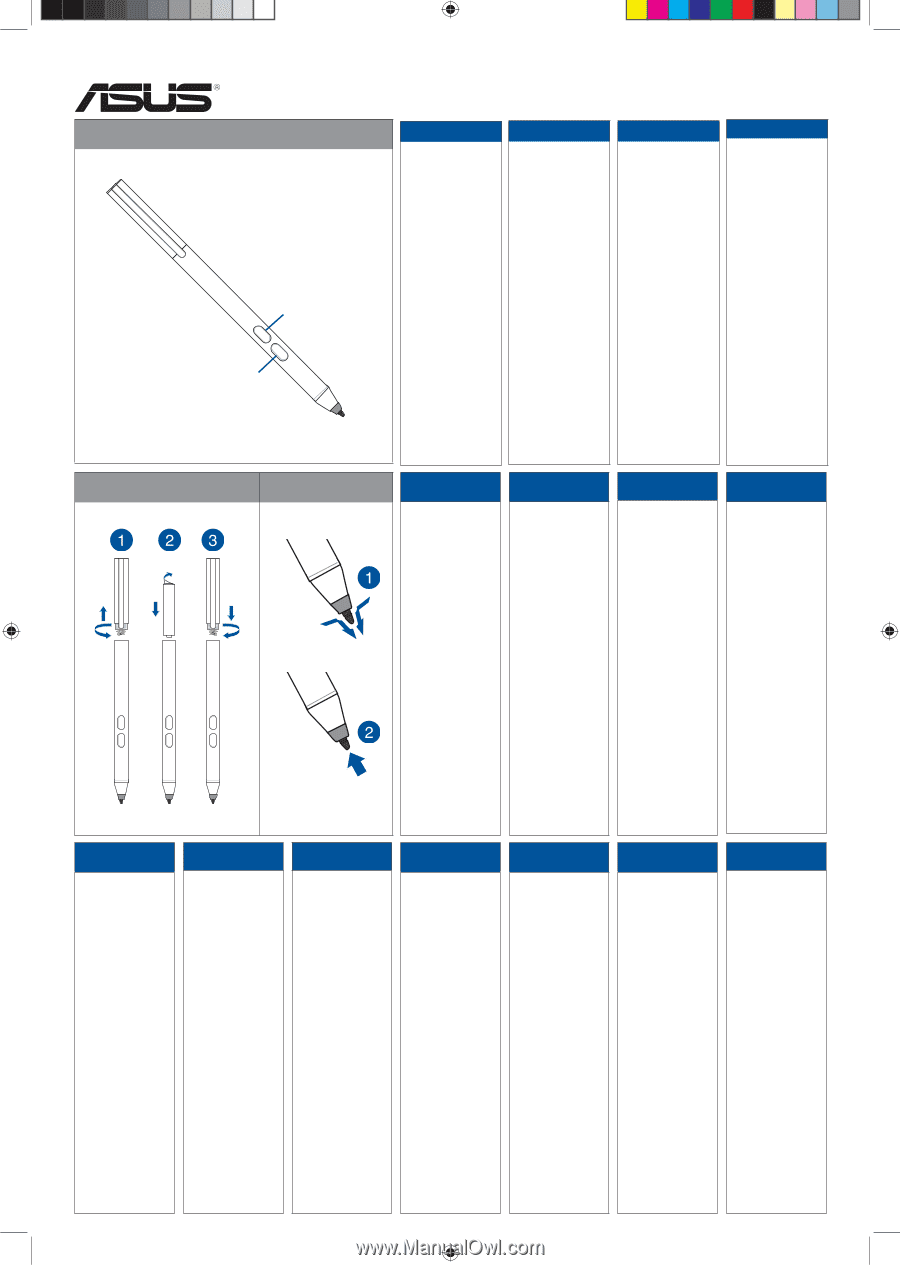
ASUS Pen (Active Stylus) (for T303/T305/T102) Q12501 Revised Edition V3 February 2017 Getting to know your ASUS Pen (Active Stylus) Right click button Eraser button ENGLISH 繁體中文 簡體中文 FRANÇAIS Package contents • ASUS Pen (Active Stylus) x 1 • AAAA battery x 1 • Replacement tip x 1 Getting to know your ASUS Pen (Active Stylus) You can use the buttons on the stylus to enable the eraser and right-click functions. Inserting the battery 1. Remove the top half of the stylus. 2. Remove the sticker and insert the battery, noting the correct polarity. 3. Return the top half of the stylus into place. Replacing the tip 1. Use your fingernails to grab the tip and pull it out. 2. Insert a replacement tip into the stylus. x 1 • AAAA ཥϫ x 1 x 1 f τༀཥϫ 1 f 2 f 3 f һ౬അ᎘ 1 f 2 f x 1 • AAAA ཥϫ x 1 x 1 f 1 f 2 f 3 f 1 f 2 f Contenu de la boîte • ASUS Pen (Stylet) x 1 • Pile AAAA x 1 • Pointe de remplacement x 1 Présentation de votre ASUS Pen (Stylet) Vous pouvez utiliser les boutons du stylet pour activer les fonctions d'effacement et de clic droit. Insérer la pile 1. Retirez la partie supérieure du stylet. 2. Retirez l'autocollant, puis insérez la pile en prenant garde à bien respecter la polarité. 3. Replacez la partie supérieure en place. Remplacer la pointe 1. Utilisez vos ongles pour saisir la pointe puis retirez-la. 2. Insérez la pointe de remplacement dans le stylet. Inserting the battery Replacing the tip DEUTSCH Verpackungsinhalt • ASUS Pen (Aktiver Schreibstift) x 1 • AAAA Batterie x 1 • Ersatzspitze x 1 Kennenlernen Ihres ASUS Pens (Aktiver Schreibstift) Sie können mit den Tasten am Schreibstift die Löschund Rechtsklickfunktion aktivieren. Einsetzen der Batterie 1. Entfernen Sie die obere Hälfte des Schreibstifts. 2. Entfernen Sie den Aufkleber und setzen Sie die Batterie unter Beachtung der richtigen Polung ein. 3. Setzen Sie die obere Hälfte des Schreibstifts wieder ein. Auswechslung der Spitze 1. Benutzen Sie Ihre Fingernägel, um die Spitze zu greifen und ziehen Sie sie heraus. 2. Stecken Sie eine Ersatzspitze in den Schreibstift. ITALIANO Contenuto della confezione • ASUS Pen (Active Stylus) x 1 • 1 x Batteria AAAA • 1 x Punta di ricambio Conoscete la vostra ASUS Pen (Active Stylus) Potete usare i pulsanti sulla stilo per attivare la gomma e le funzioni tasto destro. Inserire la batteria 1. Rimuovete la parte superiore della stilo. 2. Rimuovete l'adesivo e inserite la batteria seguendo la corretta polarità. 3. Riposizionate correttamente la parte superiore della stilo. Sostituzione della punta 1. Usate le vostre unghie per estrarre la punta. 2. Inserite la punta sostitutiva all'interno della stilo. 日本語 한국어 ASUS Pen 1 • 単 6 電池× 1 1 1 2 3 1 2 • ASUS 1 개 • AAAA 배터리 1 1 개 ASUS 1 2 3 1 2 ASUS (Active Stylus) AAA x 1 Active Stylus) 1 2 3 1 2 ASUS x 1 Stylus( AAAA 1 ASUS Stylus( 1 2 3 1 2 Português do Brasil Conteúdo da embalagem • ASUS Pen (Caneta Ativa) x 1 • Pilha AAAA x 1 • Substituição da ponta x 1 Conhecendo sua ASUS Pen (Caneta Ativa) Você pode usar os botões na caneta para ativar a borracha e as funções de clique duplo. Inserindo a pilha 1. Remova a metade da parte superior da caneta stylus. 2. Remova o adesivo e insira a bateria, observando a polaridade correta. 3. Retorne a metade da parte superior da caneta stylus. Substituindo a ponta 1. Use suas unhas para pegar a ponta e retirála. 2. Insira uma ponta substitura na caneta. ASUS x 1 AAAA x 1 1 ASUS 1 2 3 1 2 Čeština Obsah balení • Pero ASUS (aktivní stylus) x 1 • Baterie AAAA x 1 • Náhradní hrot x 1 Seznámení s perem ASUS (aktivní stylus) Tlačítky na peru lze aktivovat funkce gumy a pravého klepnutí. Vložení baterie 1. Odstraňte horní polovinu stylusu. 2. Sejměte nálepku a vložte baterii tak, aby byla zachována správná polarita. 3. Vraťte horní polovinu stylusu na místo. Výměna hrotu 1. Uchopte hrot nehty a vysuňte. 2. Zasuňte do pera náhradní hrot. Nederlands Inhoud verpakking • ASUS-pen (actieve digitale pen) x 1 • AAAA-batterij x 1 • Reservepunt x 1 Kennismaken met uw ASUS-pen (actieve digitale pen) U kunt de knoppen op de stylus gebruiken om het gum en rechtsklikfuncties in te schakelen. De batterij plaatsen 1. Neem de bovenste helft van de pen af. 2. Verwijder de sticker en plaats de batterij en liet hierbij op de juiste polariteit. 3. Plaats de bovenste helft van de pen terug. De punt vervangen 1. Gebruik uw nagels om de punt te grijpen en het uit te trekken. 2. Plaats een reservepunt in de stylus. ASUS 1 • AAAA 1 1 • ASUS 1 2 3 1 2 Q12501_T303UA_Stylus_QSG_V3.indd 1 2017/2/14 �� 10:32:37
-
 1
1 -
 2
2
 |
 |