Asus RT-N15 User Manual - Page 15
Setting up virtual server in your LAN, Authentication, Shared, WPA/WPA2 and WPA-PSK/WPA2-PSK - wireless range
 |
UPC - 610839739349
View all Asus RT-N15 manuals
Add to My Manuals
Save this manual to your list of manuals |
Page 15 highlights
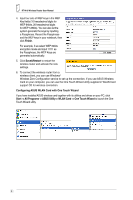
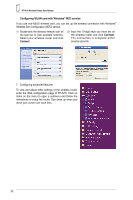
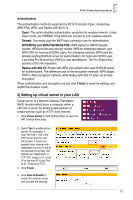
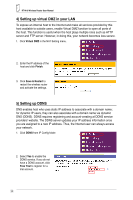
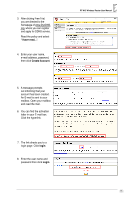
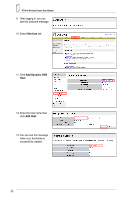
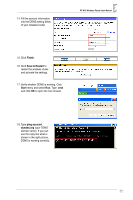
RT-N15 Wireless Router User Manual Authentication The authentication methods supported by RT-N15 include: Open, shared key, WPA-PSK, WPA, and Radius with 80.211x. Open: This option disables authentication protection for wireless network. Under Open mode, any IEEE802.11b/g client can connect to your wireless network. Shared: This mode uses the WEP keys currently in use for authentication. WPA/WPA2 and WPA-PSK/WPA2-PSK: WPA stands for WiFi-Protected Access. WPA provides two security modes: WPA for enterprise network, and WPA-PSK for home and SOHO users. For enterprise network, WPA uses the already existing RADIUS server for authentication; for home and SOHO user, it provides Pre-Shared Key (PSK) for user identification. The Pre-Shared Key consists of 8 to 64 characters. Radius with 802.1X: Similar with WPA, this solution also uses RADIUS server for authentication. The difference lays on the encryption methods: WPA adopts TKIP or AES encryption methods, while Radius with 802.1X does not provide encryption. When authentication and encryption are set, click Finish to save the settings and restart the wireless router. 3) Setting up virtual server in your LAN Virtual server is a Network Address Translation (NAT) function which turns a computer within a LAN into a server by allowing data packets of certain service, such as HTTP, from Internet. 1. Click Virtual Server in NAT Setting folder to open the NAT configuration page. 2. Select Yes to enable virtual server. For example, if host 192.168.1.100 is the FTP server that the user will access, it means all packets from Internet with destination port as 21 are to be directed to the host. Set Well-known Application to FTP. Port range to 21, Local IP to the host IP, Local Port to 21, Protocol to TCP. 3. Click Finish. 4. Click Save & Restart to restart the wireless router and activate the settings. 13
-
 1
1 -
2
-
3
-
4
-
5
-
6
-
7
-
8
-
9
-
 10
10 -
 11
11 -
 12
12 -
 13
13 -
 14
14 -
 15
15 -
 16
16 -
 17
17 -
 18
18 -
 19
19 -
 20
20 -
21
-
22
-
23
-
24
-
25
-
26
-
27
-
28
-
29
-
30
-
31
-
32
-
33
-
34
-
35
-
36
-
37
-
38
-
39
-
40
-
41
-
42
-
43
-
44
-
45
-
46
 |
 |
