Asus S1-AT5NM10E User Manual
Asus S1-AT5NM10E Manual
 |
View all Asus S1-AT5NM10E manuals
Add to My Manuals
Save this manual to your list of manuals |
Asus S1-AT5NM10E manual content summary:
- Asus S1-AT5NM10E | User Manual - Page 1
S1-AT5NM10E ASUS PC (Desktop Barebone) User Manual - Asus S1-AT5NM10E | User Manual - Page 2
OR DATA, INTERRUPTION OF BUSINESS AND THE LIKE), EVEN IF ASUS HAS BEEN ADVISED OF THE POSSIBILITY OF SUCH DAMAGES ARISING FROM ANY DEFECT OR ERROR IN THIS MANUAL OR PRODUCT. SPECIFICATIONS AND INFORMATION CONTAINED IN THIS MANUAL ARE FURNISHED FOR INFORMATIONAL USE ONLY, AND ARE SUBJECT TO CHANGE - Asus S1-AT5NM10E | User Manual - Page 3
Harkort Str. 21-23, D-40880 Ratingen, Germany Fax +49-2102-959911 Web site www.asus.de Online contact www.asus.de/sales Technical Support Telephone (Component) Telephone (System/Notebook/Eee/LCD) Support Fax Online support +49-1805-010923* +49-1805-010920* +49-2102-9599-11 - Asus S1-AT5NM10E | User Manual - Page 4
Running the support DVD 2-3 2.3.2 Drivers menu 2-4 2.3.3 Utilities menu 2-5 2.3.4 Make Disk menu 2-6 2.3.5 Manual menu 2-6 2.3.6 ASUS Contact information 2-7 2.3.7 Other information 2-8 2.4 Software information 2-10 2.4.1 ASUS AI Manager 2-10 Chapter 3: Motherboard info 3.1 Introduction - Asus S1-AT5NM10E | User Manual - Page 5
20 4.5.2 ACPI 2.0 Support 4-20 4.5.3 ACPI APIC Support 4-20 4.5.4 Control Eup 4-20 4.5.5 APM Configuration 4-21 4.5.6 Hardware Monitor 4-22 4.6 Boot menu 4-23 4.6.1 Boot Device Priority 4-23 4.6.2 Boot Settings Configuration 4-24 4.6.3 Security 4-25 4.7 Tools menu 4-27 4.7.1 ASUS EZ Flash - Asus S1-AT5NM10E | User Manual - Page 6
cause undesired operation. This equipment has been tested and found to comply with the limits for in accordance with manufacturer's instructions, may cause harmful interference B limits for radio noise emissions from digital apparatus ASUS REACH website at http://green.asus.com/english/REACH.htm. vi - Asus S1-AT5NM10E | User Manual - Page 7
the electric outlet before relocating the system. • When adding or removing devices to or from the system, ensure that the power cables If you encounter technical problems with the product, contact a qualified service technician or your retailer. DO NOT throw the motherboard in municipal waste. This - Asus S1-AT5NM10E | User Manual - Page 8
), one ODD (HLDS / GSA-T50N(RR07)), one HDD (HITACHI / HDT721032SLA380). About this guide Audience This guide provides general information and installation instructions about the ASUS S1-AT5NM10E barebone system. This guide is intended for experienced users and integrators with hardware knowledge of - Asus S1-AT5NM10E | User Manual - Page 9
task. IMPORTANT: Instructions that you MUST follow to complete a task. NOTE: Tips and additional information to aid in completing a task. Where to find more information Refer to the following sources for additional information and for product and software updates. 1. ASUS Websites The ASUS websites - Asus S1-AT5NM10E | User Manual - Page 10
description 1. ASUS S1-AT5NM10E barebone system with • ASUS motherboard • ASUS ODD (slim type) • ASUS chassis • CPU fan • Chassis fan 2. Accessories • SATA HDD signal cable x1 • HDD screw x4 • Power adapter x1 • Power cord x1 • ODD bezel x1 3. Support DVD (user manual, drivers, utilities - Asus S1-AT5NM10E | User Manual - Page 11
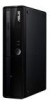
System introduction Chapter 1 This chapter gives a general description of the ASUS S1-AT5NM10E. The chapter lists the system features including introduction on the front and rear panel, and internal components. - Asus S1-AT5NM10E | User Manual - Page 12
1.1 Welcome! Thank you for choosing the ASUS S1-AT5NM10E! The ASUS S1-AT5NM10E is a slimline barebone system with rich home entertainment features. The system supports up to 4 GB of system memory using DDR3 SO-DIMMs, HDMI display output, Serial ATA 3Gb/s, USB 3.0, 8-channel audio configuration, and - Asus S1-AT5NM10E | User Manual - Page 13
Open this cover to show the front I/O ports. 10. Power button (with LED). Press this button to turn the system on. 11. HDD LED. 12. Network LED. This network LED is for WiFi / Bluetooth / infrared connections. 13. Infrared (IR) port. Transfer data between the barebone system . ASUS S1-AT5NM10E 1-3 - Asus S1-AT5NM10E | User Manual - Page 14
8-channel audio configuration, the function of this port becomes Front Speaker Out. 10. Line In port (light blue). This port connects to the tape, CD Speaker Out Side Speaker Out 11. Kensington® lock slot. Secure the barebone system to an immovable object using a Kensington® security product. 12. - Asus S1-AT5NM10E | User Manual - Page 15
3.5 inch SATA HDD bay 2. ODD (slim type) 3. ASUS motherboard 4. CPU fan 5. Chassis fan 6. 204-pin DDR3 SO-DIMM slots • Refer to the bundled Quick Installation Guide for installing an SO-DIMM and a hard disk. • Refer to Chapter 3&4 in this user guide for motherboard details. ASUS S1-AT5NM10E 1-5 - Asus S1-AT5NM10E | User Manual - Page 16
support: • A*: Supports one module inserted into either slot as Single-channel memory configuration. • B*: Supports one pair of modules inserted into both slots as one pair of Dual-channel memory configuration. Visit the ASUS website at www.asus.com for the latest QVL. 1-6 Chapter 1: System - Asus S1-AT5NM10E | User Manual - Page 17
Chapter 2 This chapter helps you power up the system and install drivers and utilities from the support DVD. Starting up - Asus S1-AT5NM10E | User Manual - Page 18
2.1 Installing an operating system The barebone system supports Windows® XP/Vista/7 operating systems (OS). Always install the latest OS version and corresponding updates so you can maximize the features of your hardware. • Windows XP OS setup cannot recognize Serial ATA hard drives in AHCI mode or - Asus S1-AT5NM10E | User Manual - Page 19
menus. Click an icon to display support DVD/motherboard information Click an item to install If Autorun is NOT enabled on your computer, browse the contents of the support DVD to locate the file ASSETUP.EXE from the BIN folder. Double-click the ASSETUP.EXE to run the DVD. ASUS S1-AT5NM10E 2-3 - Asus S1-AT5NM10E | User Manual - Page 20
the wireless LAN and Bluetooth driver. Realtek 10/100/1000 PCI-E LAN Driver Installs the Realtek® 10/100/1000 PCI-E LAN driver. USB 3.0 Host Controller Driver Installs the USB 3.0 host controller driver. NVIDIA ION Graphics Driver Installs the NVIDIA® ION graphics driver. CIR Tool Kit Installs the - Asus S1-AT5NM10E | User Manual - Page 21
Utility Installs the Realtek® Ethernet utility. Adobe Reader 9 Installs the Adobe® Reader that allows you to open, view, and print documents in Portable Document Format (PDF). Internet Radio installs the Internet Radio utility. PC-cillin 2010 Installs the PC-cillin utility. ASUS S1-AT5NM10E 2-5 - Asus S1-AT5NM10E | User Manual - Page 22
Creates an Intel® AHCI / RAID driver disk. 2.3.5 Manual menu The Manual menu contains a list of supplementary user manuals. The user manual files are in Portable Document Format (PDF). Install the Adobe® Reader from the Utilities menu before opening a user manual file. 2-6 Chapter 2: Starting up - Asus S1-AT5NM10E | User Manual - Page 23
2.3.6 ASUS Contact information Click the Contact tab to display the ASUS contact information. ASUS S1-AT5NM10E 2-7 - Asus S1-AT5NM10E | User Manual - Page 24
give additional information on the motherboard and the contents of the support DVD. Click an icon to display the specified information. Motherboard Info Displays the general specifications of the motherboard. Browse this DVD Displays the support DVD contents in graphical format. 2-8 Chapter - Asus S1-AT5NM10E | User Manual - Page 25
Filelist Displays the contents of the support DVD and a brief description of each in text format. ASUS S1-AT5NM10E 2-9 - Asus S1-AT5NM10E | User Manual - Page 26
Manager folder in the support CD. Double-click the setup.exe file to start installation. 2. Click the Utilities tab, then click ASUS AI Manager. 3. Follow the screen instructions to complete the installation. Launching AI Manager To launch the AI Manager from the Windows® desktop, click Start > All - Asus S1-AT5NM10E | User Manual - Page 27
space and allows you to launch the ASUS utilities or display system information easily. Click any of the Main, My Favorites, Support or Information tab to display the menu's bar to display the full AI Disk window and select the items you want to clear. Click Apply when done. ASUS S1-AT5NM10E 2-11 - Asus S1-AT5NM10E | User Manual - Page 28
the password you have set previously, then click Ok. The selected device is unlocked. To change password: Click Change Password, then follow the on-screen instructions to change the password. 2-12 Chapter 2: Starting up - Asus S1-AT5NM10E | User Manual - Page 29
automatically detects and displays the motherboard and CPU temperatures, CPU fan speed, and the voltage output. You can adjust the values as you need. Click the Temperature, Voltage, or Fan Speed tab, then select an item to enable and change the value by dragging the bar. ASUS S1-AT5NM10E 2-13 - Asus S1-AT5NM10E | User Manual - Page 30
throughout your computer. To add an application: 1. Click Add, then locate the application you want to add to My Favorites. 2. Click Open on the file location window. The application is added to My Favorites list. Right click on the application icon to launch, delete, or rename the selected - Asus S1-AT5NM10E | User Manual - Page 31
the Support window to go to the ASUS website, technical support website, download support website, or contact information. Information Click the tab on the Information window to see the detailed information about your system, motherboard, CPU, BIOS, installed device(s), and memory. ASUS S1-AT5NM10E - Asus S1-AT5NM10E | User Manual - Page 32
2-16 Chapter 2: Starting up - Asus S1-AT5NM10E | User Manual - Page 33
Chapter 3 This chapter gives information about he motherboard that comes with the system. This chapter includes the motherboard layout, jumper settings, and connector locations. Motherboard info - Asus S1-AT5NM10E | User Manual - Page 34
3.1 Introduction The barebone system comes with an ASUS motherboard. This chapter provides technical information about the motherboard for future upgrades or system reconfiguration. 3.2 Motherboard layout 23.1cm(9.1in) AUDIO LAN1_ USB12 USB34 VGA_HDMI DC_PWR ALC 887 SPDIF_OUT RTL 8111E - Asus S1-AT5NM10E | User Manual - Page 35
. • You do not need to clear the RTC when the system hangs due to overclocking. For system failure due to overclocking, use the CPU Parameter Recall (C.P.R.) feature. Shut down and reboot the system, then the BIOS automatically resets parameter settings to default values. ASUS S1-AT5NM10E 3-3 - Asus S1-AT5NM10E | User Manual - Page 36
pin USBPW1-4, USBPW56) Set these jumpers to +5V to wake up the computer from S1 sleep mode (CPU stopped, DRAM refreshed, system running in low power mode) using the connected USB devices. Set these jumpers to 12 23 +5V +5VSB (Default) AT5I0N3L USB Device Wake Up 3-4 Chapter 3: Motherboard info - Asus S1-AT5NM10E | User Manual - Page 37
FAN PWR CPU FAN IN CPU FAN PWM DO NOT forget to connect the fan cables to the fan connectors. Insufficient air flow inside the system may damage the motherboard components. These are not jumpers! DO NOT place jumper caps on the fan connectors! ASUS S1-AT5NM10E 3-5 - Asus S1-AT5NM10E | User Manual - Page 38
3. SATA power connector (5-pin HDD_PWR) Connect the supplied SATA power cable splitter to this connector to power one optical disk drive and one hard disk drive. AT5I0N3L HDD_PWR +5V GND +3V GND +12V AT5I0N3L SATA power connector 3-6 Chapter 3: Motherboard info - Asus S1-AT5NM10E | User Manual - Page 39
Chapter 4 This chapter tells how to change system settings through the BIOS Setup menus and describes the BIOS parameters. BIOS setup - Asus S1-AT5NM10E | User Manual - Page 40
the help of a trained service personnel. • BIOS updating is potentially risky. If there is no problem in using the current BIOS version, DO NOT manually update the BIOS. Inappropriate BIOS updating may result to system boot failure. • Save a copy of the original motherboard BIOS file to a USB flash - Asus S1-AT5NM10E | User Manual - Page 41
the Internet. Always update the utility to avail all its features. Updating from a BIOS file a. Select Update BIOS from a file, then click Next. b. Locate the BIOS file from the Open window, then click Open. 3. Follow the onscreen instructions to complete the updating process. ASUS S1-AT5NM10E 4-3 - Asus S1-AT5NM10E | User Manual - Page 42
file is found, then press . EZ Flash 2 performs the BIOS updating process and automatically reboots the system when done. ASAUSSUTSeTkekEEZZ FFllaassh 2 BBIIOOSS RROOMMUtUitliiltiytyV3.V336.44 FLASH TYPE: MXIC 25L8005 Current ROM BOARD: S1-AT5NM10E VER: 0103 (H:00 B:02) DATE: 04/06/2010 - Asus S1-AT5NM10E | User Manual - Page 43
the BIOS file is found, the utility reads and starts flashing the corrupt BIOS file. 4. Turn off the system after the utility completes the updating process and turn it on again. DO NOT shut down or reset the system while updating the BIOS! Doing so can cause system boot failure! ASUS S1-AT5NM10E - Asus S1-AT5NM10E | User Manual - Page 44
Use the BIOS Setup program to update the BIOS or configure its parameters. The BIOS screens include navigation keys and brief online help to guide you in using the BIOS Setup program. Entering BIOS Setup at startup To enter BIOS Setup at startup: • Press during the Power-On Self-Test (POST - Asus S1-AT5NM10E | User Manual - Page 45
Advanced System Time System Date SATA 1 SATA 2 Power S1-AT5NM10E BIOS Setup Boot Tools Exit [14:32:36] [Fri 06/25/2010] :[Not Detected] :[Not Detected] Storage Configuration System Information Version Some of the navigation keys differ from one screen to another. ASUS S1-AT5NM10E 4-7 - Asus S1-AT5NM10E | User Manual - Page 46
to display a pop-up window with the configuration options for that item. 4.2.8 Scroll bar Main Advanced S1-AT5NM10E BIOS Setup Power Boot Tools Exit Version 0103 SATA 1 Device : Not Detected Select the type of device connected to the system. Type [Auto] LBA/Large Mode [Auto - Asus S1-AT5NM10E | User Manual - Page 47
Screen Select Item Enter Go to Sub-screen F1 General Help F10 Save and Exit ESC Exit v02.61 (C)Copyright 1985-2010, American Megatrends, Inc. 4.3.1 System Time [xx:xx:xx] Allows you to set the system time. 4.3.2 System Date [Day xx/xx/xxxx] Allows you to set the system date. ASUS S1-AT5NM10E 4-9 - Asus S1-AT5NM10E | User Manual - Page 48
display the SATA device information. Main Advanced S1-AT5NM10E BIOS Setup Power Boot Tools Exit Version 0103 system. Configuration options: [Auto] [CDROM] [ARMD] [Not Installed] LBA/Large Mode [Auto] Enables or disables the LBA mode. Setting to Auto enables the LBA mode if the device supports - Asus S1-AT5NM10E | User Manual - Page 49
SATA devices installed in the system. Select an item then press if you want to configure the item. Main Storage Configuration S1-AT5NM10E BIOS Setup Configure SATA as SATA ] Sets the SATA run mode configuration. Configuration options: [Compatible] [Enhanced] ASUS S1-AT5NM10E 4-11 - Asus S1-AT5NM10E | User Manual - Page 50
specifications. The BIOS automatically detects the items in this menu. Main S1-AT5NM10E BIOS Setup Version 0103 BIOS Information Version : 0103 Build Date : 04/06/10 Processor Type Speed : Intel(R) Atom(TM)2 CPU D510 @ 1.66GHz : 1666MHz Select the type of device connected System Memory - Asus S1-AT5NM10E | User Manual - Page 51
Auto] Allows selection of CPU overclocking options to achieve desired CPU internal frequency. Select either one of the preset overclocking configuration options: Manual - allows you to individually set overclocking parameters. Auto - loads the optimal settings for the system. ASUS S1-AT5NM10E 4-13 - Asus S1-AT5NM10E | User Manual - Page 52
The items in this menu show the CPU-related information that the BIOS automatically detects. Advanced S1-AT5NM10E BIOS Setup Configure advanced CPU settings Module Version:3F.17 Manufacturer:Intel Brand String:Intel(R) Atom(TM) CPU D510 @ 1.66GHz Frequency :1.66GHz FSB Speed :666MHz Cache L1 :48 - Asus S1-AT5NM10E | User Manual - Page 53
cause system to malfunction. North Bridge Configuration SSeelleecctt SSccrreeeenn SSeelleecctt IItteemm +E-nter CGhoantgoeSOupbt-isocnreen FF11 GGeenneerraall HHeellpp FF1100 SSaavvee aanndd EExxiitt EESSCC EExxiitt v02.61 (C)Copyright 1985-2010, American Megatrends, Inc. ASUS S1-AT5NM10E 4-15 - Asus S1-AT5NM10E | User Manual - Page 54
North Bridge Configuration Advanced S1-AT5NM10E BIOS Setup North Bridge Chipset Configuration DRAM Frequency Configure DRAM Timing by Graphic Adapter [PCI/IGD] Allows you to decide which graphics controller to use as the primary boot device. Configuration options: [IGD] [PCI/IGD] 4-16 Chapter - Asus S1-AT5NM10E | User Manual - Page 55
4.4.4 Onboard Devices Configuration Advanced S1-AT5NM10E BIOS Setup Onboard Devices Configuration Onboard LAN Onboard LAN Boot ROM Audio Controller Front Panel Support Type Onboard Wlan Onboard Bluetooth CIR Function VT6308P Controller [Enabled] [Disabled] [Enabled] [HD Audio] [Enabled] [ - Asus S1-AT5NM10E | User Manual - Page 56
> to display the configuration options. Advanced S1-AT5NM10E BIOS Setup Version 0103 USB Configuration Options Module Version - 2.24.5-14.4 USB Devices Enabled: 1 Keyboard, 1 Hub USB Functions USB 2.0 Controller Legacy USB Support USB 2.0 Controller Mode [Enabled] [Enabled] [Auto] [HiSpeed - Asus S1-AT5NM10E | User Manual - Page 57
. Plug And Play O/S [No] When set to [No], BIOS configures all the devices in the system. When set to [Yes] and if you install a Plug and Play operating system, the operating system configures the Plug and Play devices not required for boot. Configuration options: [No] [Yes] ASUS S1-AT5NM10E 4-19 - Asus S1-AT5NM10E | User Manual - Page 58
Advanced S1-AT5NM10E BIOS Setup Power Boot Tools Suspend Mode ACPI 2.0 Support ACPI APIC Support Control Eup system suspend. Configuration options: [S3 Only] 4.5.2 ACPI 2.0 Support [Enabled] Allows you to add more tables for Advanced Configuration and Power Interface (ACPI) 2.0 specifications - Asus S1-AT5NM10E | User Manual - Page 59
PME wake from sleep states. Configuration options: [Disabled] [Enabled] Power On By Remote Control [Disabled] Enables or disables a remote control to power up the system or wake up the system from S3, S4, and S5 sleep states. Configuration options: [Enabled] [Disabled] ASUS S1-AT5NM10E 4-21 - Asus S1-AT5NM10E | User Manual - Page 60
4.5.6 Hardware Monitor Hardware Monitor S1-AT5NM10E BIOS Setup Power CPU Temperature MB Temperature CPU Fan Speed Chassis Fan fan speed in rotations per minute (RPM). If the fan is not connected to the motherboard or to the chassis, the field shows N/A. Select Ignored if you do not want the - Asus S1-AT5NM10E | User Manual - Page 61
Boot Device 2nd Boot Device 3rd Boot Device S1-AT5NM10E BIOS Setup Boot Version 0103 [USB: JetFlash Trans system startup, press when ASUS logo appears. • To access Windows OS in Safe Mode, do any of the following: • Press when ASUS logo appears. • Press after POST. ASUS S1-AT5NM10E - Asus S1-AT5NM10E | User Manual - Page 62
Configuration S1-AT5NM10E BIOS Setup Boot Boot Settings Configuration Quick Boot Full Screen Logo AddOn ROM Display Mode Bootup Num-Lock Wait For 'F1' If Error Hit 'DEL' Message Display [Enabled] [Enabled [Force BIOS] [On] [Enabled] [Enabled] Version 0103 Allows BIOS to skip certain tests while - Asus S1-AT5NM10E | User Manual - Page 63
system security settings. Select an item then press to display the configuration options. Security Settings S1-AT5NM10E BIOS BIOS password, you can clear it by erasing the CMOS Real Time Clock (RTC) RAM. See section 3.3 Jumpers for information on how to erase the RTC RAM. ASUS S1-AT5NM10E - Asus S1-AT5NM10E | User Manual - Page 64
you to change other security settings. Security Settings S1-AT5NM10E BIOS Setup Boot Supervisor Password : Installed User Password BIOS checks for user password when accessing the Setup utility. When set to [Always], BIOS checks for user password both when accessing Setup and booting the system - Asus S1-AT5NM10E | User Manual - Page 65
the sub-menu. Main Advanced S1-AT5NM10E BIOS Setup Power Boot Tools Exit ASUS EZ Flash 2 Express Gate Enter OS Timer Reset User Data AI NET2 [Auto] [10 Seconds] [No] Version 0103 Press ENTER to run the utility to select and update BIOS. This utility supports 1.FAT 12/16/32 (r/w) 2.NTFS - Asus S1-AT5NM10E | User Manual - Page 66
. ASUS Express Gate is a unique instant-on environment that provides quick access to the Internet and Skype. Configuration options: [Auto] [Enabled] [Disabled] Enter OS Timer [10 Seconds] Sets countdown duration that the system waits at the Express Gate's first screen before starting Windows or - Asus S1-AT5NM10E | User Manual - Page 67
default values for each of the parameters on the Setup menus. When you select this option or if you press , a confirmation window appears. Select OK to load default values. Select Exit & Save Changes or make other changes before saving the values to the non-volatile RAM. ASUS S1-AT5NM10E 4-29 - Asus S1-AT5NM10E | User Manual - Page 68
4-30 Chapter 4: BIOS setup
-
 1
1 -
 2
2 -
 3
3 -
 4
4 -
 5
5 -
 6
6 -
 7
7 -
8
-
9
-
10
-
11
-
12
-
13
-
14
-
15
-
16
-
17
-
18
-
19
-
20
-
21
-
22
-
23
-
24
-
25
-
26
-
27
-
28
-
29
-
30
-
31
-
32
-
33
-
34
-
35
-
36
-
37
-
38
-
39
-
40
-
41
-
42
-
43
-
44
-
45
-
46
-
47
-
48
-
49
-
50
-
51
-
52
-
53
-
54
-
55
-
56
-
57
-
58
-
59
-
60
-
61
-
62
-
63
-
64
-
65
-
66
-
67
-
68
 |
 |

S1-AT5NM10E
ASUS PC (Desktop Barebone)
User Manual