Asus SABERTOOTH X79 User Manual - Page 51
Thermal Armor for ASUS SABERTOOTH X79 - tuf
 |
View all Asus SABERTOOTH X79 manuals
Add to My Manuals
Save this manual to your list of manuals |
Page 51 highlights
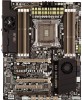
2.3.6 Thermal Armor for ASUS SABERTOOTH X79 The Thermal Armor for ASUS SABERTOOTH X79 consists of a rear I/O cover and a PCH cover and fan assembly, providing effective dissipation of the heat generated from the motherboard components. To ensure the most optimum heat dissipation, follow the instruction below to install the I/O cover fan to the rear I/O cover. 1. Remove the two screws on the rear I/O cover, and then remove the lid to show the fan socket. 2. Place the rear I/O cover fan into the fan socket, ensuring that the TUF logo on the fan is facing up. 3. Secure the fan to the socket using the two screws removed in step 1. Chapter 2 ASUS SABERTOOTH X79 2-33
-
 1
1 -
2
-
3
-
4
-
5
-
6
-
7
-
8
-
9
-
10
-
11
-
12
-
13
-
14
-
15
-
16
-
17
-
18
-
19
-
20
-
21
-
22
-
23
-
24
-
25
-
26
-
27
-
28
-
29
-
30
-
31
-
32
-
33
-
34
-
35
-
36
-
37
-
38
-
39
-
40
-
41
-
42
-
43
-
44
-
45
-
 46
46 -
 47
47 -
 48
48 -
 49
49 -
 50
50 -
 51
51 -
 52
52 -
 53
53 -
 54
54 -
 55
55 -
 56
56 -
57
-
58
-
59
-
60
-
61
-
62
-
63
-
64
-
65
-
66
-
67
-
68
-
69
-
70
-
71
-
72
-
73
-
74
-
75
-
76
-
77
-
78
-
79
-
80
-
81
-
82
-
83
-
84
-
85
-
86
-
87
-
88
-
89
-
90
-
91
-
92
-
93
-
94
-
95
-
96
-
97
-
98
-
99
-
100
-
101
-
102
-
103
-
104
-
105
-
106
-
107
-
108
-
109
-
110
-
111
-
112
-
113
-
114
-
115
-
116
-
117
-
118
-
119
-
120
-
121
-
122
-
123
-
124
-
125
-
126
-
127
-
128
-
129
-
130
-
131
-
132
-
133
-
134
-
135
-
136
-
137
-
138
-
139
-
140
-
141
-
142
-
143
-
144
-
145
-
146
-
147
-
148
 |
 |

ASUS SABERTOOTH X79
2-33
Chapter 2
2.3.6
Thermal Armor for ASUS SABERTOOTH X79
The Thermal Armor for ASUS SABERTOOTH X79 consists of a rear I/O cover and a
PCH cover and fan assembly, providing effective dissipation of the heat generated from
the motherboard components. To ensure the most optimum heat dissipation, follow the
instruction below to install the I/O cover fan to the rear I/O cover.
1.
Remove the two screws on the rear
I/O cover, and then remove the lid to
show the fan socket.
2.
Place the rear I/O cover fan into the
fan socket, ensuring that the TUF logo
on the fan is facing up.
3.
Secure the fan to the socket using the
two screws removed in step 1.