Asus Xonar D-KARAX User Manual - Page 11
Installing the hardware - sound card
 |
View all Asus Xonar D-KARAX manuals
Add to My Manuals
Save this manual to your list of manuals |
Page 11 highlights
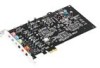
3. Installing the hardware 3.1 Installing the audio card Before you proceed with the following installation steps, it's recommended that you disable your onboard audio device in your BIOS settings, or uninstall any other audio cards on your PC. (For BIOS settings or uninstallation of other sound cards, refer to the user manuals of your motherboard and audio card.) Installing the Xonar D-KARAX card 1. Power OFF the computer, the monitor, and all other peripheral devices connected to your computer. 2. Unplug the computer power cord from your computer and power outlet. 3. Touch the metal back or side panel of the computer to avoid static electricity. 4. Remove the chassis cover. 5. Remove the metal bracket from an available PCIe slot for the Xonar D-KARAX audio card. 6. Carefully insert the audio card into the PCIe slot until the card is seated firmly in place. 7. Secure the audio card with screws and the metal bracket. 8. Replace the chassis cover. 9. Reconnect all cables. 10. Plug the power cord to the computer and to a power outlet. 11. Power ON the computer. 1 2 ASUS Xonar D-KARAX PCIe 7.1 Karaoke Audio Card 5
-
 1
1 -
2
-
3
-
4
-
5
-
 6
6 -
 7
7 -
 8
8 -
 9
9 -
 10
10 -
 11
11 -
 12
12 -
 13
13 -
 14
14 -
 15
15 -
 16
16 -
17
-
18
-
19
-
20
-
21
-
22
-
23
-
24
-
25
-
26
-
27
-
28
-
29
-
30
-
31
-
32
-
33
-
34
-
35
-
36
-
37
-
38
-
39
-
40
-
41
-
42
 |
 |
