Audiovox XMB10 User Guide
Audiovox XMB10 - Boom Box Speaker Sys Manual
 |
View all Audiovox XMB10 manuals
Add to My Manuals
Save this manual to your list of manuals |
Audiovox XMB10 manual content summary:
- Audiovox XMB10 | User Guide - Page 1
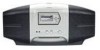
Xpress® Satellite Radio Receiver XMB10 Boom Box User Guide -1- Released 9-15-05. 128-7546 1 of 16 - Audiovox XMB10 | User Guide - Page 2
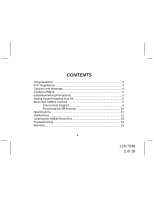
and Warnings 4 Contents XMB10 5 Installation/Wiring Precautions 5 Setting Up and Installing Your Kit 5 Boom Box XMB10 Controls 5 Interconnect Diagram 9 Positioning the XM Antenna 10 Specifications 12 Maintenance 13 Cleaning the XMB10 Boom Box 13 Troubleshooting 14 Warranty 15 -2- 128 - Audiovox XMB10 | User Guide - Page 3
® Satellite Radio service gives you the power to choose what you want to hear - wherever and whenever you want it. XM® is America's #1 Satellite Radio provider with over 4 million customers. Your Audiovox Xpress XM® receiver must be used with an accessory kit, such as the Audiovox Home Kit, Boom Box - Audiovox XMB10 | User Guide - Page 4
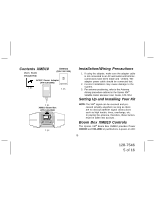
outdoors, position the XMB10 and antenna where there are no obvious satellite signal obstructions such Receiver Boom Box caused by battery leakage, it is recommended that the batteries be removed when the Boom Box is not being used for an extended period of time. 6. Do not install or place the XMB10 - Audiovox XMB10 | User Guide - Page 5
XM® signal can be received and processed virtually anywhere as long as there are no obvious satellite signal obstructions such as high terrain, trees, overhangs, etc. In placing the antenna, therefore, these factors must be taken into account . Boom Box XMB10 Controls The Xpress XM® Boom Box XMB10 - Audiovox XMB10 | User Guide - Page 6
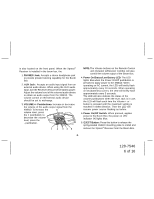
as before. 5. Power On/Off Switch: When pressed, applies power to the Boom Box; the power on LED indicator (4) lights blue. 6. EJECT Button: Press this button to release the spring-loaded XMB10 mounting plate to install and remove the Xpress® Receiver from the Boom Box. -6- 128-7546 6 of 16 - Audiovox XMB10 | User Guide - Page 7
begin to enjoy Xpress XM® Satellite Radio as soon as the Receiver and Boom Box Kit installation are complete. Set up your Audiovox XMB10 by following theinterconnect diagram. 3. Installing the Receiver in the XMB10 Install the receiver as follows: IMPORTANT: Make sure boom box power is off before - Audiovox XMB10 | User Guide - Page 8
. 4. Removing the Receiver From the XMB10 Press the EJECT button on top of the Boom Box; the receiver will swing out automatically. Gently grasp each side of the Receiver at the top and pull straight up to disengage it from the mounting plate. INSTALLING/REMOVING THE Xpress RECEIVER PUSH IN AT TOP - Audiovox XMB10 | User Guide - Page 9
Interconnect Diagram RECEIVER BOOM BOX XMB10 ANTENNA JACK (ANT) ANTENNA STORAGE SHELF DC POWER ADAPTER JACK 5. Installing the Antenna For best reception, the supplied antenna should be placed near a window if in the house or, if outdoors, in an open area and as high as possible; some - Audiovox XMB10 | User Guide - Page 10
to optimally aim your XM Antenna. To access and use this screen, refer to the Xpress XM Satellite Radio Receiver User Guide (128-7454). 7. Positioning the XM Antenna The antenna supplied with the XMB10 is a high-gain type that can receive XM's signal from one of XM's satellites and/or, depending on - Audiovox XMB10 | User Guide - Page 11
at the factory to ensure that they will work with XM's unique frequency band. Use an XMapproved antenna extension kit from your local consumer electronics retailer. Failure to do so could damage the unit. a. Apply power to the XMB10 Boom Box as outlined previously in paragraph 3c and obtain an audio - Audiovox XMB10 | User Guide - Page 12
Output Level Headphone Connector Type Auxiliary Input Impedance Auxiliary Input Level Auxiliary Connector Type Equalizer Frequency Overall XMB10 Dimensions Overall AC Adapter Dimensions XMB10 Weight 5.0 Watts Rms 0.3% at 1 Watt 30Hz to 20kHz >65dB Maximum 8 Ohms Nominal 32 Ohms 800 mV (Maximum - Audiovox XMB10 | User Guide - Page 13
Periodic Inspection The XMB10 Boom Box should be inspected periodically for external damage. At least once every 30 days of use, perform the following checks: 1. Inspect the Receiver connector for loose, bent or broken pins, misalignment, etc.; make sure the Xpress Receiver connector is intact - Audiovox XMB10 | User Guide - Page 14
panel Xpress Receiver not firmly seated in cradle mounting plate Check for obstacles over or around antenna Headphones installed Replace batteries Connect satellite antenna to XMB10 rear panel ANT jack Press firmly down on the Receiver to ensure that the connector is firmly mated to the Boom Box - Audiovox XMB10 | User Guide - Page 15
accessories, or vehicle and home electrical systems, malfunction of satellite transmissions, repeater signal or receiver COMPANY'S LIABILITY EXCEED THE PURCHASE PRICE PAID BY PURCHASER FOR THE PRODUCT which vary from state to state. U.S.A. : AUDIOVOX CORPORATION, 150 MARCUS BLVD., HAUPPAUGE, NEW YORK - Audiovox XMB10 | User Guide - Page 16
© 2005 Audiovox Electronics Corporation, 150 Marcus Blvd., Hauppauge, New York 11788 128-7546 -16- 128-7546 16 of 16
-
 1
1 -
 2
2 -
 3
3 -
 4
4 -
 5
5 -
 6
6 -
 7
7 -
8
-
9
-
10
-
11
-
12
-
13
-
14
-
15
-
16
 |
 |
128-7546
1 of 16
Released 9-15-05.
Xpress
®
Satellite
Radio Receiver
XMB10 Boom
Box User Guide