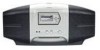
Audiovox XMB10 User Guide - Page 7
Installing the Receiver in the XMB10, Cabling Interconnections, Battery Installation - xm radio
 |
View all Audiovox XMB10 manuals
Add to My Manuals
Save this manual to your list of manuals |
Page 7 highlights
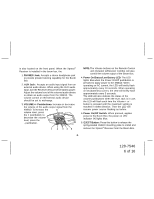
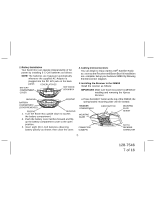
1. Battery Installation Your Boom Box can operate independently of AC power by installing 8 C-Cell batteries as follows: NOTE: The batteries are bypassed automatically whenever the supplied AC Adapter is plugged into the DC 12V jack on the back panel. COVER LATCHES BATTERY COMPARTMENT BOTTOM OF BOOM BOX COVER NEGATIVE BATTERY COMPARTMENT (COVER REMOVED) POSITIVE POSITIVE NEGATIVE 1. Turn the Boom Box upside down to access the battery compartment. 2. Push the battery cover latches forward and flip up the battery compartment cover to the open position. 3. Insert eight (8) C-Cell batteries observing battery polarity as shown; then close the cover. 2. Cabling Interconnections You can begin to enjoy Xpress XM® Satellite Radio as soon as the Receiver and Boom Box Kit installation are complete. Set up your Audiovox XMB10 by following theinterconnect diagram. 3. Installing the Receiver in the XMB10 Install the receiver as follows: IMPORTANT: Make sure boom box power is off before installing and removing the Xpress Receiver. a. Press the EJECT button at the top of the XMB10; the spring-loaded mounting plate will tilt forward. RECEIVER COMPARTMENT MOUNTING PLATE EJECT BUTTON MOUNTING PLATE DETENT CONNECTOR GUIDE PIN Xpress RECEIVER CONNECTOR -7- 128-7546 7 of 16
-
 1
1 -
 2
2 -
 3
3 -
 4
4 -
 5
5 -
 6
6 -
 7
7 -
 8
8 -
 9
9 -
 10
10 -
 11
11 -
 12
12 -
13
-
14
-
15
-
16
 |
 |
