Behringer EURORACK PRO RX1602 Quick Start Guide - Page 7
EURORACK PRO RX1602 Controls
 |
View all Behringer EURORACK PRO RX1602 manuals
Add to My Manuals
Save this manual to your list of manuals |
Page 7 highlights
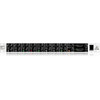
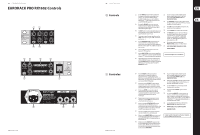
12 EURORACK PRO RX1602 EURORACK PRO RX1602 Controls (1) (2) (3) (4) (7) (8) (9) (11) (10) (12) (15) (13) (14) 13 Quick Start Guide (EN) Controls (1) Use the MON/FX control to set the signal level of (9) You can easily get a readout of both channels the respective channel for monitoring or effects by observing the highly acurate 7-digit level purposes. You can take the MON/FX signal at meters labeled LEFT OUTPUT LEVEL and the MON OUT SEND connector (14). The MON/FX RIGHT OUTPUT LEVEL. SEND control (7) of the main section governs the overall MON/FX SEND signal level. (10) The TO PHONES switch gives you the option to feed the signals routed to the monitor/effects bus into your (2) By using the BALANCE control, you can set up headphones for control purposes. (7) the position of mono signals in the stereo image, (8) and regulate(9the) ratio of left/right ch(a1n1n)el signals when processing stereo signals. (11) The LEVEL control in the MAIN section governs the volume level of your headphones. (3) The MUTE switch is used to interrupt the signal path, (12) Use the POWER switch to power up your RX1602. thus muting the respective channel. When pressed (signal muted) the switch is lit red. (13) The MAIN OUT connectors come as 1/4" TRS jacks. The main mix signal (derived from all channels) (4) To increase or reduce the input signal level, use the LEVEL control (increase up to +15 dB, reduce all the way down to -∞). is present here. You can set the output signal level by using the MAIN LEFT and MAIN RIGHT controls (8) (reducing all the way down to -∞, increasing up to +15 dB). (5) Use the OPERATING LEVEL switch located on the rear of your RX1602 to individually adjust each channel to the output signal level of your equipment. (14) The monitor signal can be taken at the MON OUT SEND connector (1/4" TRS connector). (10) When the switch is depressed (-10 dBV), the inputs are more sensitive. (12(1)5) FUSE COMPARTMENT/VOLTAGE SELECTION. (6) These are the inputs of the channel sections on SERIAL NUMBER. balanced 1/4" TRS connectors. (7) Use the MON/FX SEND control to set the signal level of those signals that are routed to the MON OUT SEND connector (14) for monitoring or effects applications. Check Out behringer.com for Full Manual (8) The left signal portion of the mix created using the LEVEL and BALANCE controls of each channel is set using the MAIN LEFT control. The right signal portion of the mix is correspondingly adjusted using the MAIN RIGHT control. (ES) Controles (1) El control MON/FX se utiliza para ajustar el (9) You can easily get a readout of both channels nivel de señal de los respectivos canales de by observing the highly acurate 7-digit level monitor o de efectos. Se puede tomar la señal meters labeled LEFT OUTPUT LEVEL and MON/FX en el conector MON OUT SEND (14). El control RIGHT OUTPUT LEVEL. MON/FX SEND (7) de la sección principal controla el nivel de señal MON/FX SEND global. (10) El interruptor TO PHONES le da la opción de alimentar las señales dirigidas al bus de monitor/efectos a sus (2) Utilizando el control BALANCE, se puede ajustar auriculares para finalidades de control. la posición de señales mono en la imagen estéreo, y regular la proporción de las señales de los canales (11) El control LEVEL de la sección principal controla izquierdo/derecho cuando se procesen señales estéreo. el volumen de sus auriculares. (3) El interruptor MUTE se usa para interrumpir el camino de la señal y por lo tanto, para silenciar el canal correspondiente. Cuando está presionado (señal silenciada), aparece una luz roja en el interruptor. (4) Para incrementar o reducir el nivel de la señal de entrada, use el control LEVEL (incremento hasta +15 dB, reducción total hasta -∞). (12) Con el conmutador POWER se pone en marcha el RX1602. (13) Los conectores MAIN OUT son tomas hembras de 6,3 mm. La señal de mezcla principal (derivada de todos los canales) se encuentra aquí. Puede ajustar el nivel de señal de salida usando los controles MAIN LEFT y MAIN RIGHT (8) (reduciendo totalmente hasta -∞, incrementando hasta +15 dB). (5) Utilice el interruptor OPERATING LEVEL situado en la parte de atrás de su RX1602 para ajustar individualmente cada canal al nivel de señal de salida de su equipo. Cuando este interruptor está pulsado (-10 dBV), las entradas son más sensibles. (14) La señal de monitor puede tomarse del conector MON OUT SEND (toma hembra de 6,3 mm). (15) PORTAFUSIBLES / SELECCIÓN DE TENSIÓN. NÚMERO DE SERIE. (6) Estas son las entradas de las secciones de canal en conectores hembras de 6,3 mm balanceados. (7) Utilice el control MON/FX SEND para ajustar el nivel de señal de aquellas señales que estén dirigidas al conector MON OUT SEND (14) para aplicaciones de monitor o efectos. Si quiere acceder al manual de instrucciones completo, vaya a la página web behringer.com (8) Utilizando el control MAIN LEFT se ajusta el nivel de la señal izquierda de la mezcla creada usando los controles LEVEL y BALANCE de cada canal. El nivel de la señal derecha de la mezcla se ajusta, por tanto, usando el control MAIN RIGHT.
-
 1
1 -
 2
2 -
 3
3 -
 4
4 -
 5
5 -
 6
6 -
 7
7 -
 8
8 -
 9
9 -
 10
10 -
 11
11
 |
 |
