Behringer FCA202 Manual - Page 11
Operating Elements and Connections, Front panel - drivers
 |
View all Behringer FCA202 manuals
Add to My Manuals
Save this manual to your list of manuals |
Page 11 highlights
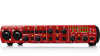
11 F-CONTROL AUDIO FCA202 User Manual 3. Operating Elements and Connections 3.1 Front panel (1) (3) (2) Fig. 3.1: Front panel FCA202 (1) You can connect standard commercial headphones fitted with a ¼" TRS jack plug to the socket. (2) Use the LEVEL control to adjust the headphone volume. Turn the control fully to the left before you connect the headphones. This helps you avoid the damage that is caused by high volume settings. (4) (3) The POWER LED indicates that the equipment is ready to operate. It lights up as soon as the FCA202 is provided with power from the mains adapter or via the FireWire socket. (4) The FW LED lights up as soon as the FCA202 is correctly connected by a FireWire cable to a computer that is in operation. If the LED does not light up, check the FireWire connection to the computer. You can find more information on hardware and driver installation in Chapter 2.
-
 1
1 -
2
-
3
-
4
-
5
-
 6
6 -
 7
7 -
 8
8 -
 9
9 -
 10
10 -
 11
11 -
 12
12 -
 13
13 -
 14
14 -
 15
15 -
 16
16 -
17
-
18
-
19
-
20
-
21
-
22
-
23
-
24
-
25
 |
 |
