Behringer NOX404 Quick Start Guide - Page 10
Controls - midi
 |
View all Behringer NOX404 manuals
Add to My Manuals
Save this manual to your list of manuals |
Page 10 highlights
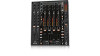
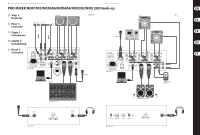
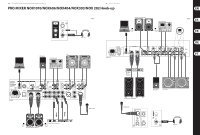
18 PRO MIXER NOX1010/NOX606/NOX404/NOX303/NOX202 19 Quick Start Guide PRO MIXER NOX1010/NOX606/NOX404/NOX303/NOX 202 Controls (EN) Controls Mic Channels FX Section (1) AUX 1/2 knobs adjust the channel's signal at the AUX SEND 1 and 2 jacks. The PRE buttons allow the channel's signal to be sent to the AUX SEND jack pre-fader. (2) MIC/RTN switch selects either the XLR MIC input or the stereo ¼" RETURN jacks as the channel's audio source. (3) MIC EQ knobs adjust the channel's equalization. On the NOX606, the MID 1 knob adjusts the high midrange frequencies and MID 2 adjusts the lower mids. (4) MIC GAIN knob controls the sensitivity of the mic input. On the NOX1010, the knob acts as a volume control. (5) TALKOVER causes the music volume to automatically drop whenever the mic is in use, allowing the operator to be heard over the music. On the NOX606, hold the switch in the up position to engage the talkover function, and flip the switch down to turn the mic channel on without attenuating the music. (6) ON/PEAK LED lights green to indicate that the channel has been activated, and lights red if the audio begins to overload. (7) MIC ON button engages the mic channel. (8) AUX IN knob adjusts the level of the audio connected to the AUX IN jacks. Stereo Channels (9) GAIN knob controls the sensitivity of the channel input. (10) INPUT SELECT switch selects the channel's audio source. (11) CUE button allows the source to be monitored without being included in the master output section. (12) CHANNEL EQ knobs boost or cut the high, mid and low frequencies of the channel. On the NOX404, use the EQ ON/OFF switch to engage the knobs. (13) FILTER switch sends the channel to either FILTER 1 or 2. Leave the switch in the center to bypass the filters. (14) XFADE (A OFF B) switch sends the channel to either side of the crossfader. When the center OFF position is selected, a channel whose fader is raised will bypass the crossfader and be heard in the main mix. (15) CHANNEL FADER controls the volume of the channel in the overall mix. (16) CHANNEL VU METER displays the signal level of the input source. (17) PAN fader adjusts the channel's left to right balance. Crossfader Section (18) FADER START switch engages the fader start function, allowing the mixer to send start/cue signals to an auto-start CD player. (19) CF ASSIGN knobs determine which channels appear at either side of the crossfader. (20) CROSSFADER fades between the sources assigned to either side. (21) XFADE CURVE knob determines how steep or gradual the fade between source A and source B is. (22) REV/MODE LEDs indicate the status of the REVERSE and MODE 1/2 buttons. (23) KILL switches/buttons remove the high, mid and low frequencies from the A or B crossfader mix. On the NOX303, flip the switches up to lock the effect, or manually hold the switches down to briefly remove the selected frequencies. (24) FX DISPLAY indicates the current effect. The display will flash when a new effect is selected, and remain lit when it is confirmed by pressing the FX SELECT button. (25) FX SELECT knob scrolls through the available effects. Pressing the knob confirms the effect selection. (26) FX ON button activates the digital effects processor. (27) FX CUE button sends the effect to the cue section for preview before applying it to the mix. (28) FREQUENCY knob adjusts a frequency-based or time-based parameter of the selected effect. (29) INTENSITY fader adjusts the mix or resonance parameter of the selected effect. (30) FX ASSIGN knob determines which sources are affected by the effect. (31) TAP button allows the effect's tempo parameter to be manually entered by pressing in rhythm with the music. Holding the TAP button for 2 seconds will cause the button to light permanently and allow the FREQUENCY knob to continuously control the effect's tempo. (32) DATA/MIDI knob allows adjustment of data such as MIDI clock speed. (33) MIDI ON button sends MIDI start/stop data to an external sequencer. Master Section (34) BALANCE knob adjusts the left to right balance of the RCA MAIN OUTPUTS and BALANCED OUTPUTS. (35) BOOTH knob controls the level of the RCA BOOTH OUTPUTS on the back panel. (36) MONO button switches the BOOTH signal from stereo to mono. (37) MUTE button mutes the BOOTH output. (38) MASTER fader/knob controls the level of the RCA MAIN OUTPUTS and BALANCED OUTPUTS. (39) AUX OUT knob adjusts the output of the AUX OUT jacks, which carry the same signal as the MAIN OUTPUTS. (40) MIX 1 knob adjusts the output of the MIX 1 XLR outputs on the rear panel. (41) MIX 2 knob adjusts the output of the MIX 2 ¼" jacks on the rear panel. (42) MASTER VU METER displays the signal level of the master output and/or cue signal. (43) MASTER/CUE button determines whether the MASTER VU METER displays the signal from the master output or cue signal. (44) CUE ACTIVE LED lights when a channel's CUE button is active. (45) POST EQ button selects whether the cue is taken pre (up) or post-EQ (down). (46) STEREO/MONO button allows the master output signal to send in stereo or mono mode. (47) SPLIT/BLEND(CUE) button allows the cue signal to combine the cue and program sources or separate the sources into left (cue) and right (main). (48) AUX 1/2 switches send the selected AUX RETURN signal to the cue mix. (49) CUE GAIN knob determines the volume and sensitivity of the cue signal. (50) CUE MIX knob/fader allows a gradual blend between the cue signal and the program signal. On the NOX404 and NOX202, this fades between channel 1 and 2. (51) CUE MODE switch determines whether channels 1 and 2, the FX section, or the Master signal are heard in the cue/headphone mix. Rear Panel (52) POWER SWITCH turns the power to the unit on and off. (53) LINE/PHONO button optimizes the PHONO jacks for use with a turntable or CD player. Front Panel (54) CUE TONE knob adjusts the tone of the cue/headphone signal. (55) REV/CF REVERSE button switches the assignment of the signals present at either side of the crossfader. (56) MODE button determines whether XFADE CURVE A or B is active. (63) CONTOUR fader either adjusts the CHANNEL FADER volume slope or the pan slope, depending on MODE 1/2 selection. Normal Slow Fade Fast Cut Reverse Normal Slow Fade Reverse Fast Cut Soft Pan Fast Pan FX LOOP/CONTOUR section (NOX404) (57) FX LOOP CH1/2 switches send the channel to the FX LOOP SEND jack. (58) FX LOOP MIX fader adjusts how much of the FX LOOP RETURN signal is included in the main mix. (59) CH REV button allows the channels faders to control either input 1 or input 2. (60) MONO 1/2 STEREO HOUSE switch enables the VU METERS to either display channels 1 and 2 separately or the overall stereo mix. (61) REVERSE button changes the function of the CHANNEL FADER so that the top position is off and the bottom position is full volume. (62) MODE 1/2 button selects whether the CHANNEL FADER acts as a volume control (MODE 1) or as a pan control (MODE 2). Filter Section (NOX606) (64) LFO DEPTH knob adjusts the amount of LFO (low-frequency oscillator) modulation applied to the filter. (65) LFO ON button engages the LFO. (66) X2 TEMPO button doubles the speed of the LFO. (67) TAP button allows the speed of the LFO to be manually entered by tapping in rhythm with the music. (68) RESONANCE knob determines the sharpness of the filter, allowing a smooth response at the 'MILD' end to a resonant feedback boost when turned towards 'WILD'. (69) VCF LINK 2-1 allows FILTER 2 to be controlled by FILTER 1, allowing both filters to be adjusted simultaneously. The HPF, BPF and LPF buttons still function independently for each filter. (70) VCF TO XFADER button allows the filter's FREQUENCY function to be controlled by the crossfader. (71) HPF button engages the high-pass filter, allowing only the frequencies above the FREQUENCY knob setting to be heard. (72) BPF button engages the band-pass filter, allowing only the narrow band of frequencies selected by the FREQUENCY knob to be heard. (73) LPF button engages the low-pass filter, allowing only the frequencies below the FREQUENCY knob setting to be heard. (74) FREQUENCY knob selects the frequency used by the variable cutoff filter. (75) FILTER ON button engages the filter.
-
 1
1 -
2
-
3
-
4
-
 5
5 -
 6
6 -
 7
7 -
 8
8 -
 9
9 -
 10
10 -
 11
11 -
 12
12 -
 13
13 -
 14
14 -
 15
15 -
16
-
17
-
18
-
19
-
20
 |
 |
