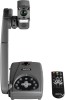
BenQ DCP10 DCP10 User Manual
BenQ DCP10 Manual
 |
View all BenQ DCP10 manuals
Add to My Manuals
Save this manual to your list of manuals |
BenQ DCP10 manual content summary:
- BenQ DCP10 | DCP10 User Manual - Page 1
DCP10 Document Camera User Manual - BenQ DCP10 | DCP10 User Manual - Page 2
Microphone ....... 10 Connect an Amplified Speaker 11 Connect to a Microscope 11 Setting Up DCP10 12 Camera Head 12 Mechanical Arm 12 LED Light Switch 13 Infrared Sensor 13 Anti-glare Sheet 13 27 Input/Output 27 Dimension 28 External Storage 28 Troubleshooting 28 Limited Warranty 29 - BenQ DCP10 | DCP10 User Manual - Page 3
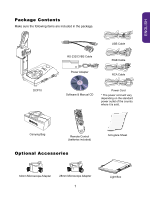
ENGLISH Package Contents Make sure the following items are included in the package. DCP10 RS-232/CVBS Cable Power Adapter USB Cable RGB Cable RCA Cable Software & Manual CD Power Cord * The power cord will vary depending on the standard power outlet of the country where it is sold. Carrying - BenQ DCP10 | DCP10 User Manual - Page 4
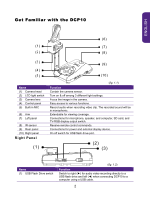
ENGLISH Get Familiar with the DCP10 (6) (1) (7) (2) (8) (3) (4) (5) Name (1) Camera head (2) LED light switch (3) Camera lens (4) Control panel (5) Built-in MIC (6) Arm (7) Left panel (8) IR sensor (9) Rear panel (10) Right panel Right Panel (1) (9) (10) (fig. 1.1) Function Contain the - BenQ DCP10 | DCP10 User Manual - Page 5
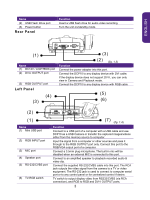
to any display device with DVI cable. If the display device does not support DVI-I, you can only view in Camera and Playback mode. Connect the DCP10 to any display device with RGB cable (5) (6) (2) (1) Name (1) Mini USB port (2) RGB INPUT port (3) MIC port (4) Speaker port (5) RS-232/CVBS port - BenQ DCP10 | DCP10 User Manual - Page 6
recording. Audio and video recording can be saved on a SD card or an USB Flash drive only. See External Memory Storage. - Capture picture in Camera mode. In continuous capture mode, press this button again to stop. - Delete the selected picture/video in Playback mode. View & playback captured still - BenQ DCP10 | DCP10 User Manual - Page 7
properly before use. You can access all the features of DCP10 with the remote. Name Function (2) (1) POWER Turn the unit on/standby. (1) (3) (2) CAMERA / PC Switch between Camera and (4) (26) (5) computer mode. (25) (6) (7) - Camera mode displays the video signal from the built-in - BenQ DCP10 | DCP10 User Manual - Page 8
factory default setting. (1) (3) (16) NEAR / FAR Adjust the focus manually. (4) (26) (5) (17) ZOOM RESET Reset zoom level to 100%. (25) (6) (18) ZOOM +/- Increase/decrease the image (7) (24) (8) (23) (9) magnification in camera and picture playback mode. (22) (10) (19) ENTER - Make - BenQ DCP10 | DCP10 User Manual - Page 9
connections below and also refer to the user manual of the device you are connecting the DCP10 with. Set the TV-RGB Switch Setting The left) to output signal using RCA connection. (see fig. 1.4 # 6) Switch DCP10 Port Display Device Port RGB RGB OUTPUT RGB INPUT TV DVI-I OUTPUT To RS232/ - BenQ DCP10 | DCP10 User Manual - Page 10
Connect to a Monitor or Projector with DVI-I interface Locate the DVI-I input port of the display device and connect it to DVI-I OUTPUT port of DCP10. Make sure the TV/RGB switch is set to RGB. LCD Monitor with DVI interface DVI cable (not supplied) Projector Connect to a TV Locate the - BenQ DCP10 | DCP10 User Manual - Page 11
or laptop and connect it to RGB INPUT port of DCP10. The video signal from the RGB INPUT port is streamed to RGB and DVI OUTPUT port. - To display computer image, press Camera/PC button on the control panel or remote control to switch DCP10 to computer mode. - For laptop to output display - BenQ DCP10 | DCP10 User Manual - Page 12
port of the computer or laptop and connect it to USB port of DCP10. This enables you to use DCP10 as a USB Camera or to transfer the captured pictures/videos from the memory and to computer. Also see "Transfer File from DCP10 to PC". Make sure the USB Flash Drive switch (see fig. 1.2 #1) is - BenQ DCP10 | DCP10 User Manual - Page 13
speaker to port. Only the audio from the video playback is supported. We recommend connecting an amplified speaker to the Audio output port. Attach the microscope adapter to the DCP10 camera head. - Make sure to connect the longer hook to the front latch hole of the camera head. - For the eyepiece, - BenQ DCP10 | DCP10 User Manual - Page 14
section provides useful tips on how to adjust the DCP10 to meet your needs. Camera Head The camera head can turn freely at 90° to the left and right and up and down. 90° 90° 90° 90° If the camera head is in upright position, you can also press ROTATE on the remote control - BenQ DCP10 | DCP10 User Manual - Page 15
DCP10 has patented four (4) laser positioning pointers feature that define the viewing area. This allows user quickly center the object underneath the camera. The three (3) various light and laser positioning pointers settings are indicated in the illustration below. Off White LED Only Document - BenQ DCP10 | DCP10 User Manual - Page 16
ENGLISH External Memory Storage DCP10 supports both SD memory card and USB flash drive for more image capture and audio & video recordings. DCP10 can detect when there is an external storage media and automatically switch to the last detected storage. If no external storage is connected, all - BenQ DCP10 | DCP10 User Manual - Page 17
ENGLISH OSD MENU There are 5 tabs on the OSD menu: BASIC, ADVANCED, PRESENTATION, SETTING and SYSTEM. In Playback mode, you can access PLAYBACK OSD menu to enable the Slide Show feature and modify Slide Show interval and transition setting if desire. For TV output, the RESOLUTION will be disabled - BenQ DCP10 | DCP10 User Manual - Page 18
effect. 7. Press MENU to close the OSD menu. Basic Menu Screen Function Brightness Adjust brightness level manually between 0 and 63. Contrast Adjust the contrast level manually between 0 and 255 under bright and dark environments. Auto Image Automatically adjust the white balance and exposure - BenQ DCP10 | DCP10 User Manual - Page 19
for microscopic viewing. Macro - set to view when object is only 5 - 20 cm away from the camera. Infinite - set to view when subject is at least 55cm away from the camera. Focus Manually adjust the focus. Effect Convert the image into positive (true color), monochrome (black and white) or negative - BenQ DCP10 | DCP10 User Manual - Page 20
ENGLISH Advanced Menu Screen Function Exposure Select the exposure setting. AUTO - automatically adjust the camera exposure and amount of light required. MANUAL - manually adjust the exposure level. The exposure can be adjusted up to 100. White Balance Select the White Balance setting for - BenQ DCP10 | DCP10 User Manual - Page 21
ENGLISH Menu Screen Function Night View Select to turn Night View OFF or AUTO. When presenting in a low-light condition, Night View enables brighter images by automatically adjusting the exposure and the frame rate will be reduced. Presentation Menu Screen Function QBOX On/Off QBOX overlays a - BenQ DCP10 | DCP10 User Manual - Page 22
thumbnail playback screen location and show the thumbnail playback screen at the corner of the screen to recall the captured image from the memory in Camera mode. Lower Left Upper Left Upper Right Lower Right 20 - BenQ DCP10 | DCP10 User Manual - Page 23
Divide the screen into two parts. Half of the screen displays the 8-thumbnail images and the other half display the image from the DCP10 camera. Select the display location of the 8- thumbnail playback images. Left Right Top Below Timer Start/Pause/Stop the timer. The timer automatically counts - BenQ DCP10 | DCP10 User Manual - Page 24
ENGLISH Menu Screen Function Capture Quality Select the capture compression setting. Capture Type Select the capture type. Single - capture one picture only. Continuous - capture successive pictures. Capture Interval Set the interval before capturing the next picture. The length can be set up to - BenQ DCP10 | DCP10 User Manual - Page 25
. Device Projector LCD TV RGB OUTPUT 1024X768 1280X720 1280X960 1600X1200 1920X1080 - DVI OUTPUT 1024X768 1280X720 1280X960 1600X1200 1920X1080 HD 720P 50HZ HD 720P 60HZ HD 1080P 50HZ HD 1080P 60HZ 23 - BenQ DCP10 | DCP10 User Manual - Page 26
ENGLISH Menu Screen Function USB State Select the status of the DCP10 when it is connected to the computer via USB. Make sure the USB Flash Drive switch is set to the left. USB Camera - can be used as a computer webcam or with our bundled software to record video and capture still image - BenQ DCP10 | DCP10 User Manual - Page 27
ENGLISH Menu Screen Function Information Display product code Playback Menu Screen Function Slide Show Display all captured still pictures in an automated slide show. The video file will be skipped. Slide Show Interval Set the interval before displaying the next picture. The length can be set - BenQ DCP10 | DCP10 User Manual - Page 28
captured image from the built-in memory or SD to a computer. The instruction below MUST be read and followed BEFORE connecting the USB cable. 1. Make switch (see fig. 1.2 #1) to the right for the computer to detect DCP10. 2. MUST set the USB STATE as MASS STORAGE before connecting the USB cable - BenQ DCP10 | DCP10 User Manual - Page 29
Hz; XGA 60 Hz; 1280 x 960; 1080P 50HZ; 1080P 60HZ; 720P 50HZ; 720P 60HZ Image Capture 240 Frames(XGA) ; 80 Frames(5M Pixel) Optics Lens F3.2 (Wide); F6.8 (Tele) Focusing Auto / Manual Shooting Area A4 Landscape/ Portrait 372mm x 279mm (47cm camera height) Zooming 5X Optical + 16X Digital - BenQ DCP10 | DCP10 User Manual - Page 30
64GB (FAT 32, 16, 12) Troubleshooting This section provides many useful tips on how to solve common problems while using the DCP10. There is no picture on the turn blue. 2. The default camera display resolution setting is on 1024x768. If your output device does not support this resolution; no image - BenQ DCP10 | DCP10 User Manual - Page 31
follow these steps, you should be able to see the same desktop image on your PC or Notebook as well as on the presentation screen. DCP10 can't detect the inserted USB flash drive. Make sure the USB flash drive switch is set to the right and check if the USB flash
-
 1
1 -
 2
2 -
 3
3 -
 4
4 -
 5
5 -
 6
6 -
 7
7 -
8
-
9
-
10
-
11
-
12
-
13
-
14
-
15
-
16
-
17
-
18
-
19
-
20
-
21
-
22
-
23
-
24
-
25
-
26
-
27
-
28
-
29
-
30
-
31
 |
 |

Document Camera
User Manual
DCP10