BenQ SH910 SH910 User Manual
BenQ SH910 Manual
 |
View all BenQ SH910 manuals
Add to My Manuals
Save this manual to your list of manuals |
BenQ SH910 manual content summary:
- BenQ SH910 | SH910 User Manual - Page 1
SH910 Digital Projector User Manual Welcome - BenQ SH910 | SH910 User Manual - Page 2
Table of contents Important safety instructions 3 Introduction 7 Projector features 7 Shipping contents 8 Projector exterior view 9 60 Maintenance 73 Care of the projector 73 Lamp information 74 Troubleshooting 80 Specifications 81 Dimensions 82 Ceiling mount installation 82 Timing - BenQ SH910 | SH910 User Manual - Page 3
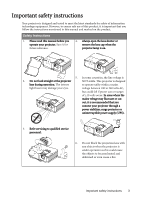
that you follow the instructions mentioned in this manual and marked on the product. Safety Instructions 1. Please read this manual before you operate your protector or uninterruptible power supply (UPS). 3. Refer servicing to qualified service personnel. 6. Do not block the projection lens with - BenQ SH910 | SH910 User Manual - Page 4
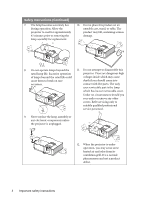
Safety Instructions (Continued) 7. The lamp becomes extremely hot during operation. Allow the on rare death if you should come into occasions. contact with live parts. The only user serviceable part is the lamp which has its own removable cover. Under no circumstances should you ever undo - BenQ SH910 | SH910 User Manual - Page 5
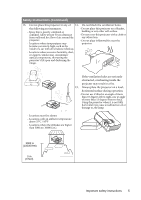
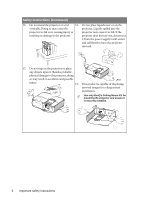
Safety Instructions (Continued) 13. Do not place this projector in any of 14. Do not block the ventilation holes. the following environments. above 35°C / 95°F - Locations where the altitudes are higher than 3000 m (10000 feet). 3000 m (10000 feet) 0 m (0 feet) Important safety instructions 5 - BenQ SH910 | SH910 User Manual - Page 6
Safety Instructions (Continued) 16. Do not stand the projector on end 18. Do not does become wet, disconnect it from the power supply's wall socket and call BenQ to have the projector serviced. 17. Do not step on the projector or place any objects upon it. Besides probable physical damage to - BenQ SH910 | SH910 User Manual - Page 7
LAN and USB display 1-M (maximum 1PC/ NB can display to 8 projectors at the same time) • USB display supports computer connection via USB mini-B type to A type cable • USB Reader supports USB flash drive or HDD display • Variable audio output • Microphone input with big speakers (10W x2) can save - BenQ SH910 | SH910 User Manual - Page 8
is only supplied in some specific regions. Please consult your dealer for detailed information. Projector Power cord VGA cable Quick start guide User manual CD Warranty card* Remote control with batteries Optional accessories 1. Spare lamp kit 2. Ceiling mount kit 3. Soft carry case 4. RS232 - BenQ SH910 | SH910 User Manual - Page 9
Projector exterior view Front/upper side 1 2 3 4 5 Rear/lower side 11 12 13 14 15 16 17 18 19 20 21 22 23 30 29 28 27 26 25 24 1. External control panel (See "Projector" on page 10 for details.) 2. Lamp cover 3. Zoom ring 4. Focus ring 5. Lens cover 6. Vent 6 7. Speaker 7 8. Front IR remote - BenQ SH910 | SH910 User Manual - Page 10
for details. 10. 3. Keystone/Arrow keys ( / Up, / Down) Manually corrects distorted images resulting from an angled projection. See 11. "Correcting keystone" the lamp. Lights up or flashes when the lamp has developed a problem. See "Indicators" on page 79 for details. Source Displays the source - BenQ SH910 | SH910 User Manual - Page 11
Ceiling mounting the projector We want you to have a pleasant experience using your BenQ projector, so we need to bring this safety matter to your attention to prevent possible damage to person and property. If you intend to mount your projector on the ceiling, we strongly recommend that you use a - BenQ SH910 | SH910 User Manual - Page 12
6. BLANK Used to hide the screen picture. See "Hiding the image" on page 34 for details. 7. Keystone/Arrow keys ( / Up, / Down) Manually corrects distorted images resulting from an angled projection. See "Correcting keystone" on page 24 for details. MODE/ENTER Selects an available picture - BenQ SH910 | SH910 User Manual - Page 13
18. AUTO 23. ASPECT Automatically determines the best picture Selects the display aspect ratio. See timings for the displayed image. See "Selecting the aspect ratio" on page 29 for "Auto-adjusting the image" on page 23 for details. details. 24. MIC/VOL 19. Arrow keys ( Left, Right) - BenQ SH910 | SH910 User Manual - Page 14
. • Replace only with the same or equivalent type recommended by the battery manufacturer. • Dispose of the used battery according to the battery manufacturer's instructions. • Never throw a battery into a fire. There may be danger of an explosion. • If the battery is dead or if you will not be - BenQ SH910 | SH910 User Manual - Page 15
Positioning your projector Choosing a location Your room layout or personal preference will dictate which installation location you select. Take into consideration the size and position of your screen, the location of a suitable power outlet, as well as the location and distance between the - BenQ SH910 | SH910 User Manual - Page 16
Obtaining a preferred projected image size The distance from the projector lens to the screen, the zoom setting (if available), and the video format each factors in the projected image size. 16:9 is the native aspect ratio of this projector. 4:3 aspect image in a 16:9 aspect display area 16:9 - BenQ SH910 | SH910 User Manual - Page 17
How to determine the position of the projector for a given screen size 1. Select your screen size. 2. Refer to the table on page 18 and find the closest match to your screen size in the left columns labelled "Screen size". Using this value, look across this row to the right to find the corresponding - BenQ SH910 | SH910 User Manual - Page 18
Projection dimensions Refer to "Dimensions" on page 82 for the center of lens dimensions of this projector before calculating the appropriate position. Maximum zoom Minimum zoom Screen Center of lens Vertical offset Projection distance Screen size Diagonal WH Inch mm (mm) (mm) 30 762 664 - BenQ SH910 | SH910 User Manual - Page 19
Connection When connecting a signal source to the projector, be sure to: 1. Turn all equipment off before making any connections. 2. Use the correct signal cables for each source. 3. Ensure the cables are firmly inserted. • In the connections shown below, some cables may not be included with the - BenQ SH910 | SH910 User Manual - Page 20
a function key labeled CRT/LCD or a function key with a monitor symbol on the notebook. Press FN and the labeled function key simultaneously. Refer to your notebook's documentation to find your notebook's key combination. • The output signal for MONITOR OUT jack only works when the input signal - BenQ SH910 | SH910 User Manual - Page 21
Connecting Video source devices You need only connect the projector to a Video source device using just one of the above connecting methods, however each provides a different level of video quality. The method you choose will most likely depend upon the availability of matching terminals on both the - BenQ SH910 | SH910 User Manual - Page 22
90 seconds before energizing the lamp. 4. If the projector is activated for the first time, select your OSD language following the onscreen instructions. 5. If you are prompted for a password, press the arrow keys to enter a six digit password. See "Utilizing the password function" on page - BenQ SH910 | SH910 User Manual - Page 23
You can also press SOURCE on the projector or Source selection keys on the remote control to select your desired input signal. See "Switching input signal" on page 28 for details. If the frequency/resolution of the input signal exceeds the projector's operating range, you will see the message 'Out - BenQ SH910 | SH910 User Manual - Page 24
occurs when the projector is not perpendicular to the screen. To correct this, besides adjusting the height of the projector, you will need to manually correct it following one of these steps. • Using the remote control Press / on the projector or remote control to display the Keystone correction - BenQ SH910 | SH910 User Manual - Page 25
Using the menus The projector is equipped with On-Screen Display (OSD) menus for making various adjustments and settings. Below is the overview of the OSD menu. Main menu icon Main menu Highlight Sub-menu Current input signal Status Press MENU/ EXIT to the previous page or to exit. The following - BenQ SH910 | SH910 User Manual - Page 26
display as asterisks on-screen. Write your selected password down here in this manual in advance or right after the password is entered so that it is available to you should you ever forget it. Password Keep this manual in a safe place. 5. To leave the OSD menu, press MENU/EXIT. - BenQ SH910 | SH910 User Manual - Page 27
number and turn off your projector. 3. Seek help from the local BenQ service center to decode the number. You may be required to provide proof of display as asterisks on-screen. Write your selected password down here in this manual in advance or right after the password is entered so that it is - BenQ SH910 | SH910 User Manual - Page 28
is On (which is the default of this projector) if you want the projector to automatically search for the signals. You can also manually cycle through the available input signals. 1. Press SOURCE on the projector. A source selection bar displays. 2. Press / until your desired signal is selected and - BenQ SH910 | SH910 User Manual - Page 29
Magnifying and searching for details If you need to find the details on the projected picture, magnify the picture. Use the direction arrow keys for navigating the picture. • Using the remote control 1. Press ZOOM+/ZOOM- to display the Zoom bar. 2. Press ZOOM + to magnify the center of the picture. - BenQ SH910 | SH910 User Manual - Page 30
• Using the remote control 1. Press ASPECT to show the current setting. Press ASPECT repeatedly to select an aspect ratio to suit the format of the video signal and your display requirements. • Using the OSD menu 1. Press MENU/EXIT and then press / until the DISPLAY menu is highlighted. 2. Press to - BenQ SH910 | SH910 User Manual - Page 31
Optimizing the image Selecting a picture mode The projector is preset with several predefined picture modes so that you can choose one to suit your operating environment and input signal picture type. To select an operation mode that suits your need, you can follow one of the following steps. • - BenQ SH910 | SH910 User Manual - Page 32
Using Wall Color In the situation where you are projecting onto a colored surface such as a painted wall which may not be white, the Wall Color feature can help correct the projected picture's color to prevent possible color difference between the source and projected pictures. To use this function - BenQ SH910 | SH910 User Manual - Page 33
*About color temperatures: There are many different shades that are considered to be "white" for various purposes. One of the common methods of representing white color is known as the "color temperature". A white color with a low color temperature appears to be reddish white. A white color with a - BenQ SH910 | SH910 User Manual - Page 34
Saturation is the amount of that color in a video picture. Lower settings produce less saturated colors; a setting of "0" removes that color from the image entirely. If the saturation is too high, that color will be overpowering and unrealistic. 6. Press to highlight Gain and adjust its values to - BenQ SH910 | SH910 User Manual - Page 35
Press FREEZE on the remote control to freeze the image. The word 'FREEZE' will display in the screen. To release the function, press any key on the projector or remote control. Even if an image is frozen on the screen, the pictures are running on the video or other device. If the connected devices - BenQ SH910 | SH910 User Manual - Page 36
To adjust the sound level, press VOLUME +/ VOLUME-on the remote control, or: 1. Repeat steps 1-2 above. 2. Highlight Volume and select a desired sound level. Turning off the Power on/off ring tone To turn off the ring tone: 1. Repeat steps 1-2 in Muting the sound section. 2. Highlight Power on/off - BenQ SH910 | SH910 User Manual - Page 37
Displaying more than one image source simultaneously Your projector is capable of displaying pictures simultaneously from two input sources, which can be used to enhance your presentation in an interesting way. Ensure the signals you want to display are correctly connected to the projector. • Using - BenQ SH910 | SH910 User Manual - Page 38
• Menu display time in the SYSTEM SETUP: Basic > Menu Settings menu sets the length of time the OSD will remain active after your last key press. The time length ranges from 5 to 30 seconds in 5-second increments. Use / to select a suitable time frame. • Menu position in the SYSTEM SETUP: Basic > - BenQ SH910 | SH910 User Manual - Page 39
Controlling the projector through a LAN environment Network Settings allow you to manage the projector from a computer using a web browser when the computer and the projector are properly connected to the same local area network. Configuring the Wired LAN Settings Internet IP Router If you are in a - BenQ SH910 | SH910 User Manual - Page 40
address bar of your browser and press Enter. For example: http://10.60.7.199 2. The BenQ remote network operation page opens. • The web page control supports IE version 7.0 or higher. 40 Operation - BenQ SH910 | SH910 User Manual - Page 41
• The illustrations in web page control, Q Presenter and USB Reader sections are for the purpose of explanation and may differ from the actual design of your projector. 3. Click Download to save Q Presenter software on your computer. You can also link to the web page control from Q Presenter > - BenQ SH910 | SH910 User Manual - Page 42
i. These buttons function the same as the ones on the remote control. See "Remote control" on page 12 for details. The Display Setting page allows you to operate the projector as if you were using the OSD menus. These functions are some useful menu settings. The Picture Setting page allows you to - BenQ SH910 | SH910 User Manual - Page 43
The Information page displays the information and status of this projector. The Conference Control page allows you to control computer's display status of all the computers linked to this projector. Operation 43 - BenQ SH910 | SH910 User Manual - Page 44
The Crestron page is only available when you are on a Wired LAN network. It also allows you to control the projector remotely. The Crestron supports RoomView version 6.2.2.9. i ii i i iii i. These buttons function the same as the ones on the OSD menus or remote control. See "2. PICTURE" on page 60 - BenQ SH910 | SH910 User Manual - Page 45
The tools page allows you to manage the projector, configure the LAN control settings and secure access of remote network operation on this projector. i iii ii iv v i. You can name the projector, keep track of its location and the person in charge of it. ii. You can adjust the Wired LAN - BenQ SH910 | SH910 User Manual - Page 46
The info page displays the information and status of this projector. i i. Press exit to go back to the Crestron remote network operation page. The Admin page allows you to enter Basic, Wired LAN, Wireless LAN and Mail pages once the password is entered. The default password is "0000". If you want to - BenQ SH910 | SH910 User Manual - Page 47
The Basic page allows you to change the password and select connected persons. The number of connected persons may affect the network display performance. The Wired LAN page allows you to adjust the Wired LAN settings. Operation 47 - BenQ SH910 | SH910 User Manual - Page 48
The Wireless LAN page allows you to adjust the Wirless LAN settings. Max. length for SSID string is 16 bytes. Please use a different SSID when more than two projectors are connecting through wireless LAN. The Mail page allows you to send alert e-mail to your ITS administrator. You can first try the - BenQ SH910 | SH910 User Manual - Page 49
Displaying image through Q Presenter The Q Presenter is an application running on the host PC. It connects to an available network display and transfers the desktop contents to the network display via local network connection. Be sure to turn off other virtual network control programs before using Q - BenQ SH910 | SH910 User Manual - Page 50
ii. Projectors linked in the LAN will be found. Then select the projector you want to link. iii. Click "Connect". Then you should be able to see the image on projector. iv. You can click to disconnect all connected projectors. The Special Feature page allows you to have some advanced functions to - BenQ SH910 | SH910 User Manual - Page 51
ii. You can select to stop/start displaying desktop contents to connected network display. iii. 4-1 Display (up to 4 computers can shoot to 1 projector at the same time). Click the location you want to display. 4locations can be chosen (1-4) or 2 places (L and R) if it's 2 computers. Once you click - BenQ SH910 | SH910 User Manual - Page 52
vii viii ix x vii. You can select Video or Graphic display mode. Graphic Mode: worse image quality but faster tramsmission speed. Video Mode: better image quality but slower transmission speed. However, the actual transmission performance was determined by the status of network usage at that time. - BenQ SH910 | SH910 User Manual - Page 53
Using the Web Control Lock This function is designed to prevent unauthorized people from maliciously changing the projector settings through the Projector Network Display System. To enable the function: 1. After your computer is connected to the projector, enter the address of the projector in the - BenQ SH910 | SH910 User Manual - Page 54
Using the Projection Login Code This function is designed to ensure network display through the correct projector. To toggle this function: 1. Go to the SYSTEM SETUP: Advanced > Network Settings menu after opening the OSD menu system. Press MODE/ENTER. 2. Press to highlight Projection Log in Code - BenQ SH910 | SH910 User Manual - Page 55
images files in JPEG, GIF, TIFF, PNG and BMP formats. • A square box will display on the filename for unidentified characters. • Thai filename is not supported. • Files in GIF, TIFF, PNG and BMP formats can be displayed for the file size smaller than WXGA (1280 x 800) only. • If a folder consists - BenQ SH910 | SH910 User Manual - Page 56
ii. Selected folder iii. Supported file format iv. Unsupported file format v. Current path and page number To open folder scroll through thumbnails return to a previous page exit USB Reader change - BenQ SH910 | SH910 User Manual - Page 57
rotate the image by 90 degree clockwise/ counterclockwise return to a previous page start/stop slideshow Settings page: / (Rotation is temporary; the image returns to its original orientation when you go back to thumbnails) Auto Enter i ii iii iv i. You can adjust order settings. ii. You can - BenQ SH910 | SH910 User Manual - Page 58
Remote Desktop Control through Q Presenter The Q Presenter can proceed the Remote Desktop Control (RDC) the host PC from projector site. 1. Setup the RDC login account (User name and Password ) in Q Presenter. • Name: must be 8 English capital letters A~Z and number 0 ~9. • Password: must be 6 - BenQ SH910 | SH910 User Manual - Page 59
/ENTER to connect the selected PC. 7. Connect USB keyboard or mouse to control the host PC's desktop through the projector. • Remote Desktop Control does not support PC Standby mode. • Remote Desktop Control only supports LAN source so the projector source is fixed on LAN. Operation 59 - BenQ SH910 | SH910 User Manual - Page 60
Menu operation Menu system Please note that the on-screen display (OSD) menus vary according to the signal type selected. Main menu 1. DISPLAY 2. PICTURE Sub-menu Options Wall Color Off/Light Yellow/Pink/Light Green/Blue/Blackboard Aspect Ratio Auto/Real/4:3/16:9/16:10 Auto Keystone On/Off - BenQ SH910 | SH910 User Manual - Page 61
3. SOURCE Quick Auto Search Color Space Conversion On/Off Auto/RGB/YUV Language ไทย 4. SYSTEM SETUP: Basic Projector Position Front Table/Rear Table/Rear Ceiling/Front Ceiling Menu display time 5 sec/10 sec/15 sec/20 sec/25 sec/30 sec Menu Settings Menu position Center/Top-left/Top-right/ - BenQ SH910 | SH910 User Manual - Page 62
5. SYSTEM SETUP: Advanced High Altitude Mode On/Off SRS On/Off Mute On/Off Volume Audio Settings Microphone Volume Power on/off Ring Tone On/Off Lamp Mode Normal/Economic Lamp Settings Reset lamp timer Equivalent lamp hour Security Settings Change password Change Security Power on - BenQ SH910 | SH910 User Manual - Page 63
Status DHCP IP Address Wired LAN Subnet Mask Default Gateway DNS Server Apply Status SSID 5. SYSTEM SETUP: Advanced Network Settings Wireless LAN IP Address Connection Mode DHCP IP Address Subnet Mask Apply Account Remote Desktop Password Connect/Disconnect Projection Log in Code - BenQ SH910 | SH910 User Manual - Page 64
1. DISPLAY menu Description of each menu • The default values listed in this manual, especially on pages 64-72, are for reference only. They may vary between the projectors due to the continuous improvement to the products. FUNCTION DESCRIPTION - BenQ SH910 | SH910 User Manual - Page 65
2. PICTURE menu FUNCTION) DESCRIPTION Picture Mode Reference Mode Pre-defined picture modes are provided so you can optimize your projector image set-up to suit your program type. See "Selecting a picture mode" on page 31 for details. Selects a picture mode that best suits your need for the image - BenQ SH910 | SH910 User Manual - Page 66
2. PICTURE menu FUNCTION DESCRIPTION Adjusts white peaking while maintaining correct color presentation. Brilliant Color See "Adjusting Brilliant Color" on page 32 for details. This function is only available when User 1/2 is selected. Color See "Selecting a Color Temperature" on page 32 for - BenQ SH910 | SH910 User Manual - Page 67
4. SYSTEM SETUP: Basic menu FUNCTION Language Projector Position Menu Settings Operation Settings DESCRIPTION Sets the language for the On-Screen Display (OSD) menus. See "Using the menus" on page 25 for details. The projector can be installed on a ceiling or behind a screen, or with one or more - BenQ SH910 | SH910 User Manual - Page 68
4. SYSTEM SETUP: Basic menu FUNCTION Remote Receiver Background Color DESCRIPTION Sets which IR remote sensor of the projector will receive the signal from the remote control. Allows you to select which background color will display when no signal is input into the projector. Three options are - BenQ SH910 | SH910 User Manual - Page 69
5. SYSTEM SETUP: Advanced menu FUNCTION DESCRIPTION High Altitude A mode for operation in high altitude areas. See "Operating in a high Mode altitude environment" on page 35 for details. Allows you to enter the audio setting menu. See "Adjusting the sound" on page 35 for details. SRS See " - BenQ SH910 | SH910 User Manual - Page 70
that is identical with your computer's so that you can connect the projector using a suitable RS-232 cable. This function is intended for qualified service personnel. Selecting On enables the function and the projector displays the grid test pattern. It helps you adjust the image size and focus and - BenQ SH910 | SH910 User Manual - Page 71
5. SYSTEM SETUP: Advanced menu FUNCTION Network Settings Reset All Settings DESCRIPTION Wired LAN See "Controlling the projector through a LAN environment" on page 39 for details. Wireless LAN See "Controlling the projector through a LAN environment" on page 39 for details. Remote Desktop See " - BenQ SH910 | SH910 User Manual - Page 72
6. INFORMATION menu FUNCTION Current System Status DESCRIPTION Source Shows the current signal source. Picture Mode Shows the selected mode in the PICTURE menu. Resolution Shows the native resolution of the input signal. Color System Shows input system format, NTSC, PAL, SECAM, or RGB. Equivalent - BenQ SH910 | SH910 User Manual - Page 73
detergents. These can damage the case. Storing the projector If you need to store the projector for an extended time, please follow the instructions below: • Make sure the temperature and humidity of the storage area are within the recommended range for the projector. Please refer to "Specifications - BenQ SH910 | SH910 User Manual - Page 74
Lamp information Getting to know the lamp hour When the projector is in operation, the duration (in hours) of lamp usage is automatically calculated by the built-in timer. See "Setting Lamp Mode as Economic" below for more information on Economic mode. To obtain the lamp hour information: 1. Press - BenQ SH910 | SH910 User Manual - Page 75
lamp warning displays will remind you to change the lamp. The warning messages below are for reference only. Please follow the actual on-screen instructions to prepare and replace the lamp. Status Message Install a new lamp for optimal performance. If the projector is normally run with Economic - BenQ SH910 | SH910 User Manual - Page 76
Replacing the lamp • Hg - Lamp contains mercury. Manage in accordance with local disposal laws. See www.lamprecycle.org. • If lamp replacement is performed while the projector is suspended upside-down from the ceiling, make sure that no one is underneath the lamp socket to avoid any possible injury - BenQ SH910 | SH910 User Manual - Page 77
3. Remove the lamp cover by (a) sliding the cover toward the side of the projector and (b) lifting it off. • Do not turn the power on with the lamp cover removed. • Do not insert your fingers between the lamp and the projector. The sharp edges inside the projector may cause injuries. 4. Loosen the - BenQ SH910 | SH910 User Manual - Page 78
7. Tighten the screws that secure the lamp. • Loose screw may cause a bad connection, which could result in malfunction. • Do not over tighten the screws. 8. Ensure the handle is fully laid flat and locked in place. 9. Replace the lamp cover by sliding it into place. 10. Tighten the screw that - BenQ SH910 | SH910 User Manual - Page 79
Indicators Light Status & Description POWER TEMP LAMP Power events Red Off Green Flashing Off Green Off Red Flashing Off Lamp events Off Stand-by mode Off Powering up Off Normal operation Off The projector needs to cool for 90 seconds after the power is turned off. The projector - BenQ SH910 | SH910 User Manual - Page 80
Troubleshooting The projector does not turn on. Cause There is no power from the power cable. Attempting to turn the projector on again obstacle. Stand within 8 meters (26 feet) of the projector. Remedy Please see "Entering the password recall procedure" on page 27 for details. 80 Troubleshooting - BenQ SH910 | SH910 User Manual - Page 81
(female) x 1 Speaker 10 watt x 2 Audio output 3.5mm jack x 1 12V Trigger 3.5mm jack x 1 Control RS-232 serial control 9 pin x 1 Type B USB x 1 (Supports firmware upgrade) LAN control RJ45 x 1 (wired) Type A USB x 1 (wireless) Input terminals Computer input RGB input D-Sub 15-pin (female) x 1 Video - BenQ SH910 | SH910 User Manual - Page 82
Dimensions 339.2 mm (W) x 138.8 mm (H) x 260.6 mm (D) 260.6 339.2 138.8 Ceiling mount installation 110.5 66.3 91.6 Ceiling mount screws: M4 x 8 (Max. L = 8 mm) 150.0 25.0 0.5 237.5 100.00 23.5 Unit: mm 116.00 40.5 120.6 339.2 65.0 166.9 82 Specifications - BenQ SH910 | SH910 User Manual - Page 83
Timing chart Supported timing for PC input Resolution Horizontal Frequency (kHz) Vertical Frequency (Hz) 640 x 480 720 x 400 800 x 600 1024 x 768 1024 x 576 1024 x 600 31.469 - BenQ SH910 | SH910 User Manual - Page 84
Supported timing for HDMI input Resolution 640 x 480 720 x 400 800 x 600 1024 x 768 1152 x 864 1280 x 768 1280 x 800 1280 x 1024 1280 x 960 1360 x 768 - BenQ SH910 | SH910 User Manual - Page 85
60Hz or 1080i(1125i)@50Hz signal may result in slight image vibration. Supported timing for Component-YPbPr input Signal Format Horizontal Frequency (kHz) Vertical 50.00 50.00 59.94 23.98 25 29.97 50 59.94 Supported timing for Video and S-Video inputs Video mode NTSC PAL SECAM PAL-M PAL-N - BenQ SH910 | SH910 User Manual - Page 86
parts (labor included). To obtain warranty service, immediately notify the dealer from which you operate the product in accordance with BenQ's written instructions, especially the ambient humidity must be inbetween 10% mechanical, magnetic, optical, chemical, manual or otherwise, without the prior - BenQ SH910 | SH910 User Manual - Page 87
energy and, if not installed and used in accordance with the instructions, may cause harmful interference to radio communications. However, there is shop where you purchased the equipment or your household waste disposal service. The recycling of materials will help to conserve natural resources and - BenQ SH910 | SH910 User Manual - Page 88
products allows us to support government in making accessible All BenQ monitors and projectors come with user manuals on compact discs which could be easily read by may be available upon requests. • BenQ's customer service provides answers and assistance to all our customers through phone - BenQ SH910 | SH910 User Manual - Page 89
you need to change the fuse. • Do NOT use a plug without the fuse cover. If the fuse cover is missing, contact your nearest BenQ Customer Service Center for assistance. Regulation statements 89
-
 1
1 -
 2
2 -
 3
3 -
 4
4 -
 5
5 -
 6
6 -
 7
7 -
8
-
9
-
10
-
11
-
12
-
13
-
14
-
15
-
16
-
17
-
18
-
19
-
20
-
21
-
22
-
23
-
24
-
25
-
26
-
27
-
28
-
29
-
30
-
31
-
32
-
33
-
34
-
35
-
36
-
37
-
38
-
39
-
40
-
41
-
42
-
43
-
44
-
45
-
46
-
47
-
48
-
49
-
50
-
51
-
52
-
53
-
54
-
55
-
56
-
57
-
58
-
59
-
60
-
61
-
62
-
63
-
64
-
65
-
66
-
67
-
68
-
69
-
70
-
71
-
72
-
73
-
74
-
75
-
76
-
77
-
78
-
79
-
80
-
81
-
82
-
83
-
84
-
85
-
86
-
87
-
88
-
89
 |
 |

Welcome
SH910
Digital Projector
User Manual