Beretta 92 FS Compact Inox Instruction Manual - Page 4
Use of the safety
 |
View all Beretta 92 FS Compact Inox manuals
Add to My Manuals
Save this manual to your list of manuals |
Page 4 highlights
2. Use of the safety 2.1. To put the safety ON, decock the hammer, move the safety lever to the lower position covering the RED indicator as shown in illustration 1. 2.2. When handling this gun the safety should be ON and the muzzle pointed in a safe direction. 2.3. To take the safety OFF, move the safety lever to the horizontal position exposing the RED indicator as shown in illustration 2. The pistol is now ready to fire. WARNING: We recommend that the safety lever always be in the "SAFE" position until you intend to shoot. safe Illustr. 1 ready to fire Illustr. 2
-
 1
1 -
 2
2 -
 3
3 -
 4
4 -
 5
5 -
 6
6 -
 7
7 -
 8
8 -
 9
9 -
 10
10 -
11
-
12
-
13
-
14
-
15
-
16
-
17
-
18
-
19
-
20
-
21
-
22
 |
 |

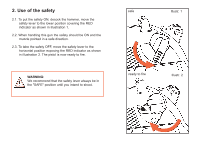
2. Use of the safety
2.1. To put the safety ON, decock the hammer, move the
safety lever to the lower position covering the RED
indicator as shown in illustration 1.
2.2. When handling this gun the safety should be ON and the
muzzle pointed in a safe direction.
2.3. To take the safety OFF, move the safety lever to the
horizontal position exposing the RED indicator as shown
in illustration 2. The pistol is now ready to fire.
WARNING:
We recommend that the safety lever always be in
the "SAFE" position until you intend to shoot.
Illustr. 1
Illustr. 2
safe
ready to fire