Beretta 92 FS Compact Inox Instruction Manual - Page 5
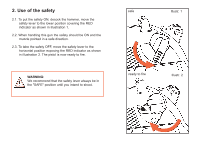
Inserting and changing the CO, cartridge, 1. Inserting a CO
 |
View all Beretta 92 FS Compact Inox manuals
Add to My Manuals
Save this manual to your list of manuals |
Page 5 highlights
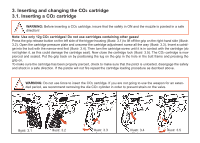
3. Inserting and changing the CO2 cartridge 3.1. Inserting a CO2 cartridge WARNING: Before inserting a CO2 cartridge, insure that the safety in ON and the muzzle is pointed in a safe direction! Note: Use only 12g CO2 cartridges! Do not use cartridges containing other gases! Press the grip release button on the left side of the trigger housing (Illustr. 3.1) to lift off the grip on the right-hand side (Illustr. 3.2). Open the cartridge pressure plate and unscrew the cartridge adjustment screw all the way (Illustr. 3.3). Insert a catridge into the butt with the narrow end first (Illustr. 3.4). Then turn the cartridge screw until it is in contact with the cartridge (do not tighten it, as this could damage the cartridge seal). Now close the cartridge lock (Illustr. 3.5). The CO2 cartridge is now pierced and sealed. Put the grip back on by positioning the lug on the grip in the hole in the butt frame and pressing the grip on. To make sure the cartridge has been properly pierced, check to make sure that the pistol is unloaded, disengage the safety and shoot in a safe direction. If the pistole will not fire repeat the cartridge loading procedure as decribed above. WARNING: Do not use force to insert the CO2 cartridge. If you are not going to use the weapon for an extended period, we recommend removing the die CO2 cylinder in order to prevent strain on the valve. Illustr. 3.1 Illustr. 3.2 2 1 Illustr. 3.3 Illustr. 3.4 1 2 Illustr. 3.5
-
 1
1 -
 2
2 -
 3
3 -
 4
4 -
 5
5 -
 6
6 -
 7
7 -
 8
8 -
 9
9 -
 10
10 -
 11
11 -
12
-
13
-
14
-
15
-
16
-
17
-
18
-
19
-
20
-
21
-
22
 |
 |
