Beretta A400 Xplor Light Beretta A400 Xplor User Manual - Page 26
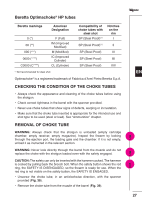
Beretta Optimachoke, HP tubes, CHECKING THE CONDITION OF THE CHOKE TUBES, REMOVAL OF CHOKE TUBE
 |
View all Beretta A400 Xplor Light manuals
Add to My Manuals
Save this manual to your list of manuals |
Page 26 highlights
Beretta Optimachoke® HP tubes Beretta markings 0 (*) 00 (**) 000 (***) 0000 (****) C0000 (C****) American Designation F (Full) IM (Improved Modified) M (Modified) IC (Improved Cylinder) CL (Cylinder) Compatibility of choke tubes with steel shot SP (Steel Proof)(1) Notches on the rim I SP (Steel Proof)(1) II SP (Steel Proof) III SP (Steel Proof) IIII SP (Steel Proof) IIIII (1) Not recommended for steel shot. Optimachoke® is a registered trademark of Fabbrica d'Armi Pietro Beretta S.p.A. CHECKING THE CONDITION OF THE CHOKE TUBES • Always check the appearance and cleaning of the choke tubes before using the shotgun. • Check correct tightness in the barrel with the spanner provided. • Never use choke tubes that show signs of defects, warping or incrustation. • Make sure that the choke tube inserted is appropriate for the intended use and shot type to be used (steel or lead). See "Ammunition" chapter. REMOVAL OF CHOKE TUBE WARNING: Always check that the shotgun is unloaded (empty cartridge chamber, empty receiver, empty magazine). Inspect the firearm by looking through the ejection port, the loading gate and the chamber. If it is not empty, unload it as instructed in the relevant section. WARNING: Never look directly through the barrel from the muzzle and do not replace the choke with the shotgun loaded even with the safety engaged. CAUTION: The safety can only be inserted with the hammer cocked. The hammer is cocked by pulling back the breech bolt. When the safety button shows the red ring, the SAFETY IS DISENGAGED, so the firearm is ready for use. When the red ring is not visible on the safety button, the SAFETY IS ENGAGED. • Unscrew the choke tube, in an anticlockwise direction, with the spanner provided (Fig. 38). • Remove the choke tube from the muzzle of the barrel (Fig. 39). EN ! ! ! 27
-
 1
1 -
2
-
3
-
4
-
5
-
6
-
7
-
8
-
9
-
10
-
11
-
12
-
13
-
14
-
15
-
16
-
17
-
18
-
19
-
20
-
 21
21 -
 22
22 -
 23
23 -
 24
24 -
 25
25 -
 26
26 -
 27
27 -
 28
28 -
 29
29 -
 30
30 -
 31
31 -
32
-
33
-
34
-
35
-
36
-
37
-
38
 |
 |
