Bernina 2000 Manual - Page 13
Threading, Sewing, tuning
 |
View all Bernina 2000 manuals
Add to My Manuals
Save this manual to your list of manuals |
Page 13 highlights
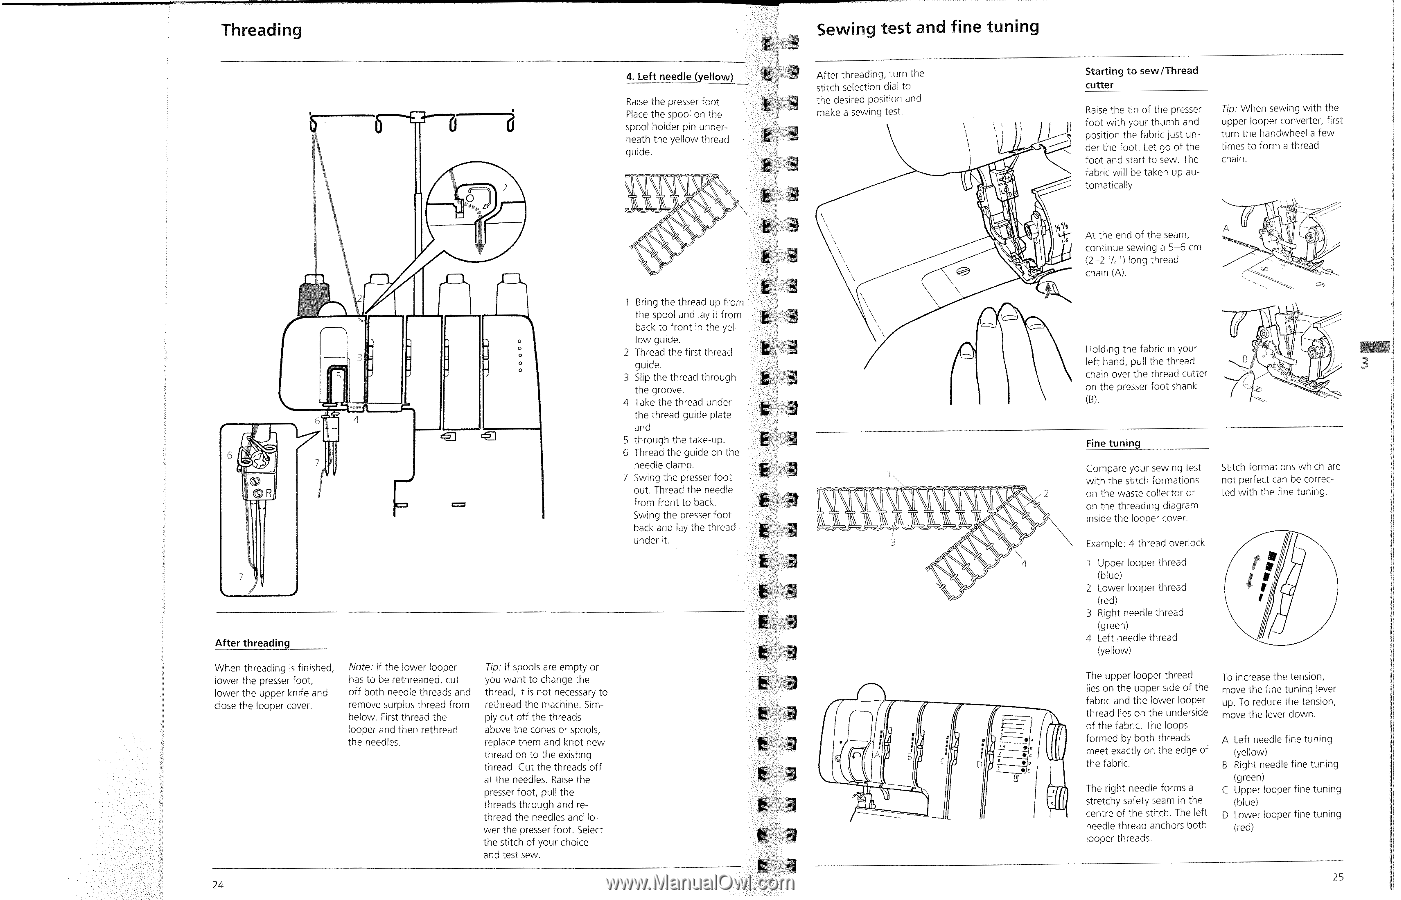
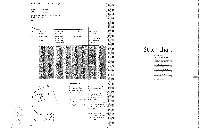
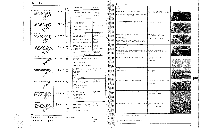
Threading Sewing test and fine tuning 4. Left needle (yellow) Raise the presser foot. Place the spool on the spool holder pin underneath the yellow thread guide. g It) After threading, turn the stitch selection dial to the desired position and make a sewing test. 3 2 E k 4 E 3 ■ 5 0 0 0 0 0 411 E 3 1 Bring the thread up from k 3 the spool and lay it from back to front in the yel- low guide. 2 Thread the first thread t 3 guide. it 3 Slip the thread through the groove. 4 Take the thread under the thread guide plate t and 5 through the take-up. E 6 Thread the guide on the needle clamp. 7 Swing the presser foot E 4 out. Thread the needle from front to back. E Swing the presser foot E 3 back and lay the thread under it. 3 E E After threading When threading is finished, lower the presser foot, lower the upper knife and close the looper cover. Note: If the lower looper has to be rethreaded, cut off both needle threads and remove surplus thread from below. First thread the looper and then rethread the needles. Tip: If spools are empty or you want to change the thread, it is not necessary to rethread the machine. Simply cut off the threads above the cones or spools, replace them and knot new thread on to the existing thread. Cut the threads off at the needles. Raise the presser foot, pull the threads through and rethread the needles and lower the presser foot. Select the stitch of your choice and test sew. E t 3 • 4"1 A • • • 24 0 34 Starting to sew/Thread cutter Raise the tip of the presser Tip: When sewing with the ' foot with your thumb and upper looper converter, first position the fabric just un- turn the handwheel a few der the foot. Let go of the times to form a thread foot and start to sew. The chain. fabric will be taken up au- r, tomatically. At the end of the seam, continue sewing a 5-6 cm (2-2 'h") long thread chain (A). I Holding the fabric in your left hand, pull the thread chain over the thread cutter on the presser foot shank (B). 2 z 4 • • to Fine tuning Compare your sewing test with the stitch formations on the waste collector or on the threading diagram inside the looper cover. Stitch formations which are not perfect can be corrected with the fine tuning. Example: 4 thread overlock 1 Upper looper thread (blue) 2 Lower looper thread (red) 3 Right needle thread (green) 4 left needle thread (yellow) The upper looper thread lies on the upper side of the fabric and the lower looper thread lies on the underside of the fabric. The loops formed by both threats meet exactly on the ecge of the fabric. The right needle forms a stretchy safety seam in the centre of the stitch. The left needle thread anchors both looper threads. To increase the tension, move the fine tuning lever up. To reduce the tension, move the lever down. A Left needle fine tuning (yellow) B Right needle fine tuning (green) C Upper looper fine tuning (blue) D Lower looper fine tuning (red) 25
-
 1
1 -
2
-
3
-
4
-
5
-
6
-
7
-
 8
8 -
 9
9 -
 10
10 -
 11
11 -
 12
12 -
 13
13 -
 14
14 -
 15
15 -
 16
16 -
 17
17 -
 18
18 -
19
-
20
-
21
-
22
-
23
-
24
-
25
-
26
 |
 |