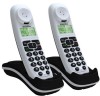
Binatone Lifestyle 1900 User Manual - Page 2
Phone Settings, Declaration Of Conformity - telephone
 |
View all Binatone Lifestyle 1900 manuals
Add to My Manuals
Save this manual to your list of manuals |
Page 2 highlights
6.3 Delete an entry in the Call List 1. Follow Steps 1 and 2 in Section 6.1. 2. Press and to select DELETE. 3. Press to confirm. 6.4 Delete all Call list entries 1. Follow Steps 1 and 2 in Section 6.1 2. Press and to select DELETE ALL. 3. Press to display CONFIRM?. 4. Press to confirm. All entries will be deleted and the display will show EMPTY. 17 7 PHONE SETTINGS Your phone comes with a selection of settings that you can change to personalise your phone the way you like it to work. 7.1 Date and Time Settings If you subscribe to Caller Display the time and date settings will be automatically updated by the network when you receive an incoming call. The Caller Display service only sends the month and date, not the year, so you may need to set the year. 7.1.1 Change the Date Format 1. Press and to select HS SETTINGS. 2. Press and to select DATE & TIME. 3. Press and to select DATE FORMAT. 4. Press and to select your desired date format (DD-MM-YYor MM-DD-YY ). 5. Press to confirm. 7.1.2 Change the Time Format 1. Press and to select HS SETTINGS. 2. Press and to select DATE & TIME. 3. Press and to select TIME FORMAT. 4. Press and to select your desired time format (12 HR or 24 HR). 5. Press to confirm. 7.1.3 Set the Time 1. Press and to select HS SETTINGS. 2. Press and to select DATE & TIME. 3. Press and to select SET TIME. 4. Press and then enter the time information in 24 hour format. 5. Press to confirm. Note: If time has been set before, the current time will display, otherwise, "HH:MM" will display. 7.1.4 Set the Date 1. Press and to select HS SETTINGS. 2. Press and to select DATE & TIME. 3. Press and to select SET DATE. 4. Press and then enter the date information. The date entered will be in the format you set in Section 7.1.1. 5. Press to confirm. Note: If date has been set before, the current date will display, otherwise, "DD-MM-YY " will display. 18 7.2 Alarm Settings You can set an alarm time on the handset. When an alarm is set, the is shown on the handset display. When the alarm time is reached, the and "ALARM ON " flash on the handset display, and the alarm tone rings for 45 seconds. You can press any key to disable the alarm. If the snooze function is activated, the alarm will sound again at the end of the snooze period of seven minutes. You can also press and hold while the alarm is sounding, to stop the alarm and turn off the snooze function. Note: a. A key press will still disable the alarm even if the handset keypad is locked when the alarm rings. b. The alarm volume level is the same as the settings of the handset ringer volume. If the handset ringer is set to VOLUME OFF, the alarm still sounds at VOLUME 1 level. c. During an external call or internal call, if an alarm is set and when the alarm time is reached, the and "ALARM ON" will still flash. An alarm tone will be emitted from the earpiece to alert the user the alarm time is reached. Once the user presses any key or presses and holds to disable the alarm, the display will revert to the call duration. d. During paging or ringing, the alarm will not sound when the alarm time is reached. However, if the snooze function is enabled and there is no paging or ringing, the alarm will sound again at the end of the snooze period. 7.2.1 Turn on/off the Alarm 1. Press and to select HS SETTINGS. 2. Press and to select ALARM. 3. Press and to select ON/OFF. 4. Press to confirm. Note: If ON is selected, you will be asked to set the alarm time. 7.2.2 Set the Alarm Time (If Alarm time is set to be ON) 1. Follow Steps 1 to 4 in Section 7.2.1. 2. Enter the alarm time in 24 hour format. 3. Press to display "SNOOZE". 4. Press and to select snooze ON or OFF. 5. Press to confirm. 7.3 Handset Settings 7.3.1 Set the Ringer Melody for Internal Calls 1. Press and to select HS SETTINGS . 2. Press and to select RING SETUP 3. Press and to select INT RING. 4. Press and to select the melody you want to hear for internal calls. 19 Note: The respective melody will be played while browsing the ringtone list. 5. Press to confirm. 7.3.2 Set the Ringer Melody for External Calls 1. Press and to select HS SETTINGS. 2. Press and to select RING SETUP. 3. Press and to select EXT RING. 4. Press and to select melody you want to hear for external calls. Note: The respective melody will be played while browsing the ringtone list. 5. Press to confirm. 7.3.3 Set the Ringer Volume 1. Press and to select HS SETTINGS. 2. Press and to select RING SETUP. 3. Press and to select RING VOLUME. 4. Press and to select the desired ringer volume (a total of 6 ringer volume levels including VOLUME OFF). Note: The respective ringer volume will be played during your selection. If VOLUME OFF is selected, the icon will be displayed. 5. Press to confirm. 7.3.4 Set Alert Tones Three different alert tones are set on by default, but can be turned off, if desired. Key Tone - a single beep is emitted when you press a key. Low Battery Tone - emitted while you are talking on the phone to alert you that you need to charge the handset batteries. Out of Range Tone - emitted while you are talking on the phone to alert you to move closer to the base unit, before the call is lost. 1. Press and to select HS SETTINGS. 2. Press and to select TONE SETUP. 3. Press and to select KEY TONE / BATTERY TONE / OUT OF RANGE. 4. Press and to turn on or off these tones. 5. Press to confirm. 7.3.5 Set the Handset Language 1. Press and to select HS SETTINGS. 2. Press and to select LANGUAGE. 3. Press and to select the desired language. 4. Press to confirm. 20 7.3.6 Rename the Handset 1. Press and to select HS SETTINGS 2. Press and to select RENAME HS. 3. Press and change the name of your handset, using to delete letters and the alphanumeric keys to enter up to 10 letters for the name. 4. Press to confirm. 7.3.7 Choose the Information to be Displayed in Idle You can choose to display the time or handset name in your idle screen. 1. Press and to select HS SETTINGS. 2. Press and to select HS DISPLAY. 3. Press and to select HANDSET NAME or TIME. 4. Press to confirm. 7.3.8 Set the Auto Answer If you turn on the Auto Answer, you can answer a call automatically by just lifting the handset off the base or charger, without having to press any key. 1. Press and to select HS SETTINGS. 2. Press and to select AUTO ANSWER. 3. Press and to turn on or off the auto answer feature. 4. Press to confirm. 7.4 Base Settings 7.4.1 De-register a Handset This operation should only be necessary if one of your handsets becomes faulty or lost and needs to be replaced. You will need to enter the 4-digit System PIN (Default PIN is 0000) in order to de-register a handset from the base station.A de-registered handset will have the antenna icon flashing and "REGISTER" on the display. Note: You cannot de-register the handset that you are currently using. 1. Press and to select BS SETTINGS. 2. Press and to select DELETE HS. 3. Press and the display shows "PIN?". 4. Enter the 4-digit system PIN. 5. Press and the first handset number is displayed. 6. Press to scroll through the list of registered handsets and select the number of the handset you want to de-register. 7. Press to confirm, and the chosen handset will be de-registered. 7.4.2 Change the dial mode You should normally leave the dialling mode at its default setting of TONE (also called DTMF) unless the phone is connected to an old exchange that only recognises PULSE dialling. Note: If PULSE dialling is set, you can press the * key to switch to TONE dialling for the rest of that call. 1. Press and to select BS SETTINGS 2. Press and to select DIAL MODE. 3. Press and to select TONE or PULSE (The current setting is indicated by an asterisk to the right). 4. Press to confirm. 7.4.3 Change the Flash (Recall) Time You may need to change the recall (flash) time if your phone is connected to a PBX. The recall time options are SHORT (the default value of 100ms), MEDIUM (300ms) or LONG (600ms). 1. Press and to select BS SETTINGS. 2. Press and to select FLASH TIME. 3. Press and to select your desired flash time (SHORT, MEDIUM, LONG, with the current setting indicated by and asterisk to the right). 4. Press to confirm. 7.4.4 Change the System PIN Code A 4-digit system PIN code is used for changing the system settings of the base station. It is used to protect your phone against unauthorised use. The default system PIN code is 0000. 1. Press and to select BS SETTINGS. 2. Press and to select CHANGE PIN. 3. Press and you are requested to enter the 4-digit system PIN. 4. Enter the old system PIN. 5. Press and enter the new system PIN. 6. Press and enter the new system PIN again. Note: If the new PIN entered in Step 6 is not the same as the new system PIN entered in Step 5, you must enter the new system PIN at step 5 again. 7. Press to confirm 21 22 7.5 Registration IMPORTANT: When you purchase a Lifestyle 1900 system, all handsets are already registered to your base, so you do not need to register them. Handset registration is only necessary when you buy extra handsets or if a handset has become faulty. You can register additional handsets to have up to five handsets per base unit, with each handset's number (1 to 5) shown on its display. (Note: each handset can only be registered to one base.) To register a new handset to your base: 1. Press and hold on the base station for more than five seconds, to put the base station into registration mode. (Note: there is no feedback to know it is in registration mode.) It will stay in registration mode for about 1 minute, so the following handset sequence must be completed within this time. 2. Press and to select REGISTRATION. 3. Press and you are requested to enter the 4-digit system PIN. 4. Enter the 4-digit system PIN. 5. Press to confirm, and the display will show SEARCHING. If the handset registration is successful, you will hear a confirmation tone and the will stop flashing. This may take a short while. The handset will automatically be allocated the next available handset number. This handset number is shown in the handset display in standby mode. If the handset registration is unsuccessful, the will still flash and the display will return to "REGISTER", so you will need to repeat the registration process. 7.6 Reset Your Phone You can reset your phone to the default settings . After a reset, all your personal settings, call list entries and redial list entries, will be deleted but your phonebook remains unchanged. 1. Press and to select DEFAULT. 2. Press and you are requested to enter the 4-digit system PIN. 3. Enter the 4-digit system PIN. 4. Press to display CONFIRM? 5. Press to confirm, and the phone will be reset to its default settings. 8 TROUBLESHOOTING Problem No dialling tone when pressing key Causes a.The connection cord of the base station is not plugged in. b.The adapter cord is not plugged in correctly in the base station. c. Another handset is using the base to make a call. d. Wrong telephone line cord Solutions a.Check the connections. Unplug and plug back in the mains. Check that the telephone cord has been plugged into the base station and the phone socket. b.Check the base station plug and the 230V plug (remove and plug-in). c.Wait until the line is unoccupied. d.Use the original telephone line cord supplied When connect to a PBX, Dialling prefix is needed. no and/or wrong connection after dialling. Insert the dialling prefix "SEARCHING" is displayed. a. Base station out of range. b. Base station not connected to mains. Reduce the range. Connect base station to mains. The call does not work. No display. Service not activated or wrong operator or wrong setting Empty battery Check your Subscription with network or change the dial mode. Recharge battery Please contact the technical support of the network provider for further information. This telephone is not equipped with a grounding function, and therefore some of the functions may be limited when used in PBX systems. Technical Support If the fault persists... Disconnect all other instruments connected to the same line as the Lifestyle 1900 system and try to make a call . Disconnect the baseunit from the telephone line and plug a different phone into the master telephone socket. Try making a call. If this works, the line is OK. If the call does not work,and you are using a two-way socket adapter, remove it and plug a telephone directly into the socket. If the callnow works, theadapter may be faulty. 9 DECLARATION OF CONFORMITY We the manufacturer / Importer : Binatone Telecom Plc,1 Apsley Way London, NW2 7HF Declare under our sole responsibility that the following product Type of equipment: Digital cordless telephone Model Name: Country of Origin: Lifestyle 1900 Series China Brand: Binatone complies with the essential protection requirements of R&TTE Directive 1999/5/EC on the approximation of the laws of the Member States relating to Radio Spectrum Matters, the Council Directive 2004/108/EC on the approximation of the laws of the Member Statesrelating to electromagnetic compatibility (EMC) and the European Community Directive 2006/95/EC relating to Electrical Safety. Assessment of compliance of the product with the requirements relating to the essential requirements according to Article 3 R&TTE was based on Annex III of the Directive 1999/5/EC and the following standard: Radio Spectrum: EMC: Electrical Safety: EN 301406: V1.5.1 : 2003; EN 301489-1: V1.8.1 : 2008; EN 301489-6: V1.3.1 : 2008; EN 60950-1: 2006. Manufacturer / Importer (signature of authorized person) 30 Nov 2009 Date The conformity to the requirements is validated by the Signature symbol. NOTE: In compliance withDirective 2002/96/EC, when you purchase a product that comes with the symbol shown on the right, you are required to dispose of electrical and electronic equipment by separate waste collection and you cannot dispose of the product as normal waste. This equipment and all its components, subsystems and consumable materials formed an integral part of this product and when you decide to dispose of them you have to take them to a local recycling centre for appropriate waste disposal, in compliance with the current regulations. Details about the location of these centres can be obtained from your local authority. Notes for battery disposal Your product contains batteries covered by the European Directive 2006/66/EC, which cannot be disposed of with normal household waste. Please be aware of the local rules on separate collection of batteries. The correct disposal of batteries helps protect the environment and prevent health hazards. 10 GUARANTEE AND SERVICE The Lifestyle 1900 system is guaranteed for 12 months from the date of purchase shown on your sales receipt. This guarantee does not cover any faults or defects caused by accidents,misuse, fair wear and tear, neglect, faults on the telephone line, lightning, tampering with the equipment, or any attempt at adjustment or repair other than through approved agents. Please keep your sales (till) receipt this is your guarantee. You should also keep the original packaging material. In the unlikely event that you need to return your Lifestyle 1900 system to our Repair Centre while it is under guarantee, there may be handling charge. While the unit is under Guarantee 1. Disconnect the base unit from the telephone line and the mains electricity supply. 2. Pack up all parts of your Lifestyle 1900 system , using the original packaging. 3. Return the unit to the shop where you bought it, making sure you take your sales receipt. Remember to include the mains adapter. After the Guarantee has expired If the unit is no longer under Guarantee, first follow steps 1 and 2 as for repair under Guarantee. Then... 3. Call Helpline on 0845 345 9677 (for UK only) and ask for a quotation of the repair charge and details of where to send your Lifestyle 1900 system for repair. 4. Make sure you include with your Lifestyle 1900 system. ¾ Your name and address ¾ A cheque or postal order for the value of the repair ¾ A brief description of the fault 5. Return your Lifestyle 1900 system to the address given by the Service Department. * This doesnot affect your statutory rights. UK (BTP) Ver 1, 2009 23 24 25 26 27
-
 1
1 -
 2
2
 |
 |
