Bissell PowerForce PowerBrush Carpet Cleaner 2089 User Guide - Page 10
Cleaning Machine After Use
 |
View all Bissell PowerForce PowerBrush Carpet Cleaner 2089 manuals
Add to My Manuals
Save this manual to your list of manuals |
Page 10 highlights
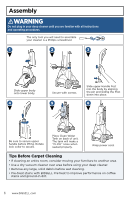
Cleaning Machine After Use WARNING To reduce the risk of electric shock, turn power switch OFF and disconnect plug from electrical outlet before performing maintenance or troubleshooting checks. 1 2 Unplug the unit. 3 Remove tank vent & foam filter (located on top of the Collection Tank) and rinse. Remove and rinse the Collection Tank thoroughly. 4 To remove and clean the nozzle, keep the Collection Tank off of the unit. Gently pull the two tabs that point up near the front of the unit. The nozzle will unhook to remove. Rinse under running water. When finished, slightly tilt the machine so the foot raises up so you can align the nozzle hooks at the floor of the unit. Rotate the nozzle up to clip back into place. 5 6 Remove lint and hair from red gasket in base of unit. (Do not remove gasket) Once the parts have been rinsed clean and dried, replace the Collection Tank to the base of the machine and secure with both latches. Wrap power cord around Quick Release Cord Wrap™ on side of the machine. Wipe all surfaces with a soft cloth and store cleaner upright in a protected, dry area. NOTICE: To reduce the risk of a leaking condition, do not store unit where freezing may occur. Damage to internal components may result. 10 www.BISSELL.com
-
 1
1 -
2
-
3
-
4
-
 5
5 -
 6
6 -
 7
7 -
 8
8 -
 9
9 -
 10
10 -
 11
11 -
 12
12 -
 13
13 -
 14
14 -
 15
15 -
16
-
17
-
18
-
19
-
20
-
21
-
22
-
23
-
24
-
25
-
26
-
27
-
28
-
29
-
30
-
31
-
32
 |
 |
