Bissell Trilogy Vacuum 81M9 User Guide
Bissell Trilogy Vacuum 81M9 Manual
 |
View all Bissell Trilogy Vacuum 81M9 manuals
Add to My Manuals
Save this manual to your list of manuals |
Bissell Trilogy Vacuum 81M9 manual content summary:
- Bissell Trilogy Vacuum 81M9 | User Guide - Page 1
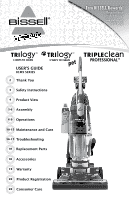
Rewards! Register your product today! See details on back page USER'S GUIDE 81M9 SERIES 2 Thank You 3 Safety Instructions 4 Product View 5-6 Assembly 6-9 Operations 10-15 Maintenance and Care 16-17 Troubleshooting 18 Replacement Parts 18 Accessories 19 Warranty 20 Product Registration 20 Consumer - Bissell Trilogy Vacuum 81M9 | User Guide - Page 2
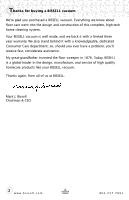
, dedicated Consumer Care department, so, should you ever have a problem, you'll receive fast, considerate assistance. My great-grandfather invented the Today, BISSELL is a global leader in the design, manufacture, and service of high quality homecare products like your BISSELL vacuum. Thanks again, - Bissell Trilogy Vacuum 81M9 | User Guide - Page 3
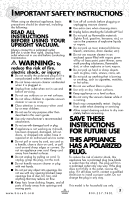
children. ■ Do not use for any purpose other than described in this user's guide. ■ Use only manufacturer's recommended attachments. ■ Do not use with damaged cord when cleaning or servicing ■ Allow carpet cleaning solution to dry completely before vacuuming. SAVE THESE INSTRUCTIONS FOR FUTURE USE - Bissell Trilogy Vacuum 81M9 | User Guide - Page 4
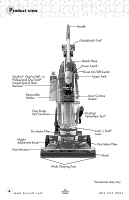
Product view Handle TurboBrush® Tool* OxyPro®, OxyPro Pet®, or Professional Oxy Total® Carpet Spot & Stain Remover Removable Holster Easy Empty Dirt Container Stretch Hose Power Switch Brush On/Off Switch Upper Tank Inner Cyclone Screen Dusting/ Upholstery Tool* Pre-Motor Filter Height - Bissell Trilogy Vacuum 81M9 | User Guide - Page 5
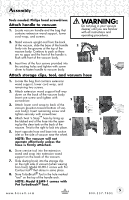
Attach handle to vacuum 1. Locate vacuum handle and the bag that contains extension wand support, lower cord wrap, and screws. WARNING: Do not plug in your vacuum cleaner until you are familiar with all instructions and operating procedures. 2. Stand vacuum upright and from the back of the vacuum - Bissell Trilogy Vacuum 81M9 | User Guide - Page 6
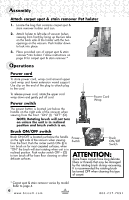
3. Place provided can of carpet spot & stain remover*into holster. Follow instructions on page 8 for carpet spot & stain remover.* Operations Power cord To store power cord, wrap cord around upper cord wrap and lower extension wand support. Use clip on the end of the plug to attach plug to the - Bissell Trilogy Vacuum 81M9 | User Guide - Page 7
Operations Handle positions 1. In upright position, tilt cleaner back on its rear wheels to transport from room to room. The vacuum can also be moved by using the carrying handle on front of the vacuum. 2. Using your foot, press handle release pedal on the lower left side of the vacuum to recline - Bissell Trilogy Vacuum 81M9 | User Guide - Page 8
remove tough stains and odors from carpet. These items are available for purchase by visiting the BISSELL website www.bissell.com. Read instructions on spot & stain remover can before using, including testing for colorfastness. How to use For best results: treat stains immediately. Stains allowed - Bissell Trilogy Vacuum 81M9 | User Guide - Page 9
you in raking motion, too much pressure will cause brush to stop rotating. NwOitThEt:hMe oPdeet lTu8r1bMo9B-r1uscho®mTeosol and follows same operation instructions. e. 2e. Pet Contour Tool® (Included with 81M91 only): Use to reach into corners and edges on stairs as well as armrests and other - Bissell Trilogy Vacuum 81M9 | User Guide - Page 10
upper tank of dirt container 1. Turn Power OFF. Unplug power cord from electrical outlet. 2. Remove and Empty Dirt Container as instructed in previous section. 3. With dirt container removed, grasp inner 3 cyclone screen and twist counterclockwise until the locking tabs stop the rotation - Bissell Trilogy Vacuum 81M9 | User Guide - Page 11
Maintenance and care Cleaning the pre-motor filter Check pre-motor filter and wash as needed based on frequency of cleaning. 1. Turn power OFF. Unplug power cord from electrical outlet. 2. The pre-motor filter protects motor from debris and is located in the slide out tray underneath the dirt - Bissell Trilogy Vacuum 81M9 | User Guide - Page 12
area. 7. Check drive belt carefully for wear, cuts, or stressed areas. If any damage is present, discard old drive and replace as instructed in following section. Replace drive belt 1. Turn power OFF. Unplug power cord from electrical outlet. 2. With rotating floor brush removed from vacuum - Bissell Trilogy Vacuum 81M9 | User Guide - Page 13
problem (i.e. full dirt cup, dirty filters or clog). 3. Fix the problem by following the steps in the maintenance section of the user guide. activate, your cleaner may need servicing. Call BISSELL Consumer Care or visit the website to locate an authorized Service Center. Note: The thermal protector - Bissell Trilogy Vacuum 81M9 | User Guide - Page 14
vacuum by turning to the left. 6 Straighten the hose and unclog with a long, narrow object such as a broom handle. 7. If clog persists, follow instructions for checking the rotating brush and drive belt on page 12 and inspect air passageway for obstructions. 14 www.bissell.com 800.237.7691 - Bissell Trilogy Vacuum 81M9 | User Guide - Page 15
Maintenance and care TurboBrush® Tool maintenance NPeot tTeu:rMbooBdreulsh8®1MTo9o-1l acnodmfeosllowwiths the same 2. maintenance instructions. 1. Turn power OFF. Unplug vacuum cord from electrical outlet 2. Twist collar so opening is at the top and lift top cover to remove 4. 3. Remove - Bissell Trilogy Vacuum 81M9 | User Guide - Page 16
disconnect polarized plug from electrical outlet before performing maintenance or troubleshooting. Remedies 1. Power cord not plugged in 1. Check Unplug, check for damage, have cord replaced at an authorized service center if necessary 4. Thermal protector activated 4. Allow cleaner to - Bissell Trilogy Vacuum 81M9 | User Guide - Page 17
Troubleshooting Visible dirt escaping from cleaner Possible causes Remedies 1. Dirt container full dirt container correctly, see page 10 Other maintenance or service not included in the manual should be performed by an authorized service representative. Thank you for selecting a BISSELL product. - Bissell Trilogy Vacuum 81M9 | User Guide - Page 18
Replacement parts - BISSELL vacuum Item 1 2 3 4 5 6 7 8 1 Part No. 203-1520 203-1512 203-1509 203-1510 203-7930 13A2 13A2-1 95C9 2 Part Name Drive Belt Foot Brush Roll Pre-Motor Foam Filter Post-Motor Filter Holster OxyPro® Carpet Spot and Stain Remover OxyPro® Pet Carpet Spot & Stain Remover - Bissell Trilogy Vacuum 81M9 | User Guide - Page 19
which may vary from state to state. If you need additional instruction regarding this warranty or have questions regarding what it may cover, User's Guide is not covered. If your BISSELL product should require service: Contact BISSELL Consumer Care to locate a BISSELL Authorized Service Center - Bissell Trilogy Vacuum 81M9 | User Guide - Page 20
Service Supplying your information now saves you time should you need to contact us with questions regarding your product. Product Support Inc. PO Box 1888 Grand Rapids MI 49501 8 pm ET ATTN: Consumer Services Or visit the BISSELL website -www.bissell.com When contacting BISSELL, have model
-
 1
1 -
 2
2 -
 3
3 -
 4
4 -
 5
5 -
 6
6 -
 7
7 -
8
-
9
-
10
-
11
-
12
-
13
-
14
-
15
-
16
-
17
-
18
-
19
-
20
 |
 |
Earn BISSELL Rewards!
R
egister your
product today!
See details on
back page
2
Thank You
USER'S GUIDE
81M9 SERIES
Safety Instructions
Product View
Assembly
Operations
Maintenance and Care
Troubleshooting
Consumer Care
Replacement Parts
3
4
5-6
6-9
10-15
16-17
20
18
Accessories
Warranty
Product Registration
18
19
20
Earn BISSELL Rewards!
R
egister your
product today!
See details on
back page