Blendtec Professional Series Owners Manual
Blendtec Professional Series Manual
 |
View all Blendtec Professional Series manuals
Add to My Manuals
Save this manual to your list of manuals |
Blendtec Professional Series manual content summary:
- Blendtec Professional Series | Owners Manual - Page 1
® Connoisseur Owner's Manual and User Guide - Blendtec Professional Series | Owners Manual - Page 2
- Blendtec Professional Series | Owners Manual - Page 3
TABLE OF CONTENTS SECTION SECTION 1: IMPORTANT SAFEGUARDS SECTION 2: UNPACKING SECTION 3: TOTAL BLENDER OVERVIEW SECTION 4: INSTALLATION SECTION 5: CARE AND CLEANING SECTION 6: OPERATIONAL OVERVIEW SECTION 7: TROUBLESHOOTING SECTION 8: WARRANTY PAGE # 1 3 4 6 10 11 12 14 - Blendtec Professional Series | Owners Manual - Page 4
SAFEGUARDS READ ALL INSTRUCTIONS CAREFULLY BEFORE USING YOUR CONNOISSEUR™ 1.1 SAFETY CERTIFICATION The blender is certified by blender to a Blendtec service agent immediately for examination, repair, electrical or mechanical adjustment, or possible replacement. 1.5 NEVER OPERATE BLENDER - Blendtec Professional Series | Owners Manual - Page 5
. The blender drive socket may become hot after numerous cycles. 1.16 CLOSE SUPERVISION IS NECESSARY WHEN APPLIANCE IS USED BY OR NEAR CHILDREN. 1.17 THE CONNOISSEUR IS INTENDED FOR HOME USE ONLY! ANY USE OF THE CONNOISSEUR FOR COMMERCIAL PURPOSES VOIDS ALL WARRANTIES. SAVE THESE INSTRUCTIONS CN - Blendtec Professional Series | Owners Manual - Page 6
Inspect all items to ensure no damage occurred in shipment. 5. If any damage has occurred contact your Blendtec service agent immediately. 2.2 RECORDING YOUR SERIAL NUMBER AND DATE OF PURCHASE Record your blender motor serial number and date of purchase in the space below. You will need these when - Blendtec Professional Series | Owners Manual - Page 7
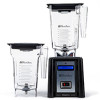
jar, blade assembly, and lid. • Jar: Made from polycarbonate to provide maximum efficiency and clear visibility of blender performance. • Blade Assembly: Stainless steel designed to provide fast consistent blending 3.3 POWER SPECIFICATIONS The Connoisseur is made for 110/120 volts circuits only. It - Blendtec Professional Series | Owners Manual - Page 8
FIGURE 1 - Motor Base and Jar - Front View Lid Jar Blade Assembly Motor Base LCD Diplay Power Switch FIGURE 4 - Motor Base - Top View Drive Socket Touchpad CN-5 - Blendtec Professional Series | Owners Manual - Page 9
SECTION 4 INSTALLATION It is recommended that surge protection be placed between the receptacle and the blender motor. 4.1 CONNOISSEUR ABOVE COUNTER INSTALLATION 1. Place motor into base unit. 2. Place blender on a flat, clean and dry surface. 3. Make sure a plug outlet is available within four feet - Blendtec Professional Series | Owners Manual - Page 10
FIGURE 3 - Above-Counter Dimensions 16 1/8" 6 3/8" 8 1/4" CN-7 - Blendtec Professional Series | Owners Manual - Page 11
always recommended to consult with a professional before cutting. Installation In Counter 1. Ensure that an electrical receptacle is readily accessible when you locate the equipment. 2. Slide the blender base into the hole cut in your counter top (per instructions above) with the LCD indicator and - Blendtec Professional Series | Owners Manual - Page 12
FIGURE 4 - In-Counter Installation CN-9 - Blendtec Professional Series | Owners Manual - Page 13
. 5.2 LONG-TERM SANITATION 1. For long-term sanitation, occasionally fill the blender jar half way with hot water. 2. Add one teaspoon of liquid chlorine Stir for 10 seconds to mix water and bleach. Let mixture stand in blender jar for five minutes. 4. Empty water/bleach mixture and rinse the jar - Blendtec Professional Series | Owners Manual - Page 14
may press any button on the lower row to stop the cycle. 4. When cycle is complete, remove the blender jar and serve. 6.2 AUTOMATIC CYCLE OPERATION The Blendtec Connoisseur has blending cycles for ice cream, frozen yogurt, ice crushing, milkshakes, soups, syrups, fondues, sauces, dips, dressings - Blendtec Professional Series | Owners Manual - Page 15
SECTION 7 TROUBLESHOOTING 7.1 BLENDER MOTOR WILL NOT TURN ON If the blender motor will not turn on, try the Check the blender jar for blockage. If overload condition re-occurs, contact your Blendtec service agent. • Blade stops: If the overload switch stops the blender, remove the blender jar and - Blendtec Professional Series | Owners Manual - Page 16
in which the blender blade spins freely in an air pocket within the drink mix because the mix is too cold or too solid. This problem can be preceding suggestions work, contact your Blendtec service agent for further assistance. INSTRUCTIONS THAT APPEAR IN THIS USER GUIDE ARE NOT MEANT TO COVER - Blendtec Professional Series | Owners Manual - Page 17
quality of Blendtec blenders are unsurpassed. You will enjoy years of wonderful and reliable service from your Blendtec Connoisseur. Blendtec home 1206 South 1680 West Orem, UT 84058 Toll Free: (800) 253-6383 Local: (801) 222-0888 FOR QUESTIONS REGARDING THIS WARRANTY CONTACT CUSTOMER SERVICE AT (800 - Blendtec Professional Series | Owners Manual - Page 18
immediately to diagnose the difficulty. Please have blender serial number ready as well as a description of the problem. Do not attempt to do your own repairs. Repairs made by persons other than Blendtec authorized service representatives will void the warranty. Many issues can be resolved simply - Blendtec Professional Series | Owners Manual - Page 19
- Blendtec Professional Series | Owners Manual - Page 20
1206 South 1680 West Orem, UT 84058 801-222-0888 blendtechome.com ©2007 K-TEC, Inc., All Rights Reserved Blendtec is a registered trademark of K-TEC, Inc. OWN-RE-028 Manual, Connoisseur Rev 03 July 07
-
 1
1 -
 2
2 -
 3
3 -
 4
4 -
 5
5 -
 6
6 -
 7
7 -
8
-
9
-
10
-
11
-
12
-
13
-
14
-
15
-
16
-
17
-
18
-
19
-
20
 |
 |
Owner’s Manual and User Guide
®
Connoisseur