Bosch 16176 Operating Instructions - Page 21
Caution - base base plate
 |
UPC - 000346311600
View all Bosch 16176 manuals
Add to My Manuals
Save this manual to your list of manuals |
Page 21 highlights
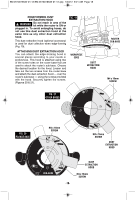
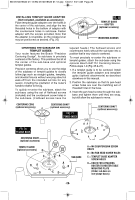
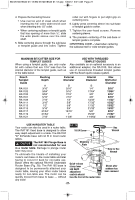
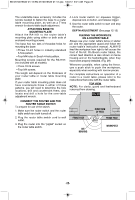
BM 2610018532 01-12:BM 2610018532 01-12.qxp 1/23/12 9:21 AM Page 21 4. Prepare the Centering Device: • Use narrow end of steel shaft when inserting into 1/4" collet, wider end of cone when inserting into 1/2" collet. • When centering subbase or templet guide that has opening of more than ½", slide the wide plastic sleeve over the steel shaft. 5. Slide centering sleeve through the sub-base or templet guide and into collet. Tighten collet nut with fingers to put slight grip on centering cone. 6. Lightly press centering sleeve into sub-base or templet guide to center. 7. Tighten the pan-head screws. Remove centering sleeve. 8. The precision centering of the sub-base or templet guide is complete. CENTERING CONE - Used when centering the subbase itself or wide templet guides. MAXIMUM BIT/CUTTER SIZE FOR TEMPLET GUIDES When using a templet guide, use only router bit with cutters that are 1/16" less than the internal diameter of the templet guide, such as in the table below. USE WITH THREADED TEMPLET GUIDES Also available as an optional accessory is an additional adapter, the RA1100, that allows use of conventional threaded templet guides with the Bosch quick-release system. Bosch Templet Guide RA1101 RA1103 RA1105 RA1107 RA1109 RA1111 RA1113 RA1115 RA1117 RA1119 RA1121 Bushing Depth A 3/16" 9/64" 9/64" 5/16" 7/16" 3/16" 1/2" 3/16" 31/64" 31/64" 7/16" External Diameter B 5/16" 5/16" 7/16" 7/16" 1/2" 5/8" 5/8" 3/4" 13/16" 1" 1-3/8" Internal Diameter B 1/4" 17/64" 3/8" 3/8" 13/32" 17/32" 17/32" 21/32" 5/8" 25/32" 1-19/64" Max Bit/Cutter Diameter 3/16" 13/64" 5/16" 5/16" 11/32" 15/32" 15/32" 19/32" 9/16" 21/32" 1-15/64" USE IN ROUTER TABLE Your router can also be used in a router table. The RA1161 fixed base is designed to allow easy depth adjustment in a table. The RA1162 "D" D-Handle base will not fit in most router tables. FIG. 28 10-24 Screw ! CAUTION The RA1166 Plunge Base is not recommended for use in a router table. Damage to plunge router base may occur. Mounting Plate To eliminate the hassle of installing your router's own base on the router table and later having to convert it back for non-table use, Bosch offers the optional RA1165 Undertable Router Base (Fig. 28). The RA1165 base is designed to be permanently attached your router table, leaving your other router bases ready for non-table use. The motor can be quickly moved from base to base - without any tools! Quick-release clamp lever and depth adjustment controls should face the front of the router table -21- Hex Wrench Hole for Hex Wrench Shown after subbase has been removed
-
 1
1 -
2
-
3
-
4
-
5
-
6
-
7
-
8
-
9
-
10
-
11
-
12
-
13
-
14
-
15
-
 16
16 -
 17
17 -
 18
18 -
 19
19 -
 20
20 -
 21
21 -
 22
22 -
 23
23 -
 24
24 -
 25
25 -
 26
26 -
27
-
28
-
29
-
30
-
31
-
32
-
33
-
34
-
35
-
36
-
37
-
38
-
39
-
40
-
41
-
42
-
43
-
44
-
45
-
46
-
47
-
48
-
49
-
50
-
51
-
52
-
53
-
54
-
55
-
56
-
57
-
58
-
59
-
60
-
61
-
62
-
63
-
64
-
65
-
66
-
67
-
68
-
69
-
70
-
71
-
72
 |
 |
