Bosch DHR-1600A-150A Quick Installation Guide - Page 3
Quick Install - alternator
 |
View all Bosch DHR-1600A-150A manuals
Add to My Manuals
Save this manual to your list of manuals |
Page 3 highlights
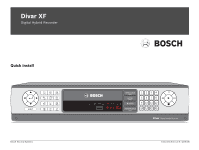
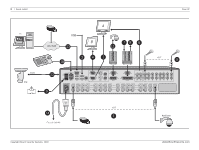
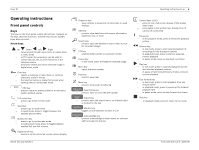
Divar XF Quick Install | en 3 Quick Install To get the unit quickly operational, make the connections described below and then enter the relevant data in the Quick Install menu. The Quick Install menu appears the first time the unit is started. When the relevant information is entered, the unit will be operational. Connections Primary connections 1. Connect the cameras to the BNC camera inputs (automatically terminated). 2. Connect monitor A to the BNC, Y/C, or VGA (supporting 1280x1024) output MON A. 3. Connect (supplied) USB mouse to a USB port. Optional connections 4. Connect monitor B to the BNC, Y/C, or VGA (supporting 1024x768) output MON B. 5. Connect up to 16 audio signals to the RCA audio inputs. 6. Connect the RCA audio output(s) to the monitor or an audio amplifier. 7. Connect up to 16 (alarm) inputs (via the supplied 25-pin D-type connector board). 8. Connect up to 4 alarm output relays (via the supplied 25- pin D-type connector board). 9. Connect the malfunction output (via the supplied screw terminal adapter). 10. Connect an Intuikey keyboard to the KBD In socket and connect the terminator (supplied with the keyboard) to the KBD Out socket. 11. Connect a Bosch pan/tilt/zoom control unit to the Biphase port (via the supplied 15-pole D-type connector board). 12. Connect a third-party pan/tilt/zoom control unit to the RS485 port (via the supplied screw terminal adapter). 13. Connect to your network via the Ethernet port. Powering up Switch on all connected equipment. 14. Connect the power cord to the unit. First-time use The unit starts with a multiscreen display. The Quick Install menu opens the first time the unit is used. Fill in the basic settings in the four tabs to get the unit operational. The unit begins recording automatically when the Quick Install menu is closed. Navigating Use the supplied USB mouse. Alternatively, use the following front panel keys: - Use the enter button to select a submenu or item. - Use the arrow move through a menu or list. buttons to - Use the escape switch off the menu. button to go back or to Quick Install menu The Quick Install menu contains four tabs: International, Schedule, Recording, and Network. Navigate through these tabs using Back and Next. Click Undo to cancel changes made in the active tab. Click Close to exit the Quick Install menu. Changing Quick Install settings overwrites customized settings. International Language Select the language for the menu from the list. Time Zone Select a time zone from the list. Time format Select either a 12 or a 24 hour clock format. Time Fill in the current time. Date format Select from three date formats which show either the month (MM), the day (DD), or the year (YYYY) first. Date Fill in the current date. Schedule A graphical representation of the currently active weekly schedule is shown. Each color represents one of the four available profiles: - Yellow - Profile 1 - Blue - Profile 2 - Green - Profile 3 - Pink - Profile 4 - Light blue - Profile 5 - Brown - Profile 6 Click Overwrite to start making changes. - Select at which day the week should start and end. - Select at which time the day begins and ends on weekdays. - Select at which time the day begins and ends on weekends. The graphical representation is automatically updated when settings are changed. Recording Set the Normal recording Resolution, Quality, and Frame rate for each profile in the table. Set the Alarm and Motion recording Resolution, Quality, and Frame rate. These settings are generic for all four profiles. In case of previously made advanced settings, click Overwrite to replace them with Quick install settings. Network DVR name Enter a DVR name to be used in the network. DHCP Enable DHCP to have IP address, subnet mask, and default gateway assigned automatically by the network server. The actual values are displayed. IP address, Subnet mask, Default gateway, and DNS server Fill in the IP, subnet mask, default gateway, and DNS server addresses when DHCP is disabled. Bandwidth limit Restrict the network bandwidth by entering a value between 0.1 and 100 Mbps for the bandwidth limit. MAC address The MAC address is read only. Bosch Security Systems F.01U.135.430 | v2.5 | 2009.08
-
 1
1 -
 2
2 -
 3
3 -
 4
4
 |
 |
