Bosch NIT3065UC Installation Instructions - Page 9
Installation, procedure
 |
View all Bosch NIT3065UC manuals
Add to My Manuals
Save this manual to your list of manuals |
Page 9 highlights
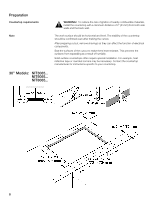
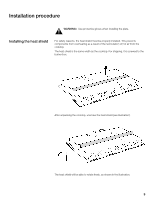
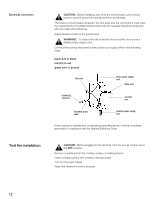
Installation procedure Installing the heat shield ř WARNING:ĄUse protective gloves when installing the plate. For safety reasons, the heat shield must be properly installed. This prevents components from overheating as a result of the recirculation of hot air from the cooktop. The heat shield is the same width as the cooktop. For shipping, it is screwed to the burner box. After unpacking the cooktop, unscrew the heat shield (see illustration). The heat shield will be able to rotate freely, as shown in the illustration. 9
-
 1
1 -
2
-
3
-
 4
4 -
 5
5 -
 6
6 -
 7
7 -
 8
8 -
 9
9 -
 10
10 -
 11
11 -
 12
12 -
 13
13 -
 14
14 -
15
-
16
-
17
-
18
-
19
-
20
-
21
-
22
-
23
-
24
-
25
-
26
-
27
-
28
-
29
-
30
-
31
-
32
-
33
-
34
-
35
-
36
 |
 |

9
Installation
procedure
WARNING
:
Ą
Use
protective
gloves
when
installing
the
plate.
For
safety
reasons,
the
heat
shield
must
be
properly
installed.
This
prevents
components
from
overheating
as
a
result
of
the
recirculation
of
hot
air
from
the
cooktop.
The
heat
shield
is
the
same
width
as
the
cooktop.
For
shipping,
it
is
screwed
to
the
burner
box.
After
unpacking
the
cooktop,
unscrew
the
heat
shield
(see
illustration).
The
heat
shield
will
be
able
to
rotate
freely,
as
shown
in
the
illustration.
ř
Installing
the
heat
shield