Bosch SHP7PT55UC Installation Instructions - Page 28
Slide metal toe panel
 |
View all Bosch SHP7PT55UC manuals
Add to My Manuals
Save this manual to your list of manuals |
Page 28 highlights
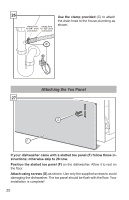
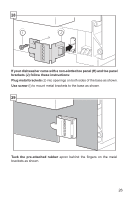
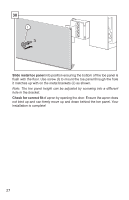
30 I Slide metal toe panel into position ensuring the bottom of the toe panel is flush with the floor. Use screw (I) to mount the toe panel through the hole it matches up with on the metal brackets (J) as shown. Note: The toe panel height can be adjusted by screwing into a different hole in the bracket. Check for correct fit of apron by opening the door. Ensure the apron does not bind up and can freely move up and down behind the toe panel. Your installation is complete! 27
-
 1
1 -
2
-
3
-
4
-
5
-
6
-
7
-
8
-
9
-
10
-
11
-
12
-
13
-
14
-
15
-
16
-
17
-
18
-
19
-
20
-
21
-
22
-
 23
23 -
 24
24 -
 25
25 -
 26
26 -
 27
27 -
 28
28 -
 29
29 -
 30
30 -
 31
31 -
 32
32 -
 33
33 -
34
-
35
-
36
-
37
-
38
-
39
-
40
-
41
-
42
-
43
-
44
-
45
-
46
-
47
-
48
-
49
-
50
-
51
-
52
-
53
-
54
-
55
-
56
-
57
-
58
-
59
-
60
-
61
-
62
-
63
-
64
-
65
-
66
-
67
-
68
-
69
-
70
-
71
-
72
-
73
-
74
-
75
-
76
-
77
-
78
-
79
-
80
-
81
-
82
-
83
-
84
-
85
-
86
-
87
-
88
 |
 |

27
Slide metal toe panel
into position ensuring the bottom of the toe panel is
flush with the floor. Use screw (I) to mount the toe panel through the hole
it matches up with on the metal brackets (J) as shown.
Note: The toe panel height can be adjusted by screwing into a different
hole in the bracket.
Check for correct fit
of apron by opening the door. Ensure the apron does
not bind up and can freely move up and down behind the toe panel. Your
installation is complete!
30
I