Bosch WFMC5801UC Operating, Care, Installation - Page 9
Caution, Notice
 |
View all Bosch WFMC5801UC manuals
Add to My Manuals
Save this manual to your list of manuals |
Page 9 highlights
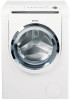
Supply Line Connection C Cold water connection and H Hot water connection (max. 140 °F / 60 °C) q Plastic threads must only be tightened by hand when connecting the water supply hoses to the back of the unit. Do not remove the strainers from the water supply hoses. In-Wall Installation min.0,4'' (10 mm) 1. Place the hose clamp over the end of the drain hose before attaching the drain hose to the appliance. q Use the elbow. Attach the elbow to the end of the hose and insert the end of the hose into the wall drain approximately four inches. q The hose and elbow should extend into the open drain pipe as far as the elbow allows when seated as shown in the above picture. q Use a strap or cable tie to hold hose in place. Drainage into a siphon q After connecting, turn on the water completely, and check that connection points are watertight. d CAUTION The connection points are under full water pressure. Check seal with tap fully open. Water drainage NOTICE Do not bend or pull the water drainage hose. Height difference between the installation location of the washing machine and the drainage point: Maximum 8 feet / 244 cm, minimum 2 feet / 60 cm. Connecting the water drainage hose q Do not remove the screw from the clamp assembly. Loosen the screw only enough so that the clamp will slide freely onto the water drain hose. 2. Attach the drain hose to the drain hose connection on the back of the appliance; position the hose clamp approximately 3/8 inch (9 mm) from the end of the hose. 3. tighten the clamp with a screwdriver Standpipe Installation q Use the elbow. Attach the elbow to the end of the hose and insert end of hose into standpipe. q Use a strap or cable tie to hold hose in place. q Secure the connection point with a hose clip(not included in factory-supplied equipment). Drainage into a sink NOTICE Ensure that the plug is not in the drain hole. q Attach water drain hose securely to sink. 9
-
 1
1 -
2
-
3
-
 4
4 -
 5
5 -
 6
6 -
 7
7 -
 8
8 -
 9
9 -
 10
10 -
 11
11 -
 12
12 -
 13
13 -
 14
14 -
15
-
16
-
17
-
18
-
19
-
20
-
21
-
22
-
23
-
24
-
25
-
26
-
27
-
28
-
29
-
30
-
31
-
32
-
33
-
34
-
35
-
36
-
37
-
38
-
39
-
40
-
41
-
42
-
43
-
44
-
45
-
46
-
47
-
48
-
49
-
50
-
51
-
52
-
53
-
54
-
55
-
56
-
57
-
58
-
59
-
60
-
61
-
62
-
63
-
64
-
65
-
66
-
67
-
68
-
69
-
70
-
71
-
72
-
73
-
74
-
75
-
76
-
77
-
78
-
79
-
80
-
81
-
82
-
83
-
84
-
85
-
86
-
87
-
88
-
89
-
90
-
91
-
92
-
93
-
94
-
95
-
96
 |
 |
