Bose 4001 Owner's guide - Page 7
Check, connections
 |
View all Bose 4001 manuals
Add to My Manuals
Save this manual to your list of manuals |
Page 7 highlights
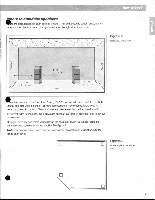
• Back of Right Speaker Back of Left Speaker Figure 4 Completed speaker connections is r,41 - + -+ Stereo Amplifier or Receiver - + - Right Output Left Output Black Red Check the connections Make sure that no loose strands of wire touch across terminals. Bridged wires can short circuit and damage the speakers or components. Tighten any loose connections before you plug in the receiver or amplifier and turn it on. Test the connections To make sure your speakers operate correctly: 1. Set your receiver or amplifier for MONO (monophonic) and turn it on. 2. Set the balance control to normal (center position). 3. Place the speakers less than 6 inches (15 cm) apart, facing each other. 4. Play some deep bass passages of music through the speakers. The sound should seem to come from a point between the two speakers. The bass should be full and natural. If it is not, your connections may be out of phase. To correct the problem, reverse the connections on the back of one speaker. Then repeat steps 1 - 4 above. S 7
-
 1
1 -
 2
2 -
 3
3 -
 4
4 -
 5
5 -
 6
6 -
 7
7 -
 8
8 -
 9
9 -
 10
10 -
 11
11
 |
 |
