Bose Acoustimass 3 Series II Owner's guide - Page 3
Acoustimass`-3
 |
View all Bose Acoustimass 3 Series II manuals
Add to My Manuals
Save this manual to your list of manuals |
Page 3 highlights
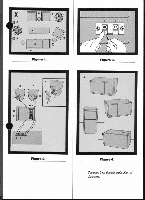
Diagrams and Illustrations for the Acoustimass -3 System Figure 1 Place the left and right cube speakers, respectively, on the left and right sides of the room. The Acoustimass module can go almost anywhere- behind or under furniture, near a wall, or in the middle of the room. A corner location (see large X), recommended for most situations, will typically provide the greatest bass output. A LeIt Cube Speaker B Right Cube Speaker Figure 2 Wiring diagram for the Acoustimass-3 system. Conned the right and left speaker terminals to the right and left terminals on the rear of the Acoustimass module marked "OUTPUTS TO CUBE SPEAKERS' Connect the right and left channel terminals on the Acoustimass module marked 'INPUTS FROM AMP OR RECEIVER' to the right and left speaker output terminals on the amplifier or receiver. A Insert thumbnail and gently pull back, being careful not to scratch frisk B Lett Cube Speaker C Righl Cube Speaker 0 Output to Cube Sneaky E Input from Amplifier or Receiver F Output from AmpWier or Receive( Figure 3 To connect cables to the cube speakers and the Acoustimass module, press the tabs on the back of each component, insert a corresponding negative or positive lead, and release the tab to secure the lead in place. A Red B Black Figure 4 You can put the Acoustimass module in any position as long as you leave at least 2 inches of space in front of the two slotted openings on its end. A Various posrions of the Acoustimass Bass Module. 2 The Bose Acoustimass -3 Series II Speaker System Owner's Guide We at Bose would like to thank you for purchasing the Acoustimass`-3 Series II speaker system, the world's smallest speaker system delivering pure sound and virtual invisibility. The advanced technology and quality construction of this music system will provide you with years of listening pleasure. You'll also find that the virtual invisibility of its components will give you almost unlimited flexibility in how-and where-you can set it up. Because the Acoustimass-3 speaker system is significantly different from conventional systems, both in the way it operates and the way you set it up. we recommend that you read this owner's guide. The first section gives you step-by-step instructions on how to connect your system to your stereo so that you can begin to enjoy it as soon as possible. We've also included some more detailed information and suggestions on arranging your system's components and on using your system to help you get the best quality performance possible. Everything you need to hook up your Acoustimass-3 system is contained in its shipping cartons. Your system consists of: • -2 cube speakers, one left (an and one right ("R"); see Figure 1 -1Acoustimass module -4 cables (one pair for connecting the cube speakers to the Acoustimass module, one pair for connecting the Acoustimass module to your receiver or amplifier) Be sure to save all the cartons and packing material in case you need to transport your system at any time. If any components appear damaged when you unpack them, do not attempt to use the system. Instead, repack the system in its original cartons and notify your authorized Bose dealer immediately.
-
 1
1 -
 2
2 -
 3
3 -
 4
4 -
 5
5 -
 6
6 -
 7
7 -
 8
8 -
 9
9
 |
 |
