Bose Acoustimass 3 Series II Owner's guide - Page 4
connecting
 |
View all Bose Acoustimass 3 Series II manuals
Add to My Manuals
Save this manual to your list of manuals |
Page 4 highlights
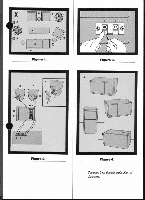
Superb Sound in Five Easy Steps 4IPrAUTION: Unplug your receiver or amplifier om the wall outlet before connecting your Acoustimass -3 system. Set up the components (Figure 1). Check the letter on the bottom of each cube speaker, then place the left (11") speaker on the left side of the room, the right ("R") speaker on the right side, and the Acoustimass module wherever you want it (just leave at least 2 inches of space in front of the two slotted openings on its end). Be sure that the supplied 20-toot cables will reach from the speakers to the AcoustimasS module. (You may increase the distance between the cube speakers and the Acoustimass module by using a longer wire of the same or greater gauge, connecting them positive to positive, negative to negative.) 2 Examine the cables and connections. Al the end of each of the supplied cables are two leads, one marked with a gray stripe or a red collar, and the other one plain. The plain lead is always negative (-), and the striped or red one is always positive (+). These correspond to the negative (plain) and positive (red) terminals on the backs Alit the speakers and the Acoustimass module. Wlways connect the leads to their corresponding terminals (negative to negative, positive to psilive). To do so, simply press the black ("-") tab, insert the plain lead, and release the tab to secure the lead in place. Insert the gray striped or red lead into the red ("+") tab (Figure 3). 3 m Connect the cube speakers to the C Acoustimass module (Figure 2). '07 a. Using the thumbnail recesses, remove the plastic covers on the back of the cube speakers (Figure 2). b. Connect one end of the first cable to the terminals on the rear of the left speaker and the other end to the left ("1") terminals on the rear of the Acoustimass module marked 'OUTPUTS TO CUBE SPEAKERS7 Take another cable and connect the right speaker to the right module outputs in the same way. Replace the plastic covers on the back of the cube speakers. 4 Connect the Acoustimass module to your amplifier or receiver (Figure 2). a. Connect the third cable between the left channel terminals on the Acoustimass module marked "INPUTS FROM AMP OR RECEIVER" and the left ("L") speaker output terminals on your amplifier or receiver. Repeat for the right channel, using the fourth cable. b. Check all your connections to make sure they are wired positive to positive ( + to +), negative to negative (- to -). The speakers will produce little or no bass if they are wired incorrectly. Also, check to make sure that no strands of wire from any terminal are brushing against any other terminal. Such "bridged" wires create short circuits that can damage your receiver or amplifier. 5 Enjoy! Plug in your receiver, turn on your system, and enjoy your music!
-
 1
1 -
 2
2 -
 3
3 -
 4
4 -
 5
5 -
 6
6 -
 7
7 -
 8
8 -
 9
9
 |
 |
