Bose FreeSpace 360P Owner's guide - Page 6
Making, the connections, Preparing, speaker, provided, Connecting, speakers, receiver
 |
View all Bose FreeSpace 360P manuals
Add to My Manuals
Save this manual to your list of manuals |
Page 6 highlights
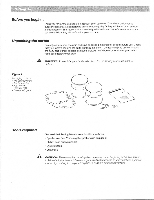
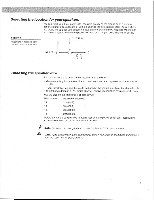
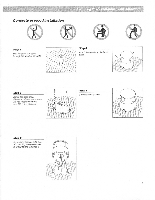
Making the connections Preparing the speaker wire (not provided) Speaker wire consists of two insulated wires. The insulation around one wire is striped, collared, or ribbed. This marked wire is positive (+). The plain wire is negative (-). These correspond to the red (+) and black (-) terminals on the back of the speaker, receiver, or amplifier. Be sure to connect each wire to the proper terminal (positive to positive, negative to negative). Figure 3 Preparing the ends ofeach wire no (1 3 cm) At the ends of each cord, strip approximately V2 inch (1.3 cm) of insulation from both wires (Figure 3). Next, twist the ends of each wire so there are no loose strands. Connecting the speaker wire to the speakers 1. Connect the positive (marked) speaker wire to the red wire from the 360P cable. Twist the stripped ends of the wire together. 2. Secure the wire nut by using a twisting motion. If you prefer to reinforce the wire nuts, use electrical tape or a silicon sealer. 3. Connect the negative wire in the same manner as in steps 1 and 2 above. Connecting the speaker wire to the receiver or amplif►er 1. Connect the speakers on the left side of the listening area to the left channel of your receiver or amplifier (Figure 4). a. Attach the marked wire to the red (+) terminal. b. Attach the plain wire to the black (-) terminal. 2. Connect the speaker on the right side of the listening area to the right channel of your receiver or amplifier, in the same manner as in step 1 above. Note:Ifyour 360Pspeakers are being connected as a secondary set ofspeakers to your receiver or amplifier, be sure to make the appropriate connections to the "B"channel. Figure 4 Connecting the speaker wire at the amplifier 6
-
 1
1 -
 2
2 -
 3
3 -
 4
4 -
 5
5 -
 6
6 -
 7
7 -
 8
8 -
 9
9 -
 10
10 -
 11
11
 |
 |
