Bose Lifestyle 25 Owner's guide - Page 27
Changing the house code settings
 |
View all Bose Lifestyle 25 manuals
Add to My Manuals
Save this manual to your list of manuals |
Page 27 highlights
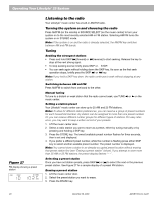
Maintaining Your Lifestyle® 25 System Figure 32 Miniature switches for setting house codes and zones Changing the house code settings Each Lifestyle® remote control uses a system of matching house codes to communicate with its corresponding music center. If your remote's commands ever conflict with those of another nearby Lifestyle® system, you can easily set a new house code for your system and its remote control(s) by following the procedures below. 1. Open the remote control battery cover and locate the miniature switches (Figure 32). 2. To create a new code, change the position of any of switches 1, 2, 3, or 4 by moving them in the opposite direction from their current settings. Use a paper clip, ball point pen, or similar object. Note: Do not change switches 5, 6, or 7 at this time. The manufacturer's standard setting is switch 5 up and switches 6 and 7 down. 3. Replace the battery cover. House code switches ON K40 l 2345678 Figure 33 Display confirming an example of house code setting (switch 1 up, switches 2, 3, and 4 down) 4. Lift the music center door. 5. Turn both zones off. 6. Press and hold the STORE key. The display will begin to flash PROGRAM. 7. While you hold the STORE key and the display is flashing, press any key on the remote control. • The display stops flashing and momentarily shows PROGRAM to confirm recognition of a new house code. • The display verifies the house code by lighting four rectangles corresponding to the four switch positions (up or down). See the example in Figure 33. 8. Release the STORE key. The system remains off. 9. If you have additional remote controls, change the switches to match those of the first remote control. It is not necessary to repeat steps 4-8. Note: To verify your system's house code, press STORE while the system is off. The display confirms the settings of switches 1-4. AM187718_01_V.pdf December 20, 2001 25
-
 1
1 -
2
-
3
-
4
-
5
-
6
-
7
-
8
-
9
-
10
-
11
-
12
-
13
-
14
-
15
-
16
-
17
-
18
-
19
-
20
-
21
-
 22
22 -
 23
23 -
 24
24 -
 25
25 -
 26
26 -
 27
27 -
 28
28 -
 29
29 -
 30
30 -
 31
31 -
 32
32 -
33
-
34
 |
 |
