Bowflex Ultimate 2 Accessory Pack Assembly Manual
Bowflex Ultimate 2 Accessory Pack Manual
 |
View all Bowflex Ultimate 2 Accessory Pack manuals
Add to My Manuals
Save this manual to your list of manuals |
Bowflex Ultimate 2 Accessory Pack manual content summary:
- Bowflex Ultimate 2 Accessory Pack | Assembly Manual - Page 1
P/N 001-6930 RevB (07/2006) Accessory Rack Assembly Instructions - Bowflex Ultimate 2 Accessory Pack | Assembly Manual - Page 2
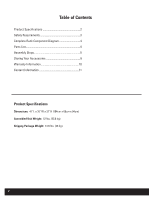
Specifications 2 Safety Requirements 3 Complete Rack Component Diagram 4 Parts List 4 Assembly Steps 5 Storing Your Accessories 9 Warranty Information 10 Contact Information 11 Product Specifications Dimensions: 41" L x 26" W x 37" H (104cm x 66cm x 94cm) Assembled Unit Weight: 52 lbs. (23 - Bowflex Ultimate 2 Accessory Pack | Assembly Manual - Page 3
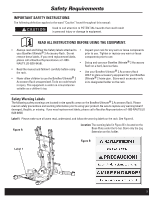
personal injury or damage to equipment. READ ALL INSTRUCTIONS BEFORE USING THE EQUIPMENT. • Always read and follow the Safety labels attached to • Inspect your rack for any worn or loose components your Bowflex Ultimate® 2 Accessory Rack . Do not prior to use. Tighten or replace any worn or loose - Bowflex Ultimate 2 Accessory Pack | Assembly Manual - Page 4
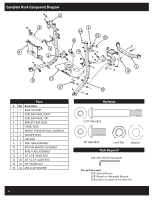
Parts # Qty. Description 1 1 BASE SUPPORT 2 1 CURL BAR HOOK, RIGHT 3 1 CURL BAR HOOK, LEFT 4 2 BRACKET, BAR HOOK 5 1 TOWEL RACK 6 1 MOUNT, PREACHER CURL ASSEMBLY 7 4 WASHER HOOK 8 1 FLEX BAG 9 2 SIDE TUBE ASSEMBLY 10 1 BOTTOM BRACKET ASSEMBLY 11 1 BASE PLATE ASSEMBLY 12 2 3/8" X 7/8" ALLEN BOLT 13 - Bowflex Ultimate 2 Accessory Pack | Assembly Manual - Page 5
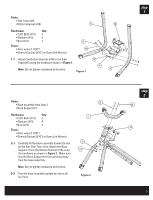
) 4 • Nuts (#14) 2 Tools: • Allen wrench (7/32") • Wrench/Socket (9/16") or Open End Wrench 2-1 Carefully tilt the base assembly forward to rest on the four Side Tube ends. Attach the Base Support (#1) to the Bottom Bracket (#12) using the hardware as shown in Figure 2. Make sure that the Base - Bowflex Ultimate 2 Accessory Pack | Assembly Manual - Page 6
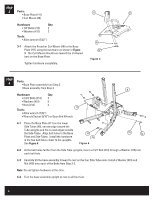
3-1 Attach the Preacher Curl Mount (#6) to the Base Plate (#11) using the hardware as shown in Figure 3. The Curl Mount should lean toward 13) through a Washer (#15) into each bolt hole. 4-3 Carefully tilt the base assembly forward to rest on the four Side Tube ends. Install a Washer (#19) and - Bowflex Ultimate 2 Accessory Pack | Assembly Manual - Page 7
Washer Hook (#7) using the hardware shown in Figure 5. Make sure the Bar Hook Brackets are pointing the same direction as the Curl Bar Hooks. Tighten hardware completely. Note: There is no washer where the Bolt (#13) is inserted through the Washer Hook. Parts: • Rack assembly from Step 5 • Towel - Bowflex Ultimate 2 Accessory Pack | Assembly Manual - Page 8
• Rack assembly from Step 6 • Flex Bag (#8) • Color-coded Dots (6 pairs) 7-1 Fasten the Flex Bag (#8) to the Side Tube uprights below the Curl Bars, using the hook-and-loop straps. See Figure 7. 7-2 The pairs of colored dots will identify the storage locations for the Bowflex Ultimate® 2 accessory - Bowflex Ultimate 2 Accessory Pack | Assembly Manual - Page 9
Your Bowflex Ultimate® 2 Accessory Rack is now complete. You are ready to store your equipment. 9 - Bowflex Ultimate 2 Accessory Pack | Assembly Manual - Page 10
assembly, improper maintenance, Acts of God (such as floods or power surges), or failure to follow instructions or warnings in Owner's Manual. 4. Use exercise product(s), which require warranty service, or to apply a limited credit reimbursement toward another Bowflex® exercise product of equal or - Bowflex Ultimate 2 Accessory Pack | Assembly Manual - Page 11
If you need assistance, please have both the serial number of your rack and the date of purchase available when you contact the appropriate Nautilus, Inc. office listed below. WORLDWIDE CUSTOMER SERVICE • NORTH AMERICA OFFICE Nautilus, Inc. World Headquarters 16400 S.E. Nautilus Drive Vancouver - Bowflex Ultimate 2 Accessory Pack | Assembly Manual - Page 12
Nautilus Dr. Vancouver, Washington, USA 98683 1-800-NAUTILUS (800-628-8458) www.nautilus.com © 2006 Nautilus, Inc. All Rights Reserved. Bowflex, the Bowflex logo and Bowflex Ultimate are either registered trademarks or trademarks of Nautilus, Inc. Specifications subject to change. Printed in China
-
 1
1 -
 2
2 -
 3
3 -
 4
4 -
 5
5 -
 6
6 -
 7
7 -
8
-
9
-
10
-
11
-
12
 |
 |
Accessory Rack
Assembly Instructions
P/N 001-6930 RevB (07/2006)