Bowflex Ultimate 2 Accessory Pack Assembly Manual - Page 7
Parts, Hardware Qty, Tools, Hardware
 |
View all Bowflex Ultimate 2 Accessory Pack manuals
Add to My Manuals
Save this manual to your list of manuals |
Page 7 highlights
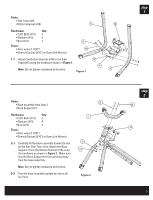
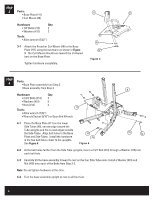
Parts: • Rack base assembly from Step 4 • Right Curl Bar Hook (#2) • Left Curl Bar Hook (#3) • Bar Hook Brackets (#4) • Washer Hooks (#7) Hardware Qty • 2 3/4" Bolts (#13) 8 • Washers (#15) 14 • Nuts (#14) 8 Tools: • Allen wrench (7/32") • Wrench/Socket (9/16") or Open End Wrench �� � � � � Figure 5 step �� 5 � � � � (Left Tube - Front View) 5-1 Install the Left Curl Bar Hook (#3) at the two top, outside bolt holes on the left Side Tube (#9) using the hardware shown in Figure 5. Make sure that the Curl Bar Hook curves inward, around the Side Tube, and the hook points toward the Base Plate. Tighten hardware completely. 5-2 Install the Right Curl Bar Hook (#2) to the right Side Tube as described above. 5-3 At the two lowest bolt holes on each Side Tube upright, install a Bar Hook Bracket (#4) and Washer Hook (#7) using the hardware shown in Figure 5. Make sure the Bar Hook Brackets are pointing the same direction as the Curl Bar Hooks. Tighten hardware completely. Note: There is no washer where the Bolt (#13) is inserted through the Washer Hook. Parts: • Rack assembly from Step 5 • Towel Rack (#5) • Washer Hooks (#7) Hardware Qty • 2 3/4" Bolts (#13) 2 • Washers (#15) 2 • Nuts (#14) 2 step 6 � � �� Tools: � • Allen wrench (7/32") • Wrench/Socket (9/16") or Open End Wrench � Figure 6 6-1 Attach the Towel Rack (#5) and one Washer Hook (#7) to the outside of each Side Tube (#9) above the Bar Hook Brackets (#4) using as the hardware shown in Figure 6. Make sure that the Towel Rack rod is toward the Base Plate. Note: There is no washer where the Bolt (#13) is inserted through the Washer Hook. 6-2 Completely tighten all hardware from Steps 1, 2, 4 and 6. (Hint: use the open end wrench to tighten the Nuts from Step 2 and 4-3.) Make sure the rack sits evenly on all four feet. You may need to loosen and retighten the hardware to adjust the unit. 7
-
 1
1 -
 2
2 -
 3
3 -
 4
4 -
 5
5 -
 6
6 -
 7
7 -
 8
8 -
 9
9 -
 10
10 -
 11
11 -
 12
12
 |
 |
