Brother International 5234PRW Users Manual - English and Spanish - Page 33
Introduction Of Optional Feet
 |
View all Brother International 5234PRW manuals
Add to My Manuals
Save this manual to your list of manuals |
Page 33 highlights
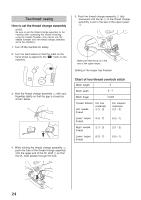
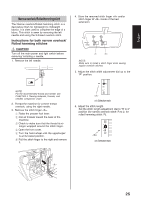
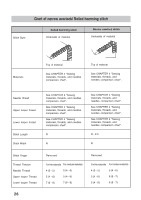
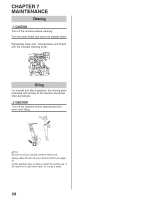
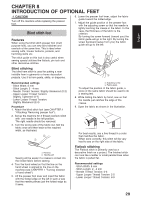
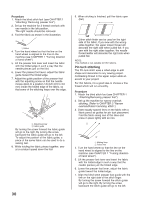
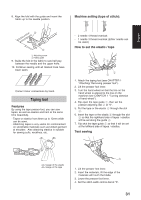
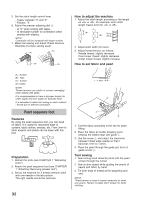
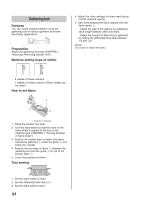
English CHAPTER 8 INTRODUCTION OF OPTIONAL FEET CAUTION Turn off the machine while replacing the presser foot. Blind stitch foot Features When using the blind stitch presser foot (multi purpose foot), you can sew blind stitches and overlock at the same time. This is ideal when sewing cuffs, trouser bottoms, pockets, and hemming skirts etc. The stitch guide on this foot is also useful when sewing special stitches like flatlock, pin tuck and other decorative stitches. 6. Lower the presser foot lever, adjust the fabric guide toward the folded edge. 7. Adjust the guide position of the presser foot with the adjusting screw so that the needle is lightly touching the crease in the fabric. In this case, the thickness of the fabric is the criterion. By turning the screw forward (toward you) the fabric guide will go to the right. By turning the screw backward (away from you) the fabric guide will go to the left. ! Blind stitching The blind hem stitch is used for putting a near invisible hem in garments or home decoration " projects. Use it to hem pants, skirts, or draperies. Recommended settings - Stitch Width: 5 mm - Stitch Length: 3 - 4 mm - Needle Thread Tension: Slightly Slackened (0-2) - Upper Looper Thread Tension: Slightly Tightened (5-7) - Lower Looper Thread Tension: Slightly Slackened (2-4) Procedure 1. Attach the blind stitch foot (see CHAPTER 1 "Attaching/ Removing presser foot"). 2. Set up the machine for 3 thread overlock stitch with one needle in the left position. The right needle should be removed. 3. Turn the wrong side of the fabric out, fold the fabric once and then back to the required width, as illustrated. 1 Reverse 2 Needle path Sewing will be easier if a crease is ironed into the folded fabric before sewing. 4. Turn the hand wheel so that the line on the hand wheel is aligned to the line on the machine (see CHAPTER 1 "Turning direction of hand wheel"). 5. Lift the presser foot lever and insert the fabric with the folded edge on the left in such a way that the needle pierces just the folded edge as it sews. 3 Adjusting screw 4 Fabric guide To adjust the position of the fabric guide, a piece of the same fabric should be used to do a sewing test. 8. While folding the fabric by hand, sew so that the needle just catches the edge of the crease. 9. Open the fabric as shown in the illustration. For best results, use a fine thread in a color that matches the fabric. When done correctly, this stitch will be very hard to see on the right side of the fabric. Flatlock stitching The Flatlock stitch is primarily used as a decorative finish on a project. The finished stitch can look like a ladder or small parallel lines when the fabric is pulled flat. Recommended settings - Stitch Width: 5 mm - Stitch Length: 2 - 4 mm - Needle Thread Tension: 0-3 - Upper Looper Thread Tension: 2-5 - Lower Looper Thread Tension: 6-9 29
-
 1
1 -
2
-
3
-
4
-
5
-
6
-
7
-
8
-
9
-
10
-
11
-
12
-
13
-
14
-
15
-
16
-
17
-
18
-
19
-
20
-
21
-
22
-
23
-
24
-
25
-
26
-
27
-
 28
28 -
 29
29 -
 30
30 -
 31
31 -
 32
32 -
 33
33 -
 34
34 -
 35
35 -
 36
36 -
 37
37 -
 38
38 -
39
-
40
-
41
-
42
-
43
-
44
-
45
-
46
-
47
-
48
-
49
-
50
-
51
-
52
-
53
-
54
-
55
-
56
-
57
-
58
-
59
-
60
-
61
-
62
-
63
-
64
-
65
-
66
-
67
-
68
-
69
-
70
-
71
-
72
-
73
-
74
-
75
-
76
-
77
-
78
-
79
-
80
 |
 |