Brother International BAS-300A Progammer Instruction Manual BAS-300A Series - - Page 16
create, circle
 |
View all Brother International BAS-300A manuals
Add to My Manuals
Save this manual to your list of manuals |
Page 16 highlights
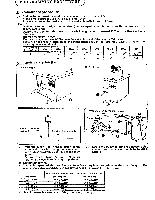
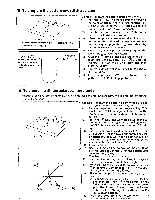
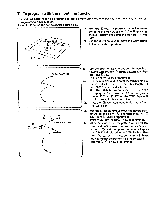
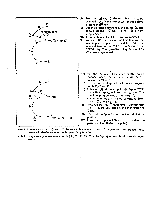
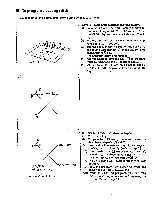
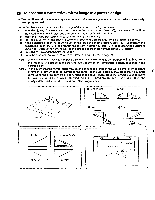
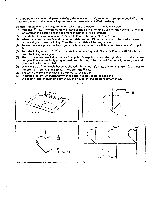
E To create a circle • Programming circles can be easily accomplished by using the smoothing function. Example: Program the pattern in the figure at left. For the procedure for smoothing, refer to steps (1) to (5) in "To program with the smoothing function" on page 7. (x-o • r -o) C• -030" -El "999"-O "789"-E1 (6) After programming point ®, use the direction keys to move the needle point to point ®, and then press the numeral keys so that "999" is displayed in the STEP display. Then press the key.Next, press the "789" keys and the E key. An electronic alarm will beep, indicating that the pattern is being processed. Semicircle ® - ® is now programmed. )K Programming can also be continued from point G. "111" •E "442"-(10 (7) From point ®, press the numeral keys so that "442" is displayed in the STEP display, and then press the key. (Refer to the Y-axis symmetry programming on page 13.) (8) The needle point will move slowly from point ® to point ®, and the left-side half of the pattern will be automatically programmed. At this time, the work clamp will be fast-forwarded if the presser-lifter pedal is depressed. (9) When the tip of the needle becomes aligned with point ®, press numeral key I 3 times so that "111" is displayed on the STEP display, and then press the t key. (10) Press the program R/W switch to write the pattern to disk. (Refer to page 24.) Caution : Unevenness in pitch may occur at the joins between the two semicircles. This can be remedied by converting the pitch setting to an enlarged or reduced setting. [Changing the Pitch] X Refer to "To Program Enlargement/Reduction Patterns" on page 22. (1) After "111" E in step (9), press the E key, and then program "888" C) "100" QF "100" CI to set an enlargement ratio of 100%. (2) Indicate the pitch on the STEP display. (For a pitch of 3 mm, the display should be "030".) (3) Press the C1 key to make the conversion.
-
 1
1 -
2
-
3
-
4
-
5
-
6
-
7
-
8
-
9
-
10
-
 11
11 -
 12
12 -
 13
13 -
 14
14 -
 15
15 -
 16
16 -
 17
17 -
 18
18 -
 19
19 -
 20
20 -
 21
21 -
22
-
23
-
24
-
25
-
26
-
27
-
28
-
29
-
30
-
31
-
32
-
33
-
34
-
35
-
36
-
37
-
38
-
39
-
40
-
41
-
42
 |
 |
