Brother International BE-1201B-AC Quick Reference Guide - English
Brother International BE-1201B-AC Manual
 |
View all Brother International BE-1201B-AC manuals
Add to My Manuals
Save this manual to your list of manuals |
Brother International BE-1201B-AC manual content summary:
- Brother International BE-1201B-AC | Quick Reference Guide - English - Page 1
into the disk drive Press the "Floppy Disk" button to enter machine memory selection screen . Press the "Floppy Disk" button to enter the "Confirm" button to verify the design will fit in the frame at the location you have chosen. Use the "Numeric Keypad" to assign a sewing speed by pressing a - Brother International BE-1201B-AC | Quick Reference Guide - English - Page 2
(5) times. Use the "Numeric Keypad" to select the number of the stitch you wish to move to. Press the "End" button to have the machine jump to that manually. Continue pressing button until desired needle is reached. MANUALLY TRIMMING THE THREAD Press the "Thread Trimming" button to have the machine
-
 1
1 -
 2
2
 |
 |
1
For Technical Assistance Please Call Toll Free
1-877-4BROTHER
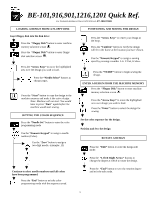
BE-101,916,901,1216,1201 Quick Ref.
LOADING A DESIGN FROM A FLOPPY DISK
SETTING THE COLOR SEQUENCE
Insert floppy disk into the disk drive
Press the
“Floppy Disk”
button to enter machine
memory selection screen
.
Press the
“Needle Select”
buttons to
change pages.
Press the
“Arrow Keys”
to move the highlighted
area over the design you wish to load.
Press the
“Start”
button to copy the design to the
machine memory and make it the active design.
Note: Machine will not start. You would
have to press “
Start
” again before the
machine would start sewing.
Press the
“Needle Set”
button to enter the color
programming mode
Use the “
Numeric Keypad
” to assign a needle
number (Color).
Use the “
Zero
” button to assign a
two-digit needle. (example:
12
)
Continue to select needle numbers until all colors
have been programmed.
Press the “
End
” button to exit the color-
programming mode with the sequence saved.
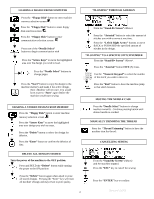
ENTER A DESIGN FROM THE MACHINE MEMORY
POSITIONING AND SEWING THE DESIGN
Press the
“Arrow Keys”
to move the highlighted
area over design you wish to load.
Press the
“Enter”
button to select the design for
sewing.
Set the color sequence for the design.
Position and Sew the design
Press the
“Arrow Keys”
to center your design in
the hoop.
Press the
“START”
button to begin sewing the
design.
Press the
“Confirm”
button to verify the design
will fit in the frame at the location you have chosen.
ROTATE A DESIGN
Press the
“Edit”
button to enter the design edit
mode.
Press the
“Left & Right Arrow”
buttons to
change the degree at which to rotate the design.
Press the
“End”
button to save the rotation degree
and exit the edit mode.
Press the
“Floppy Disk”
button to enter floppy
disk selection screen
.
Use the “
Numeric Keypad
” to assign a sewing
speed by pressing a number 1–6. 1=fast, 6=slow.
Press the
“Floppy Disk”
button to enter machine
memory selection screen
.