Brother International BE-1201B-AC Quick Reference Guide - English - Page 2
Floating To A Specific Stitch Number - manual
 |
View all Brother International BE-1201B-AC manuals
Add to My Manuals
Save this manual to your list of manuals |
Page 2 highlights
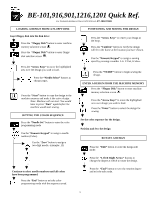
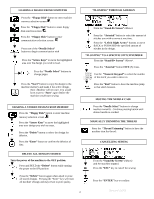
LOADING A DESIGN FROM COMPUTER Press the "Floppy Disk" button to enter machine memory selection screen . Press the "Floppy Disk" button to enter floppy disk selection screen . Press the "Floppy Disk" button to enter communication selection screen . Press one of the "Needle Select" buttons to begin communication with Press the "Arrow Keys" to move the highlighted area over the design you wish to load. Press the "Needle Select" buttons to change pages. Press the "Start" button to copy the design to the machine memory and make it the active design. Note: Machine will not start. You would have to press "Start" again before the machine would start sewing. ERASING A STORED DESIGN FROM MEMORY Press the "Floppy Disk" button to enter machine memory selection screen . Press the "Arrow Keys" to move the highlighted area over design you wish to erase. Press the "Delete" button to select the design for deletion. Press the "Enter" button to confirm the deletion of data. "FLOATING" THROUGH A DESIGN From the "Stand-By Screen" (Above). Press the "Asterisk" button to select the amount of stitches you wish to move at one time. Press the "Left & Right Arrow" buttons to move BACK or FORWARD the specified amount of stitches in the design. "FLOATING" TO A SPECIFIC STITCH NUMBER From the "Stand-By Screen" (Above). Press the "Asterisk" button FIVE (5) times. Use the "Numeric Keypad" to select the number of the stitch you wish to move to. Press the "End" button to have the machine jump to that stitch location. MOVING THE NEEDLE CASE Press the "Needle Select" buttons to change needles manually. Continue pressing button until desired needle is reached. MANUALLY TRIMMING THE THREAD Press the "Thread Trimming" button to have the machine trim the thread. CANCELLING SEWING DELETE ALL DESIGNS STORED Turn the power of the machine to the OFF position. Press and HOLD the "Delete" button while turning the power to the ON position Press the "Delete" button again when asked to erase all stored designs. Pressing the "Enter" key will reset all machine settings and may result in poor quality. 2 From the "Stand-By Screen" (Above) and the machine stopped. Press the "ESC" key to cancel the sewing Press the "ENTER" key to confirm Revised 1/10/05
-
 1
1 -
 2
2
 |
 |
