Brother International BE-1204C Changing Needle Bar Cushions - English
Brother International BE-1204C Manual
 |
View all Brother International BE-1204C manuals
Add to My Manuals
Save this manual to your list of manuals |
Brother International BE-1204C manual content summary:
- Brother International BE-1204C | Changing Needle Bar Cushions - English - Page 1
Technical Reference Title: Changing needle bar cushions Models: BE-1204C, BE-1206B 1. Make sure the machine power is turned off. 2. Remove the covers between each head by removing the two lower screws and loosening the two upper screws on the BE-1204 or one upper screw on the BE-1206. 3. Remove - Brother International BE-1204C | Changing Needle Bar Cushions - English - Page 2
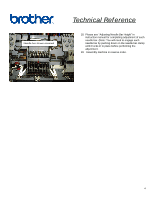
screw on the right of the face plate that has the Brother logo on it. Slide the face plate off to the right on each head. 6. Remove the two screws of the middle thread guide and remove the middle thread guide on all heads. 7. Remove the four hex screws from the thread take-up lever - Brother International BE-1204C | Changing Needle Bar Cushions - English - Page 3
Remove Technical Reference 10. Remove the four hex screws securing the tension base. Remove tension base from the machine by disconnecting the harness at the back and the ground wire held on by a screw to the tension base mount. 11. Loosen the top dead - Brother International BE-1204C | Changing Needle Bar Cushions - English - Page 4
Needle bar shown engaged Technical Reference 18. Please see "Adjusting Needle Bar Height" in instruction manual for completing adjustment of each needle bar. (Note: You will need to engage each needle bar by pushing down on the needle bar clamp until
-
 1
1 -
 2
2 -
 3
3 -
 4
4
 |
 |
1
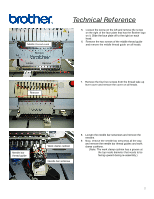
Technical Reference
Title:
Changing needle bar cushions
Models:
BE-1204C, BE-1206B
1.
Make sure the machine power is turned off.
2.
Remove the covers between each head by removing
the two lower screws and loosening the two upper
screws on the BE-1204 or one upper screw on the
BE-1206.
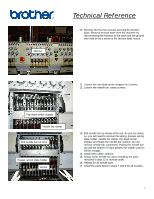
3.
Remove the right end cover by removing the two
lower screws and loosening the one upper screw.
4.
Remove the right end cover by removing the two
lower screws and loosening two upper screws. Plus
removing a screw on the cover behind the head.
Remove
Loosen