Brother International DCP-9040CN Network Users Manual - English - Page 62
Creating and installing a self-signed certificate
 |
UPC - 012502618317
View all Brother International DCP-9040CN manuals
Add to My Manuals
Save this manual to your list of manuals |
Page 62 highlights
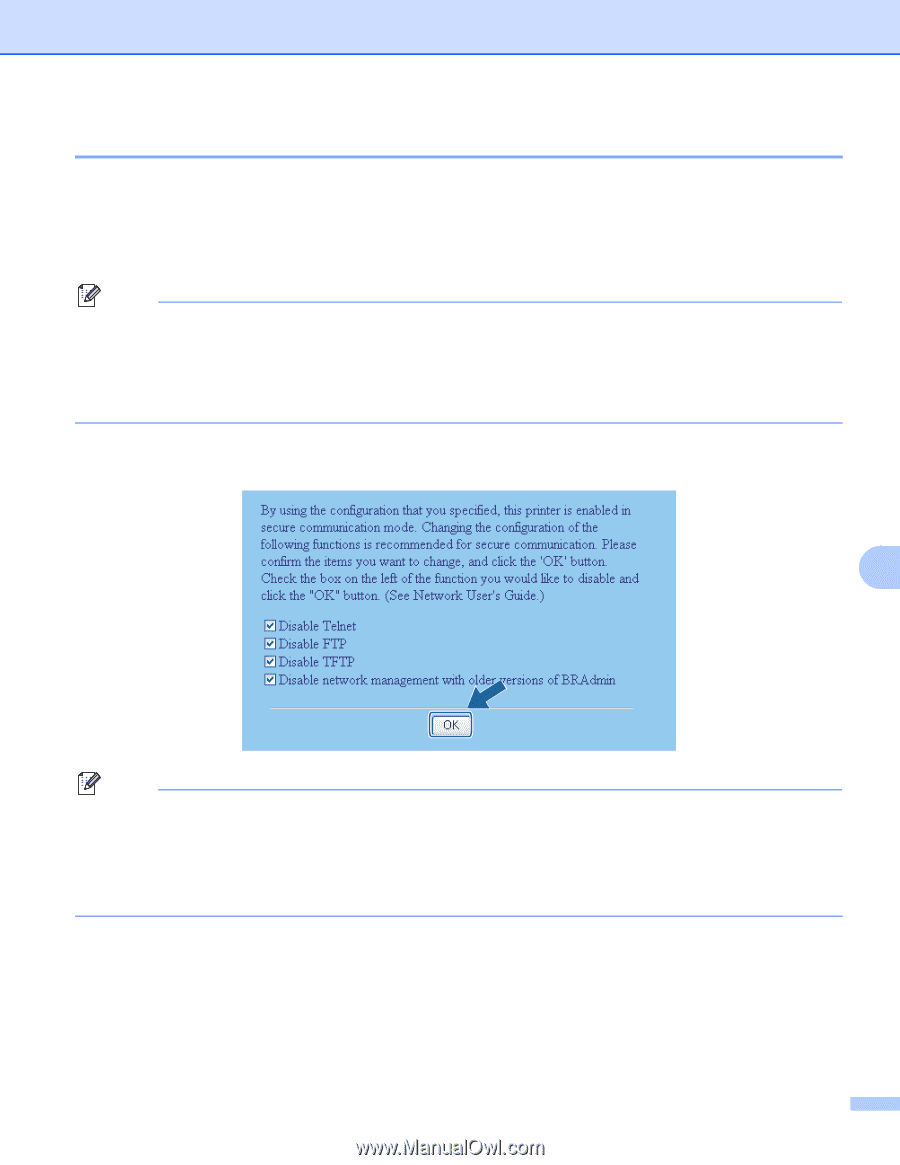
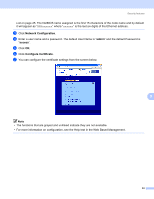
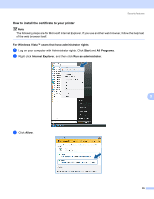
Security features Creating and installing a self-signed certificate 9 How to create and install a self-signed certificate 9 a Click Create Self-Signed Certificate on the Configure Certificate page. b Enter a Common Name and a Valid Date, then click Submit. Note • The length of the Common Name is less than 64 bytes. Enter an identifier such as an IP address, node name or domain name to use when accessing this printer through SSL/TLS communication. The node name is displayed by default. • A warning will pop-up if you enter a different name in URL than the Common Name that was used for the self-signed certificate. c Now the self-signed certificate is created successfully. Check the box on the left of each function you want to disable, and then click OK. 9 Note • We recommend disabling the Telnet, FTP, TFTP protocols and the network management with older versions of BRAdmin 1 for secure communication. If you enable them, the user authentication is not secure. • A check box only appears for an individual protocol or the older BRAdmin utility if they are already enabled. 1 BRAdmin Professional older than Ver. 2.80, Web BRAdmin older than Ver. 1.40, BRAdmin Light for Macintosh® older than Ver. 1.10. d Restart the printer to activate the configuration. e Now the self-signed certificate is saved in your printer memory. To use SSL/TLS communication, the self-signed certificate also needs to be installed on your computer. Proceed to the next section. 54
-
 1
1 -
2
-
3
-
4
-
5
-
6
-
7
-
8
-
9
-
10
-
11
-
12
-
13
-
14
-
15
-
16
-
17
-
18
-
19
-
20
-
21
-
22
-
23
-
24
-
25
-
26
-
27
-
28
-
29
-
30
-
31
-
32
-
33
-
34
-
35
-
36
-
37
-
38
-
39
-
40
-
41
-
42
-
43
-
44
-
45
-
46
-
47
-
48
-
49
-
50
-
51
-
52
-
53
-
54
-
55
-
56
-
 57
57 -
 58
58 -
 59
59 -
 60
60 -
 61
61 -
 62
62 -
 63
63 -
 64
64 -
 65
65 -
 66
66 -
 67
67 -
68
-
69
-
70
-
71
-
72
-
73
-
74
-
75
-
76
-
77
-
78
-
79
-
80
-
81
-
82
-
83
-
84
-
85
-
86
-
87
-
88
-
89
-
90
-
91
-
92
-
93
-
94
-
95
-
96
-
97
-
98
-
99
 |
 |