Brother International Innov-is 1200 Users Manual - English - Page 15
Operation buttons
 |
View all Brother International Innov-is 1200 manuals
Add to My Manuals
Save this manual to your list of manuals |
Page 15 highlights
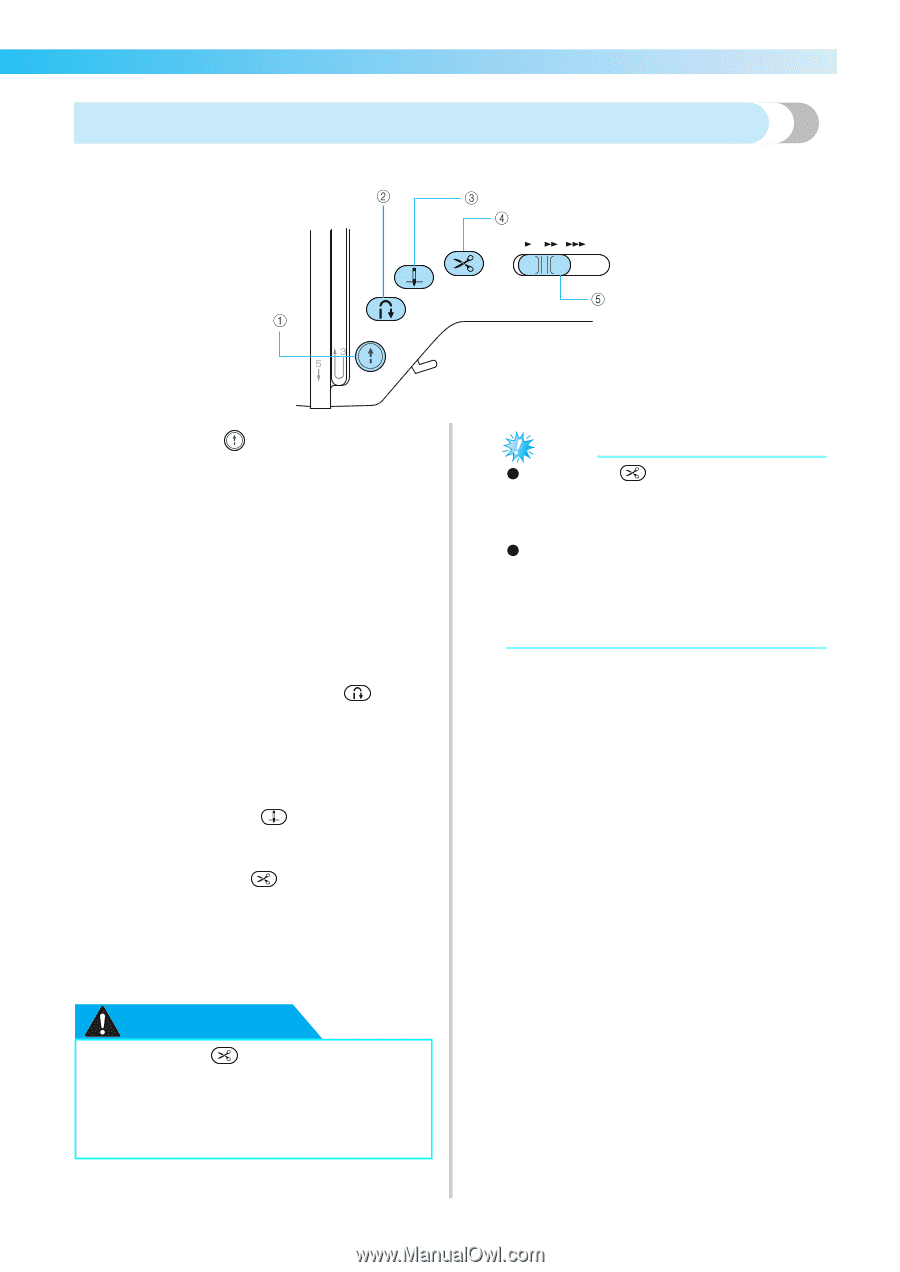
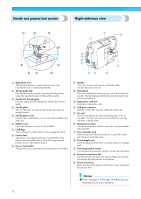
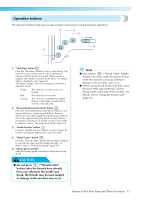
Operation buttons The operation buttons help you to easily perform various basic sewing machine operations. a "Start/Stop" button Press the "Start/Stop" button to start or stop sewing. The machine sews at a slow speed at the beginning of sewing while the button is pressed. When sewing is stopped, the needle is lowered in the fabric. For details, refer to "Starting to sew" (page 51). The button changes color according to the machine's operation mode. Green: The machine is ready to sew or is sewing. Red: The machine can not sew. Orange: The machine is winding the bobbin thread, or the bobbin winder shaft is moved to the right side. b "Reverse/Reinforcement Stitch" button Press the "Reverse/Reinforcement Stitch" button to sew reverse stitches or reinforcement stitches. Reverse stitches are sewn by keeping the button pressed down to sew in the opposite direction. Reinforcement stitches are sewn by sewing 3 to 5 stitches on top of each other. For details, refer to "Securing the stitching" (page 53). c "Needle Position" button Press the "Needle Position" button to raise or lower the needle. Pressing the button twice sews one stitch. d "Thread Cutter" button Press the "Thread Cutter" button after sewing is stopped to cut both the upper and the bobbin threads. For details, refer to "Cutting the thread" (page 54). e Sewing speed controller Slide the sewing speed controller to adjust the sewing speed. CAUTION ● Do not press ("Thread Cutter" button) after the threads have already been cut, otherwise the needle may break, the threads may become tangled or damage to the machine may occur. Note z Do not press ("Thread Cutter" button) if there is no fabric under the presser foot or while the machine is sewing, otherwise damage to the machine may occur. z When cutting thread thicker than #30, nylon thread or other special threads, use the thread cutter on the side of the machine. For details, refer to "Using the thread cutter" (page 55). Names of Machine Parts and Their Functions 13
-
 1
1 -
2
-
3
-
4
-
5
-
6
-
7
-
8
-
9
-
 10
10 -
 11
11 -
 12
12 -
 13
13 -
 14
14 -
 15
15 -
 16
16 -
 17
17 -
 18
18 -
 19
19 -
 20
20 -
21
-
22
-
23
-
24
-
25
-
26
-
27
-
28
-
29
-
30
-
31
-
32
-
33
-
34
-
35
-
36
-
37
-
38
-
39
-
40
-
41
-
42
-
43
-
44
-
45
-
46
-
47
-
48
-
49
-
50
-
51
-
52
-
53
-
54
-
55
-
56
-
57
-
58
-
59
-
60
-
61
-
62
-
63
-
64
-
65
-
66
-
67
-
68
-
69
-
70
-
71
-
72
-
73
-
74
-
75
-
76
-
77
-
78
-
79
-
80
-
81
-
82
-
83
-
84
-
85
-
86
-
87
-
88
-
89
-
90
-
91
-
92
-
93
-
94
-
95
-
96
-
97
-
98
-
99
-
100
-
101
-
102
-
103
-
104
-
105
-
106
-
107
-
108
-
109
-
110
-
111
-
112
-
113
-
114
-
115
-
116
-
117
-
118
-
119
-
120
-
121
-
122
-
123
-
124
-
125
-
126
-
127
-
128
-
129
-
130
-
131
-
132
-
133
-
134
-
135
-
136
-
137
-
138
-
139
-
140
-
141
-
142
-
143
-
144
-
145
-
146
-
147
-
148
-
149
-
150
-
151
-
152
-
153
-
154
-
155
-
156
-
157
-
158
-
159
-
160
-
161
-
162
-
163
-
164
-
165
-
166
-
167
-
168
-
169
-
170
-
171
-
172
-
173
-
174
-
175
-
176
-
177
-
178
-
179
-
180
-
181
-
182
-
183
-
184
-
185
-
186
-
187
-
188
-
189
-
190
-
191
-
192
-
193
-
194
-
195
-
196
-
197
-
198
 |
 |