Brother International MFC-9450CDN Users Manual - English - Page 224
View on LCD, Date & Time
 |
UPC - 012502622154
View all Brother International MFC-9450CDN manuals
Add to My Manuals
Save this manual to your list of manuals |
Page 224 highlights
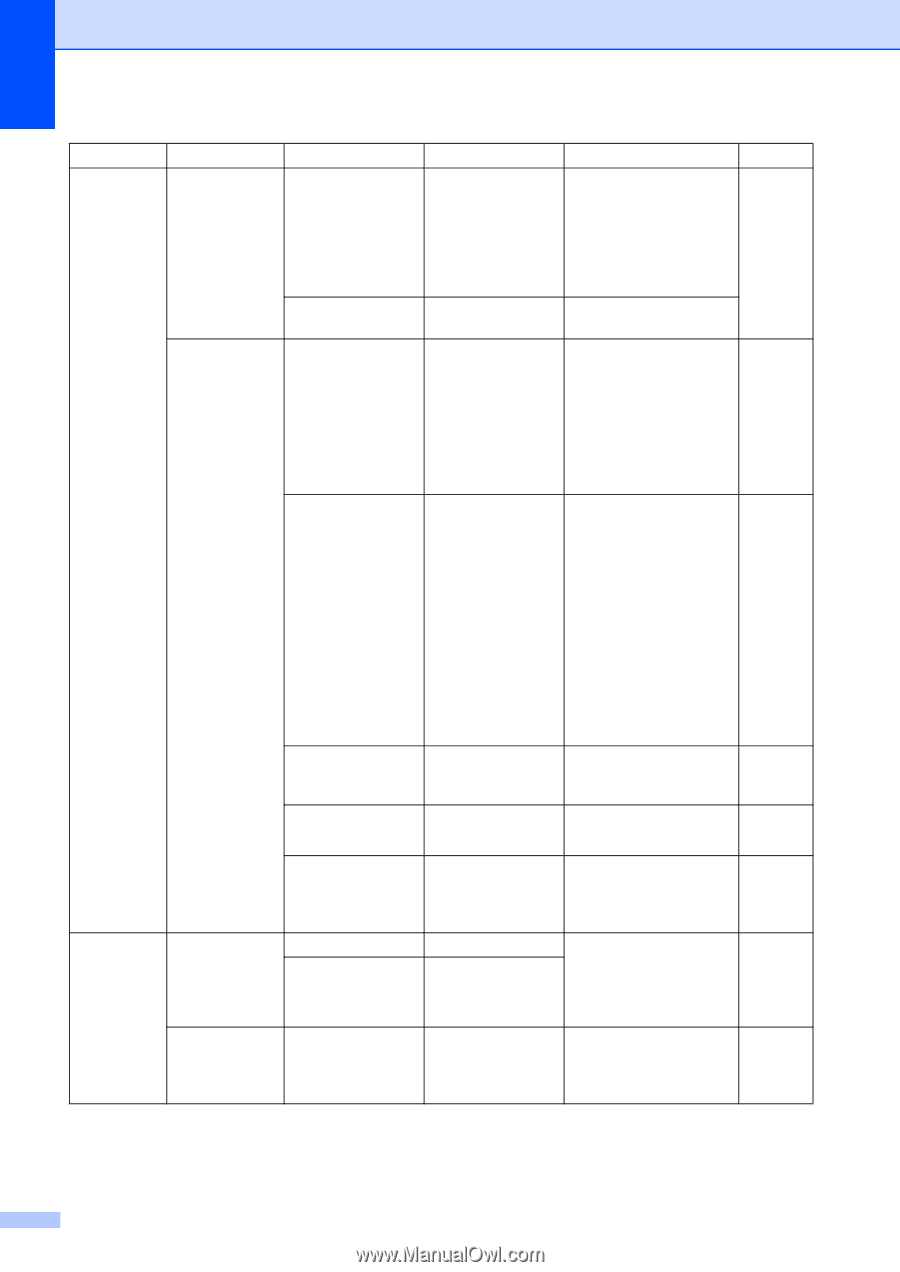
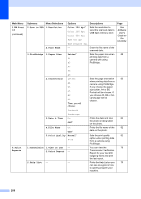
Main Menu 5.USB Direct I/F (continued) 6.Print Reports Submenu Menu Selections 2.Scan to USB 1.Resolution 2.File Name 3.PictBridge 1.Paper Size Options Descriptions Color 150 dpi* Color 300 dpi Color 600 dpi Sets the resolution to send the scanned data to USB flash memory drive. B&W 200 dpi B&W 200x100 dpi - Enter the file name of the scanned data. Letter* A4 B5 Sets the paper size when printing data from a camera with using PictBridge. Page See Software User's Guide on the CD-ROM. 82 A5 B6 2.Orientation A6 Letter A4 B5 A5 B6 A6 Then, you will choose: Sets the page orientation 82 when printing data from a camera using PictBridge. If you choose the paper size Letter, A4 or B5, Portrait will be chosen. If you choose A5, B6 or A6, Landscape will be chosen. Portrait 3.Date & Time Landscape On Off* 4.File Name On Off* 5.Print Quality Normal* Fine 1.Transmission 1.View on LCD - 2.Print Report - 2.Help List - - Prints the date and time 82 the photo is being taken on the photo. Prints the file name of the 82 data on the photo. Sets the print quality 82 option when printing data from a camera using PictBridge. You can view the 70 Transmission Verification Report for your last 200 outgoing faxes and print the last report. Prints the Help List so you 70 can see at-a-glance how to quickly program your machine. 208
-
 1
1 -
2
-
3
-
4
-
5
-
6
-
7
-
8
-
9
-
10
-
11
-
12
-
13
-
14
-
15
-
16
-
17
-
18
-
19
-
20
-
21
-
22
-
23
-
24
-
25
-
26
-
27
-
28
-
29
-
30
-
31
-
32
-
33
-
34
-
35
-
36
-
37
-
38
-
39
-
40
-
41
-
42
-
43
-
44
-
45
-
46
-
47
-
48
-
49
-
50
-
51
-
52
-
53
-
54
-
55
-
56
-
57
-
58
-
59
-
60
-
61
-
62
-
63
-
64
-
65
-
66
-
67
-
68
-
69
-
70
-
71
-
72
-
73
-
74
-
75
-
76
-
77
-
78
-
79
-
80
-
81
-
82
-
83
-
84
-
85
-
86
-
87
-
88
-
89
-
90
-
91
-
92
-
93
-
94
-
95
-
96
-
97
-
98
-
99
-
100
-
101
-
102
-
103
-
104
-
105
-
106
-
107
-
108
-
109
-
110
-
111
-
112
-
113
-
114
-
115
-
116
-
117
-
118
-
119
-
120
-
121
-
122
-
123
-
124
-
125
-
126
-
127
-
128
-
129
-
130
-
131
-
132
-
133
-
134
-
135
-
136
-
137
-
138
-
139
-
140
-
141
-
142
-
143
-
144
-
145
-
146
-
147
-
148
-
149
-
150
-
151
-
152
-
153
-
154
-
155
-
156
-
157
-
158
-
159
-
160
-
161
-
162
-
163
-
164
-
165
-
166
-
167
-
168
-
169
-
170
-
171
-
172
-
173
-
174
-
175
-
176
-
177
-
178
-
179
-
180
-
181
-
182
-
183
-
184
-
185
-
186
-
187
-
188
-
189
-
190
-
191
-
192
-
193
-
194
-
195
-
196
-
197
-
198
-
199
-
200
-
201
-
202
-
203
-
204
-
205
-
206
-
207
-
208
-
209
-
210
-
211
-
212
-
213
-
214
-
215
-
216
-
217
-
218
-
 219
219 -
 220
220 -
 221
221 -
 222
222 -
 223
223 -
 224
224 -
 225
225 -
 226
226 -
 227
227 -
 228
228 -
 229
229 -
230
-
231
-
232
-
233
-
234
-
235
-
236
-
237
-
238
-
239
-
240
-
241
-
242
-
243
-
244
-
245
-
246
-
247
-
248
-
249
-
250
-
251
-
252
 |
 |