Brother International MFC-9840CDW Users Manual - English - Page 169
Cleaning the scanner
 |
UPC - 012502618744
View all Brother International MFC-9840CDW manuals
Add to My Manuals
Save this manual to your list of manuals |
Page 169 highlights
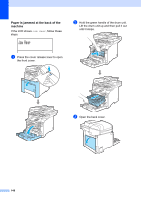
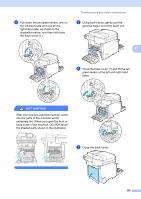
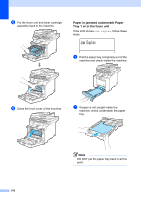
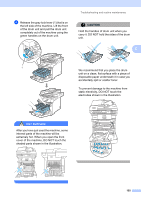
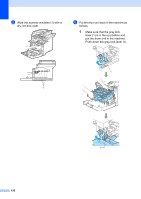
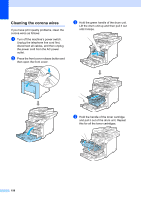
e Wipe the inside of the paper tray with a dry, lint-free cloth to remove dust. f Re-load the paper and put the paper tray firmly back in the machine. g Plug the machine's power cord back into the AC power outlet first, and reconnect all cables and telephone line cord. Turn on the machine's power switch. Cleaning the scanner C a Turn off the machine's power switch. Unplug the telephone line cord first, disconnect all cables, and then unplug the power cord from the AC power outlet. b Lift the document cover (1). Clean the white plastic surface (2) and scanner glass (3) underneath it with a soft lint-free cloth moistened with a nonflammable glass cleaner. 1 2 3 Troubleshooting and routine maintenance c In the ADF unit, clean the white bar (1) and the scanner glass strip (2) underneath it with a soft lint-free cloth moistened with a non-flammable glass cleaner. 1 C 2 d Plug the machine's power cord back into the AC power outlet first, and reconnect all cables and telephone line cord. Turn on the machine's power switch. Note In addition to cleaning the scanner glass and glass strip with a non-flammable glass cleaner, run your finger tip over the glass to see if you can feel anything on it. If you feel dirt or debris, clean the glass again concentrating on that area. You may need to repeat the cleaning process three or four times. To test, make a copy after each cleaning. 153
-
 1
1 -
2
-
3
-
4
-
5
-
6
-
7
-
8
-
9
-
10
-
11
-
12
-
13
-
14
-
15
-
16
-
17
-
18
-
19
-
20
-
21
-
22
-
23
-
24
-
25
-
26
-
27
-
28
-
29
-
30
-
31
-
32
-
33
-
34
-
35
-
36
-
37
-
38
-
39
-
40
-
41
-
42
-
43
-
44
-
45
-
46
-
47
-
48
-
49
-
50
-
51
-
52
-
53
-
54
-
55
-
56
-
57
-
58
-
59
-
60
-
61
-
62
-
63
-
64
-
65
-
66
-
67
-
68
-
69
-
70
-
71
-
72
-
73
-
74
-
75
-
76
-
77
-
78
-
79
-
80
-
81
-
82
-
83
-
84
-
85
-
86
-
87
-
88
-
89
-
90
-
91
-
92
-
93
-
94
-
95
-
96
-
97
-
98
-
99
-
100
-
101
-
102
-
103
-
104
-
105
-
106
-
107
-
108
-
109
-
110
-
111
-
112
-
113
-
114
-
115
-
116
-
117
-
118
-
119
-
120
-
121
-
122
-
123
-
124
-
125
-
126
-
127
-
128
-
129
-
130
-
131
-
132
-
133
-
134
-
135
-
136
-
137
-
138
-
139
-
140
-
141
-
142
-
143
-
144
-
145
-
146
-
147
-
148
-
149
-
150
-
151
-
152
-
153
-
154
-
155
-
156
-
157
-
158
-
159
-
160
-
161
-
162
-
163
-
 164
164 -
 165
165 -
 166
166 -
 167
167 -
 168
168 -
 169
169 -
 170
170 -
 171
171 -
 172
172 -
 173
173 -
 174
174 -
175
-
176
-
177
-
178
-
179
-
180
-
181
-
182
-
183
-
184
-
185
-
186
-
187
-
188
-
189
-
190
-
191
-
192
-
193
-
194
-
195
-
196
-
197
-
198
-
199
-
200
-
201
-
202
-
203
-
204
-
205
-
206
-
207
-
208
-
209
-
210
-
211
-
212
-
213
-
214
-
215
-
216
-
217
-
218
-
219
-
220
-
221
-
222
-
223
-
224
-
225
-
226
-
227
-
228
-
229
-
230
-
231
-
232
-
233
-
234
-
235
-
236
-
237
-
238
-
239
-
240
-
241
-
242
-
243
-
244
-
245
-
246
-
247
-
248
-
249
-
250
-
251
-
252
-
253
-
254
-
255
-
256
-
257
-
258
-
259
-
260
-
261
-
262
-
263
-
264
-
265
 |
 |
