Brother International MFC440CN Users Manual - English - Page 125
Scan to Card, Entering Scan mode, How to scan to card - scan to pdf
 |
UPC - 012502615804
View all Brother International MFC440CN manuals
Add to My Manuals
Save this manual to your list of manuals |
Page 125 highlights
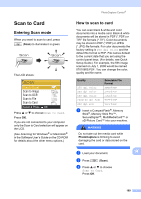
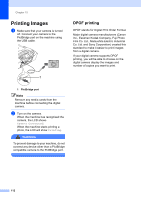
PhotoCapture Center® Scan to Card 14 Entering Scan mode 14 When you want to scan to card, press (Scan) to illuminate it in green. The LCD shows: SCAN Scan to E-mail Scan to Image Scan to OCR Scan to File Scan to Card Select & Press OK Press a or b to choose Scan to Card. Press OK. If you are not connected to your computer only the Scan to Card selection will appear on the LCD. (See Scanning for Windows® or Macintosh® in the Software User's Guide on the CD-ROM for details about the other menu options.) How to scan to card 14 You can scan black & white and color documents into a media card. Black & white documents will be stored in PDF (*.PDF) or TIFF file formats (*.TIF). Color documents may be stored in PDF (*.PDF) or JPEG (*.JPG) file formats. For color documents the factory setting is 150 dpi Color and the default file format is PDF. File names default to the current date that you set using the control panel keys. (For details, see Quick Setup Guide.) For example, the fifth image scanned on July 1, 2006 would be named 07010605.PDF. You can change the color, quality and file name. Quality 150 dpi Color 300 dpi Color 600 dpi Color 200x100 dpi B/W 200 dpi B/W Selectable File Format JPEG / PDF JPEG / PDF JPEG / PDF TIFF / PDF TIFF / PDF a Insert a CompactFlash®, Memory Stick®, Memory Stick Pro™, SecureDigital™, MultiMediaCard™ or xD-Picture Card™ into your machine. WARNING Do not take out the media card while PhotoCapture is blinking to avoid damaging the card or data stored on the card. b Load your document. 14 c Press (Scan). d Press a or b to choose Scan to Card. Press OK. 109
-
 1
1 -
2
-
3
-
4
-
5
-
6
-
7
-
8
-
9
-
10
-
11
-
12
-
13
-
14
-
15
-
16
-
17
-
18
-
19
-
20
-
21
-
22
-
23
-
24
-
25
-
26
-
27
-
28
-
29
-
30
-
31
-
32
-
33
-
34
-
35
-
36
-
37
-
38
-
39
-
40
-
41
-
42
-
43
-
44
-
45
-
46
-
47
-
48
-
49
-
50
-
51
-
52
-
53
-
54
-
55
-
56
-
57
-
58
-
59
-
60
-
61
-
62
-
63
-
64
-
65
-
66
-
67
-
68
-
69
-
70
-
71
-
72
-
73
-
74
-
75
-
76
-
77
-
78
-
79
-
80
-
81
-
82
-
83
-
84
-
85
-
86
-
87
-
88
-
89
-
90
-
91
-
92
-
93
-
94
-
95
-
96
-
97
-
98
-
99
-
100
-
101
-
102
-
103
-
104
-
105
-
106
-
107
-
108
-
109
-
110
-
111
-
112
-
113
-
114
-
115
-
116
-
117
-
118
-
119
-
 120
120 -
 121
121 -
 122
122 -
 123
123 -
 124
124 -
 125
125 -
 126
126 -
 127
127 -
 128
128 -
 129
129 -
 130
130 -
131
-
132
-
133
-
134
-
135
-
136
-
137
-
138
-
139
-
140
-
141
-
142
-
143
-
144
-
145
-
146
-
147
-
148
-
149
-
150
-
151
-
152
-
153
-
154
-
155
-
156
-
157
-
158
-
159
-
160
-
161
-
162
-
163
-
164
-
165
-
166
-
167
-
168
-
169
-
170
-
171
-
172
-
173
-
174
-
175
-
176
-
177
-
178
-
179
-
180
-
181
-
182
-
183
-
184
-
185
-
186
-
187
-
188
-
189
-
190
-
191
-
192
-
193
-
194
-
195
-
196
-
197
-
198
-
199
-
200
-
201
-
202
-
203
-
204
-
205
-
206
-
207
-
208
-
209
-
210
-
211
-
212
-
213
-
214
-
215
-
216
-
217
 |
 |
