Brother International PEDESIGN 8.0 Users Manual - English - Page 203
Applying embossing/engraving, effects to the fill/stamp stitch pattern, Saving the edited fill/stamp
 |
View all Brother International PEDESIGN 8.0 manuals
Add to My Manuals
Save this manual to your list of manuals |
Page 203 highlights
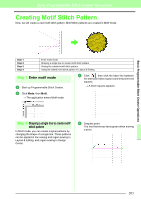
Basic Programmable Stitch Creator Operations Basic Programmable Stitch Creator Operations Step 3 Applying embossing/engraving effects to the fill/stamp stitch pattern By applying embossing or engraving effects to a pattern used as a programmable fill stitch or a stamp, an embossed or engraved finish can be created in the embroidery pattern. In order to do this, the lines of the pattern must form closed regions. In our example, the lines do not form closed regions, so we will need to add enclosing lines. 1 Click , click in the Design Page to specify point 1, and then double-click the Design Page to specify point 2. Next, click in the Design Page to specify point 3, and then double-click the Design Page to specify point 4. 1 2 4 3 → Lines are drawn along the top and bottom edges of the Design Page. 2 Click (Region (engrave)), then click the first and fourth wave regions. → These regions appear in red and will be sewn with short stitches to give the effect of engraving. 3 Click (Region (emboss)), then click the second and fifth wave regions. → This region appears in blue and will be sewn with no dropped stitches to give the effect of embossing. Step 4 Saving the edited fill/stamp stitch pattern The edited pattern can be saved. Fill/stamp stitch patterns are saved in the .pas format. 1 Click File, then Save As. 2 Select the drive and the folder, and then type in the file name. Click Save. 3 Click File, then Exit. 201
-
 1
1 -
2
-
3
-
4
-
5
-
6
-
7
-
8
-
9
-
10
-
11
-
12
-
13
-
14
-
15
-
16
-
17
-
18
-
19
-
20
-
21
-
22
-
23
-
24
-
25
-
26
-
27
-
28
-
29
-
30
-
31
-
32
-
33
-
34
-
35
-
36
-
37
-
38
-
39
-
40
-
41
-
42
-
43
-
44
-
45
-
46
-
47
-
48
-
49
-
50
-
51
-
52
-
53
-
54
-
55
-
56
-
57
-
58
-
59
-
60
-
61
-
62
-
63
-
64
-
65
-
66
-
67
-
68
-
69
-
70
-
71
-
72
-
73
-
74
-
75
-
76
-
77
-
78
-
79
-
80
-
81
-
82
-
83
-
84
-
85
-
86
-
87
-
88
-
89
-
90
-
91
-
92
-
93
-
94
-
95
-
96
-
97
-
98
-
99
-
100
-
101
-
102
-
103
-
104
-
105
-
106
-
107
-
108
-
109
-
110
-
111
-
112
-
113
-
114
-
115
-
116
-
117
-
118
-
119
-
120
-
121
-
122
-
123
-
124
-
125
-
126
-
127
-
128
-
129
-
130
-
131
-
132
-
133
-
134
-
135
-
136
-
137
-
138
-
139
-
140
-
141
-
142
-
143
-
144
-
145
-
146
-
147
-
148
-
149
-
150
-
151
-
152
-
153
-
154
-
155
-
156
-
157
-
158
-
159
-
160
-
161
-
162
-
163
-
164
-
165
-
166
-
167
-
168
-
169
-
170
-
171
-
172
-
173
-
174
-
175
-
176
-
177
-
178
-
179
-
180
-
181
-
182
-
183
-
184
-
185
-
186
-
187
-
188
-
189
-
190
-
191
-
192
-
193
-
194
-
195
-
196
-
197
-
 198
198 -
 199
199 -
 200
200 -
 201
201 -
 202
202 -
 203
203 -
 204
204 -
 205
205 -
 206
206 -
 207
207 -
 208
208 -
209
-
210
-
211
-
212
-
213
-
214
-
215
-
216
-
217
-
218
-
219
-
220
-
221
-
222
-
223
-
224
-
225
-
226
-
227
-
228
-
229
-
230
-
231
-
232
-
233
-
234
-
235
-
236
-
237
-
238
-
239
-
240
-
241
-
242
-
243
-
244
-
245
-
246
-
247
-
248
-
249
-
250
-
251
-
252
-
253
-
254
-
255
-
256
-
257
-
258
-
259
-
260
-
261
-
262
-
263
-
264
-
265
-
266
-
267
-
268
-
269
 |
 |
