Brother International XR9550 Operation Manual - Page 19
the thread may catch on the slit in the spool or
 |
View all Brother International XR9550 manuals
Add to My Manuals
Save this manual to your list of manuals |
Page 19 highlights
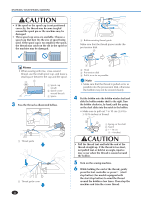
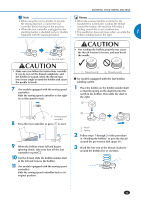
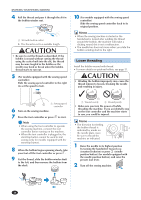
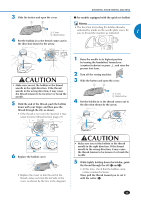
CAUTION • Do not grab the bar to raise the spool pin, otherwise, the spool pin may bend or break. • Be sure to raise the spool pin when winding the bobbin. The thread may become tangled if the bobbin winder is used without raising the spool pin. 5 Fully insert the spool for the upper thread onto the spool pin. Slide the spool cap onto the spool pin. KNOWING YOUR SEWING MACHINE 6 Pass the thread as illustrated below. 1 1 Thread guide • The thread should be unwound from the bottom to the front. CAUTION • If the spool or the spool cap is not positioned correctly, the thread may become tangled around the spool pin or the machine may be damaged. • Three spool cap sizes are available. Choose a spool cap that best fits the size of spool being used. If the spool cap is too small for the spool, the thread may catch on the slit in the spool or the machine may be damaged. 2 Thread guide cover 7 Feed the upper thread as illustrated below. Memo • When using the spool as shown below, use the small spool cap, and leave a small space between the cap and the spool. 32 1 Spool cap (small) 2 Spool (cross- wound thread) 1 3 Space 8 Make sure to guide the thread through the thread take-up lever from right to left. 1 Thread take-up lever 17
-
 1
1 -
2
-
3
-
4
-
5
-
6
-
7
-
8
-
9
-
10
-
11
-
12
-
13
-
 14
14 -
 15
15 -
 16
16 -
 17
17 -
 18
18 -
 19
19 -
 20
20 -
 21
21 -
 22
22 -
 23
23 -
 24
24 -
25
-
26
-
27
-
28
-
29
-
30
-
31
-
32
-
33
-
34
-
35
-
36
-
37
-
38
-
39
-
40
-
41
-
42
-
43
-
44
-
45
-
46
-
47
-
48
-
49
-
50
-
51
-
52
-
53
-
54
-
55
-
56
-
57
-
58
-
59
-
60
-
61
-
62
-
63
-
64
-
65
-
66
-
67
-
68
-
69
-
70
-
71
-
72
-
73
-
74
-
75
-
76
 |
 |
