Canon 0304B001 Macintosh Software Guide - Page 5
Function Window Configuration, Reference, Index
 |
UPC - 013803056648
View all Canon 0304B001 manuals
Add to My Manuals
Save this manual to your list of manuals |
Page 5 highlights
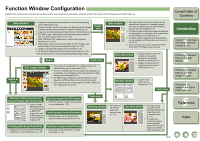
Function Window Configuration Digital Photo Professional comprises the windows and function windows shown below, centering on the main window that is displayed when DPP starts up. Main window O Images can be displayed as thumbnails, and basic image editing can be performed (p.1-2). O The size of images and the way images are displayed can be changed or images can be sorted according to a selected condition (p.1-5). O Images can be sorted and organized using 3 kinds of check marks (p.1-2). O For RAW images, white balance and brightness can be adjusted, and color space can be set (p.1-6 to p.1-9). O RAW, JPEG and TIFF images can be rotated and brightness adjusted (p.1-2, p.1-9). O RAW images can be converted into JPEG and TIFF images, and edited images can be saved as separate images* (p.1-15). O Images (including RAW images) can be printed*(p.1-19). O All settings for Digital Photo Professional can be made* (p.1-20). * This can also be done in the edit window and the edit image window. Doubleclick Button or menu Switch Tools menu Edit image window O One image can be selected from multiple images and detailed editing can be performed (p.3-1). O The size of images and the way images are displayed can be changed, or a comparison of an image before and after editing can be displayed (p.2-3). O For RAW images, brightness and white balance can be adjusted, and Picture Style can be set (p.2-3 to p.2-6). O Tone curve and color can be adjusted for RAW, JPEG and TIFF images (p.2-6 to p.2-8). Edit window O An image selected in the main window can be enlarged and displayed in a separate window. Also, you can display up to 36 edit windows to compare and edit images (p.2-2). O The size of images and the way images are displayed can be changed, or a comparison of an image before and after editing can be displayed (p.2-3). O For RAW images, brightness and white balance can be adjusted, and Picture Style can be set (p.23 to p.2-6). O Tone curve and color can be adjusted for RAW, JPEG and TIFF images (p.2-6 to p.2-8). Quick check window O Images selected in the main window can be quickly displayed in a separate window and viewed (p.4-1). O Images can be sorted and organized using 3 kinds of check marks (p.4-1). Rename window O A batch of file names can be changed (p.1-17). Tools menu Window for batch conversion and saving of images (batch processing) O A batch of multiple RAW images can be converted and saved to JPEG or TIFF images, and a batch of edited images can be saved as separate images (p.1-16). Importing images from EOS Capture O With EOS Capture, images shot remotely can be displayed (p.1-19). Transferring images to image editing software O Multiple images can be transferred to optional image editing software (p.1-18). Printing with Easy-PhotoPrint O Images can be printed together with EasyPhotoPrint on Canon BJ printers (p.1-19). Transferring an image to Adobe Photoshop O One image can be transferred to Adobe Photoshop (p.1-18). Tools menu Trimming window O An image can be trimmed within your desired range (p.1-10). Copy stamp window O An image can be corrected so that unwanted spots in the image blend with surrounding color (p.1-11). O An image can be corrected by pasting a section copied from another part of the same image to an unwanted part of the image (p.1-12). 0-3 Cover/Table of Contents Introduction 1 Displaying Thumbnail Images and Performing Basic Edits in the Main Window 2 Performing Detailed Edits in the Edit Window 3 Performing Detailed Edits in the Edit Image Window 4 Displaying an Image in the Quick Check Window 5Reference Index
-
 1
1 -
 2
2 -
 3
3 -
 4
4 -
 5
5 -
 6
6 -
 7
7 -
 8
8 -
 9
9 -
 10
10 -
 11
11 -
12
-
13
-
14
-
15
-
16
-
17
-
18
-
19
-
20
-
21
-
22
-
23
-
24
-
25
-
26
-
27
-
28
-
29
-
30
-
31
-
32
-
33
-
34
-
35
-
36
-
37
-
38
-
39
-
40
-
41
 |
 |
