Canon 2694B001 DC310/DC320 Instruction Manual - Page 46
Moving Scenes in the Playlist, Dividing Scenes, Switching Between Original and Playlist, Scenes
 |
UPC - 013803091700
View all Canon 2694B001 manuals
Add to My Manuals
Save this manual to your list of manuals |
Page 46 highlights
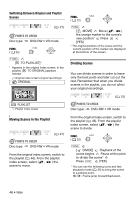
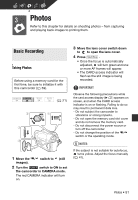
Switching Between Original and Playlist Scenes ( 21) POINTS TO CHECK Disc type: DVD-RW • VR mode FUNC. ( 22) FUNC. [ TO PLAYLIST]* * Appears in the original index screen. In the playlist, [ TO ORIGINAL] appears instead. Original index screen (original recordings) ORIGINAL FUNC. ( 22) FUNC. [ MOVE] Move ( , ) the orange marker to the scene's new position* Press [YES] * The original position of the scene and the current position of the marker are displayed at the bottom of the screen. Dividing Scenes You can divide scenes in order to leave only the best parts and later cut out the rest. Remember that when you divide scenes in the playlist, you do not affect your original recordings. PLAYLIST Playlist index screen ( 21) POINTS TO CHECK Disc type: DVD-RW • VR mode Moving Scenes in the Playlist ( 21) POINTS TO CHECK Disc type: DVD-RW • VR mode From the original index screen, switch to the playlist ( 46). From the playlist index screen, select ( , ) the scene to move. From the original index screen, switch to the playlist ( 46). From the playlist index screen, select ( , ) the scene to divide. FUNC. ( 22) FUNC. [ DIVIDE] Playback of the scene begins Pause at the point to divide the scene* Press FUNC. [YES] * You can use the following icons and fast playback mode ( 35) to bring the scene to a precise point. / : Frame jump forward/backward. 46 • Video
-
 1
1 -
2
-
3
-
4
-
5
-
6
-
7
-
8
-
9
-
10
-
11
-
12
-
13
-
14
-
15
-
16
-
17
-
18
-
19
-
20
-
21
-
22
-
23
-
24
-
25
-
26
-
27
-
28
-
29
-
30
-
31
-
32
-
33
-
34
-
35
-
36
-
37
-
38
-
39
-
40
-
 41
41 -
 42
42 -
 43
43 -
 44
44 -
 45
45 -
 46
46 -
 47
47 -
 48
48 -
 49
49 -
 50
50 -
 51
51 -
52
-
53
-
54
-
55
-
56
-
57
-
58
-
59
-
60
-
61
-
62
-
63
-
64
-
65
-
66
-
67
-
68
-
69
-
70
-
71
-
72
-
73
-
74
-
75
-
76
-
77
-
78
-
79
-
80
-
81
-
82
-
83
-
84
-
85
-
86
-
87
-
88
-
89
-
90
-
91
-
92
-
93
 |
 |
