Canon 2756B001 EOS DIGITAL REBEL XSi/EOS 450D Instruction Manual - Page 74
Using the Built-in Flash, Depth-of-Field Preview
 |
UPC - 013803096071
View all Canon 2756B001 manuals
Add to My Manuals
Save this manual to your list of manuals |
Page 74 highlights
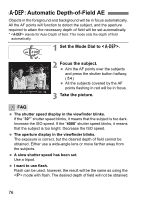
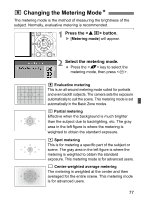
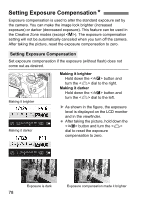
f: Changing the Depth of Field Using the Built-in Flash To obtain a correct flash exposure, the flash output will be set to match the set aperture (autoflash exposure). The shutter speed will set automatically between 30 sec. - 1/200 sec. to suit the scene's brightness. In low light, the main subject is exposed with the automatic flash, and the background is exposed with a slow shutter speed set automatically. Both the subject and background look properly exposed (automatic slow-speed flash sync). If you are handholding the camera, keep it steady to prevent camera shake. Using a tripod is recommended. To prevent slow-speed sync, select the [7 Custom Functions (C.Fn)] menu's [Flash sync. speed in Av mode] (p.154) and set it to [1: 1/ 200sec. (fixed)]. Depth-of-Field PreviewN Press the depth-of-field preview button to stop down to the current aperture setting. You can check the depth of field (range of acceptable focus) through the viewfinder. If it is difficult to discern the depth of field, first set the lowest f-number. Then hold down the depth-of-field preview button and look through the viewfinder while turning the dial to the right. As the aperture gets smaller, you can see how the depth of field increases. 74
-
 1
1 -
2
-
3
-
4
-
5
-
6
-
7
-
8
-
9
-
10
-
11
-
12
-
13
-
14
-
15
-
16
-
17
-
18
-
19
-
20
-
21
-
22
-
23
-
24
-
25
-
26
-
27
-
28
-
29
-
30
-
31
-
32
-
33
-
34
-
35
-
36
-
37
-
38
-
39
-
40
-
41
-
42
-
43
-
44
-
45
-
46
-
47
-
48
-
49
-
50
-
51
-
52
-
53
-
54
-
55
-
56
-
57
-
58
-
59
-
60
-
61
-
62
-
63
-
64
-
65
-
66
-
67
-
68
-
 69
69 -
 70
70 -
 71
71 -
 72
72 -
 73
73 -
 74
74 -
 75
75 -
 76
76 -
 77
77 -
 78
78 -
 79
79 -
80
-
81
-
82
-
83
-
84
-
85
-
86
-
87
-
88
-
89
-
90
-
91
-
92
-
93
-
94
-
95
-
96
-
97
-
98
-
99
-
100
-
101
-
102
-
103
-
104
-
105
-
106
-
107
-
108
-
109
-
110
-
111
-
112
-
113
-
114
-
115
-
116
-
117
-
118
-
119
-
120
-
121
-
122
-
123
-
124
-
125
-
126
-
127
-
128
-
129
-
130
-
131
-
132
-
133
-
134
-
135
-
136
-
137
-
138
-
139
-
140
-
141
-
142
-
143
-
144
-
145
-
146
-
147
-
148
-
149
-
150
-
151
-
152
-
153
-
154
-
155
-
156
-
157
-
158
-
159
-
160
-
161
-
162
-
163
-
164
-
165
-
166
-
167
-
168
-
169
-
170
-
171
-
172
-
173
-
174
-
175
-
176
-
177
-
178
-
179
-
180
-
181
-
182
-
183
-
184
-
185
-
186
-
187
-
188
-
189
-
190
-
191
-
192
-
193
-
194
-
195
-
196
 |
 |
