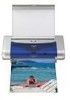
Canon 8107A001 i70 Quick Start Guide
Canon 8107A001 - i 70 Color Inkjet Printer Manual
 |
UPC - 013803019179
View all Canon 8107A001 manuals
Add to My Manuals
Save this manual to your list of manuals |
Canon 8107A001 manual content summary:
- Canon 8107A001 | i70 Quick Start Guide - Page 1
Color Bubble Jet Printer Quick Start Guide - Canon 8107A001 | i70 Quick Start Guide - Page 2
, in whole or in part, without the prior written consent of Canon U.S.A., Inc. © 2003 Canon U.S.A., Inc. Disclaimer Canon U.S.A., Inc. has reviewed this manual thoroughly in order that it will be an easy-to-use guide to your Canon i70 Color Bubble Jet Printer. All statements, technical information - Canon 8107A001 | i70 Quick Start Guide - Page 3
or Colors are Incorrect 32 Printing the Nozzle Check Pattern 33 Print Head Cleaning 35 Print Head Deep Cleaning 37 Aligning the Print Head 39 Replacing an Ink Tank 42 Troubleshooting Cannot Install the Printer Driver 48 Print Quality is Poor or Contains Errors 49 Troubleshooting Printer - Canon 8107A001 | i70 Quick Start Guide - Page 4
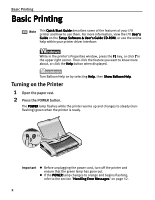
the features of your i70 printer and how to use them. For more information, view the i70 User's Guide on the Setup Software & User's Guide CD-ROM, or use the online help within your printer driver interface: While in the printer's Properties window, press the F1 key, or click ? in the upper right - Canon 8107A001 | i70 Quick Start Guide - Page 5
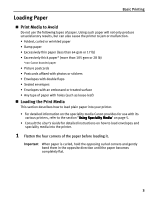
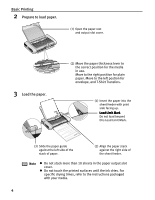
the Print Media This section describes how to load plain paper into your printer. • For detailed information on the speciality media Canon provides for use with its various printers, refer to the section "Using Speciality Media" on page 5. • Consult the User's Guide for detailed instructions on - Canon 8107A001 | i70 Quick Start Guide - Page 6
of the stack of paper. (2) Align the paper stack against the right side of the sheet feeder. Note z Do not stack more than 10 sheets in the paper output slot cover. z Do not touch the printed surfaces until the ink dries. For specific drying times, refer to the instructions packaged with your - Canon 8107A001 | i70 Quick Start Guide - Page 7
recommends that you use genuine Canon media to ensure optimal print quality. „ Photo Quality Media • Photo Paper Pro • Photo Paper Plus Glossy • Matte Photo Paper • Glossy Photo Paper • Glossy Photo Cards • High Gloss Photo Film • High Resolution Paper „ Media Suited to Business Documents • High - Canon 8107A001 | i70 Quick Start Guide - Page 8
to avoid them from sticking together. z *2: Print settings are much easier to select if you use the applications included on the Setup Software & User's Guide CD-ROM when printing with Photo Paper Pro Perforated. For instructions on how to print from the software applications, refer to the Photo - Canon 8107A001 | i70 Quick Start Guide - Page 9
section are for printing in Windows XP. 1 Create a document or open a file to print. 2 Open Printer Properties dialog box. (1) Select Print from the application software's File menu. (2) Ensure that Canon i70 is selected. (3) Click Preferences or Properties. Note In Windows 2000, click the Main tab - Canon 8107A001 | i70 Quick Start Guide - Page 10
Set on the Main tab. You can control quality in the Set Print Quality dialog box. z For details about other printer driver functions, refer to the User's Guide or Help. z Select Preview before printing by clicking the check box. This displays a preview screen that allows you to confirm the selected - Canon 8107A001 | i70 Quick Start Guide - Page 11
in this section are for printing in Mac OS 9. 1 Create a document or open a file to print. 2 Select Paper Size. (1) Select the Page Setup from the application software's File menu. (2) Select the desired paper size from the Paper Size pull-down menu. (3) Click OK. 3 Specify the required settings - Canon 8107A001 | i70 Quick Start Guide - Page 12
fine color gradation. Manual: If you select Manual, the Details button will become selectable. Click the Details button to display the Detailed Setting dialog box where you can fine-tune the Print Quality and Halftoning settings. Refer to the User's Guide. z For details about other printer driver - Canon 8107A001 | i70 Quick Start Guide - Page 13
printer. You can also print an address book, schedule, or memo received from a PDA in a fixed format through infrared transmission. „ Requirements for Infrared Transmission with the Computer Printing through infrared transmission can be performed under Windows XP, Windows Me, Windows 2000, Windows - Canon 8107A001 | i70 Quick Start Guide - Page 14
check box is not selected, select it. z When using Windows Me, check whether the infrared communication driver has been installed following the procedure below. 1.Click Start, then click Settings and Control Panel. 2.Check whether the Wireless Link icon is displayed. If this icon is not displayed - Canon 8107A001 | i70 Quick Start Guide - Page 15
computer or PDA manual. Infrared port of printer Less than 31.5 printing data or using a maintenance function of the printer driver, ensure that the name of the printer connected based on the IrDA system is displayed by clicking the Wireless Link icon (For Windows Me, Windows 98 or Windows 95, click - Canon 8107A001 | i70 Quick Start Guide - Page 16
Camera Directly Connecting a Canon digital camera with Bubble Jet Direct function to the printer allows you to print recorded images directly without using a computer. Note To print directly from a digital camera or digital video camcorder, use only a Canon "Bubble Jet Direct" compatible digital - Canon 8107A001 | i70 Quick Start Guide - Page 17
2 Load the paper on the paper rest. Advanced Printing (1) Load the media with the more glossy surface up. (2) Align the media on the right. (3) Slide the paper guide against the left side of the media. 3 Connect the printer and the digital camera. (1) Ensure that the digital camera is turned off. - Canon 8107A001 | i70 Quick Start Guide - Page 18
media set on the printer. z The digital camera does not support the following functions: · Print quality setting · Maintenance *The print head cannot be aligned by operating the digital camera. Connect the printer to the computer, then align the print head. If the print head has not been aligned - Canon 8107A001 | i70 Quick Start Guide - Page 19
refer to your Windows documentation. 1 Click Start and select Control Panel, Printers and Other Hardware, and then Printers and Faxes. For non-XP Windows, click Start, select Settings, and then Printers. 2 Select the Canon i70 icon. 3 Open the File menu and select Printing Preferences (or Properties - Canon 8107A001 | i70 Quick Start Guide - Page 20
of Canon media and inks for this printer. Printer Driver Settings The printer driver has a variety of settings that can be used to creatively enhance the colors and output of your photographs. Many of these features are covered in this chapter. For more detailed information, see the i70 User's Guide - Canon 8107A001 | i70 Quick Start Guide - Page 21
To manually adjust Print Quality settings: Advanced Printing 1 Open the Printer Properties dialog box. See"Opening the Printer Properties Dialog Box from Your Application Program" on page 17. 2 Select Custom in Print Quality, then click Set... to open the Set Print Quality dialog box. 3 Move the - Canon 8107A001 | i70 Quick Start Guide - Page 22
"Opening the Printer Properties Dialog Box from Your Application Program" on page 17. 2 Click the Effects tab. 3 Select the Photo Optimizer PRO check box. 4 Click OK. 1 Open the Print dialog box. See "Printing with Macintosh" on page 9. 2 Click Print Mode and select Manual, then click Details... to - Canon 8107A001 | i70 Quick Start Guide - Page 23
use Vivid Photo option: Vivid Photo intensifies background colors like fields, trees, oceans and skies, while maintaining natural skin tones in the images. Note In Windows Me or Windows 98 The Vivid Photo function is not available, if Background Printing has been disabled. To use Vivid Photo, select - Canon 8107A001 | i70 Quick Start Guide - Page 24
portions, such as the sky and dark portions of the images recorded with your digital camera. Note In Windows Me or Windows 98 The Photo Noise Reduction function is not available, if Background Printing has been disabled. To use Photo Noise Reduction, select the Photo Noise Reduction check box on the - Canon 8107A001 | i70 Quick Start Guide - Page 25
settings. (3) Select an icon. (4) Enter a description on the registering profile. 4 Click OK. 5 Click OK on the Profiles tab. This registers your printer driver print settings. Note You can retrieve or delete the print settings profile at any time. Retrieving profile: Select the desired profile from - Canon 8107A001 | i70 Quick Start Guide - Page 26
a name under which to register your settings. 4 Click OK. 5 Click Close in the Register Settings dialog box. This registers your printer driver print settings. Note You can retrieve or delete the saved driver settings at any time. Retrieving print settings: Select the name of the settings to - Canon 8107A001 | i70 Quick Start Guide - Page 27
below provide a basic introduction to the many features offered by your printer driver. Note For detailed description of the printer driver functions, refer to the User's Guide. Printing with Borderless Printing Reducing Noise from Images Recorded with Digital Camera Smoothing the Rough Edges - Canon 8107A001 | i70 Quick Start Guide - Page 28
Instructions. z For details about photo applications, refer to the Photo Application Guide included on the Setup Software & User's Guide CD-ROM. „ Easy-PhotoPrint (Windows) You can make Borderless Printing easily and quickly, just by selecting a photograph taken with a digital camera and the paper - Canon 8107A001 | i70 Quick Start Guide - Page 29
with Windows This chapter describes the steps used to print from photo applications included with your Setup Software and User's Guide CD-ROM using the Borderless Printing mode. Note Media Types Suitable for Borderless Printing Media types compatible with Borderless Printing include Photo Paper - Canon 8107A001 | i70 Quick Start Guide - Page 30
. Decreases the number of copies. 4 Select the layout. (1) Click the 2.Paper Selection tab. (2) Select the size of the paper you use from Paper Size. (3) Select the type of the paper you use from Media Type. (1) Click the 3. Layout/ Print tab. (2) Select Borderless (full). (3) Load the media - Canon 8107A001 | i70 Quick Start Guide - Page 31
describes the steps used to print from photo applications included with your Setup Software and User's Guide CD-ROM using the Borderless Printing mode. Note Media Types Suitable for Borderless Printing Media types compatible with Borderless Printing include Photo Paper Plus Glossy (LTR, 4s x 6s - Canon 8107A001 | i70 Quick Start Guide - Page 32
(1) Select Tiled photo printing. (2) Click Next. (3) Click Page setup.... 4 Select Borderless Printing. (1) Select Borderless Printing. (2) Select a paper size from the Paper Size pull-down menu. The menu only displays paper sizes compatible with Borderless Printing. (3) Click OK. A message box - Canon 8107A001 | i70 Quick Start Guide - Page 33
photograph. (1) Select 1(1×1) from the No. of images pull-down menu. (2) Click OK. (1) Click PRINT. The Print dialog box is displayed. (4) Load the selected paper in the printer. (5) Click Print. (2) Select a type of media for printing from the Media Type pull-down menu. (3) Select Photo from - Canon 8107A001 | i70 Quick Start Guide - Page 34
Faint or Colors are Incorrect When printing becomes faint or colors are incorrect, even if ink remains in the ink tanks, the print head nozzles are probably clogged. Follow the procedures below to clean the nozzles. Step 1 "Printing the Nozzle Check Pattern" on page 33 If the problem remains If - Canon 8107A001 | i70 Quick Start Guide - Page 35
the print head nozzles, and to verify print head alignment. Use this function when printed results are blurred or the color is incorrect. Note Nozzle check pattern printing can be executed also from the printer itself. With the printer on, load a sheet of A4 or Letter paper in the printer. Hold - Canon 8107A001 | i70 Quick Start Guide - Page 36
, click OK. See "Examining the Nozzle Check Pattern" on page 34. „ Examining the Nozzle Check Pattern The nozzle check pattern should appear as follows when ink is discharged properly. Examine the nozzle check pattern output by the printer. (1) Lines missing here indicate the print head requires - Canon 8107A001 | i70 Quick Start Guide - Page 37
the print head consumes ink, so perform print head cleaning only when necessary. 1 Ensure the printer is on. 2 Open the Printer Properties dialog box. See "Opening the Printer Properties Dialog Box Directly from the Start Menu" on page 17. 3 Start Print Head Cleaning. (1) Click the Maintenance - Canon 8107A001 | i70 Quick Start Guide - Page 38
dialog box. (1) Select Page Setup... in the File menu. (2) Click Utilities to open the Printer Utility dialog box. 3 Start Print Head Cleaning. (1) Select Cleaning from the pulldown menu. (2) Click Cleaning. (3) Select the ink tank for cleaning. (4) When the confirmation message is displayed - Canon 8107A001 | i70 Quick Start Guide - Page 39
when necessary. 1 Ensure the printer is on. 2 Open the Printer Properties dialog box. See "Opening the Printer Properties Dialog Box Directly from the Start Menu" on page 17. 3 Start Print Head Deep Cleaning. (1) Click the Maintenace tab. (2) Click Deep Cleaning. (3) Select the ink tank for deep - Canon 8107A001 | i70 Quick Start Guide - Page 40
dialog box. (1) Select Page Setup... in the File menu. (2) Click Utilities to open the Printer Utility dialog box. 3 Start Print Head Deep Cleaning. (1) Select Cleaning from the pulldown menu. (2) Click Deep Cleaning. (3) Select the ink tank for deep cleaning. (4) When the confirmation message is - Canon 8107A001 | i70 Quick Start Guide - Page 41
Aligning the Print Head Printing Maintenance Aligning the print head position allows you to print without shifts in the color registration. 1 With the printer on, load a sheet of paper in the printer. Move the paper thickness lever to the right position. 2 Open the Printer Properties dialog box. - Canon 8107A001 | i70 Quick Start Guide - Page 42
Print Head. (1) Look at the print out. From the patterns, select the most even, least irregular patterns and enter the number that corresponds. (2) Enter the numbers. (3) Click the confirmation message is displayed, click OK. 1 Ensure the printer is on. 2 Open the Print Utility dialog box. (1) - Canon 8107A001 | i70 Quick Start Guide - Page 43
Maintenance (1) Select Test Print from the pull-down menu. (2) Click Print Head Alignment. 4 Align the Print Head. (1) Look at the print out. From the patterns, select the most even, least irregular patterns and enter the number that corresponds. (2) Enter the numbers. (3) Click Send. Note If it - Canon 8107A001 | i70 Quick Start Guide - Page 44
tank is used, or installed in the incorrect position. • Black: BCI-15 Black • Color: BCI-15 Color „ Replacing an Ink Tank When an ink tank runs out of ink, replace it using the following steps. 1 Ensure that the printer is on, and then open the print head cover. The print head holder moves to the - Canon 8107A001 | i70 Quick Start Guide - Page 45
printing is specified. Color ink is consumed in the head cleaning and deep cleaning, which are necessary to maintain the printer's capabilities. z When an ink tank runs out of ink, replace the ink tank with a new one immediately. If printing is continued with no ink in the ink tank, a trouble - Canon 8107A001 | i70 Quick Start Guide - Page 46
Note Infrared transmission is performed in Windows XP or Windows 2000, the printer will not output the message asking for confirmation of ink tank replacement. This is why it is important to open the printer driver's Properties dialog box and manually reset the ink tank counter in the Maintenance - Canon 8107A001 | i70 Quick Start Guide - Page 47
happens, manually reset the ink counter according to the following procedure. Resetting the Ink Counter in Printer Properties dialog box: z When using Windows: 1. Open the Printer Properties dialog box and click the Maintenance Tab. 2. Click Ink Counter Reset. 3. Select the newly installed ink tank - Canon 8107A001 | i70 Quick Start Guide - Page 48
value with an actual ink volume. Reset the ink counter when installing a new ink tank. Low Ink Warning Display The '!' shows a low ink level in the ink tank. BJ Status Monitor (Windows) BJ Status Dialog (Macintosh) The color ink becomes low. How to Display Low Ink Warning Correctly • Reset the - Canon 8107A001 | i70 Quick Start Guide - Page 49
most common printing problems. Refer to the User's Guide for additional information on topics not covered in this section. • "Cannot Install the Printer Driver" on page 48 • "Print Quality is Poor or Contains Errors" on page 49 • "Troubleshooting Printer Hardware" on page 50 • "Paper Does Not - Canon 8107A001 | i70 Quick Start Guide - Page 50
the printer off. 5. Restart the computer. 6. Carefully follow the procedures described in the Easy Setup Instructions and reinstall the driver. • When connecting through infrared transmission 1. Click Manual selection. 2. Select a port. - Windows XP/Windows 2000: [IR] - Windows Me/Windows 98/Windows - Canon 8107A001 | i70 Quick Start Guide - Page 51
Troubleshooting Print Quality is Poor or Contains Errors Problem Ink does not eject properly/Printing is Blurred/ Colors are Wrong / White Streaks appears / Printed Ruled Lines are Displaced Possible Cause Ink tank is not seated properly Print head nozzles clogged Media not loaded print-side up - Canon 8107A001 | i70 Quick Start Guide - Page 52
Troubleshooting Troubleshooting Printer Hardware Problem Printer Does Not Start or Printer Stops During Print Jobs Possible Cause Try This Print head has overheated due to long periods of continuous printing Stop printing and turn the printer off for at least 15 minutes to allow the print head - Canon 8107A001 | i70 Quick Start Guide - Page 53
POWER lamp flashes three times, then feed the sheet of paper. Paper Jams 1. Gently pull the jammed paper out of the sheet feeder slot or the paper output slot, whichever is easier. • If the paper tears and some of it is left in the printer, turn the printer off, then open the print head cover and - Canon 8107A001 | i70 Quick Start Guide - Page 54
button. See "Paper Jams" on page 51. Six flashes Print head not installed Install print head. Seven flashes Defective print head Press the POWER button to turn off the printer, and press the POWER button again to turn on the printer. If the same error occurs, the print head may be defective - Canon 8107A001 | i70 Quick Start Guide - Page 55
the printer port status. Double-click Universal Serial Bus (USB) controllers on the Device Manager dialog box, then double-click Canon i70 to see the status. Refer to the User's Guide for instructions on how to verify the status. • When performing infrared transmission in Windows XP, Windows 2000 - Canon 8107A001 | i70 Quick Start Guide - Page 56
Troubleshooting Problem "Error No.: X202" "Error No.: X203" "Error No.: X300" Possible Cause Printer driver is not installed properly Try This Uninstall then reinstall the printer driver. 1. Click Start, and select All Programs (or Programs), Canon i70, and Uninstall. 2. Follow the on-screen - Canon 8107A001 | i70 Quick Start Guide - Page 57
Troubleshooting Problem Low Ink Warning Accompanied by Ink Tank Icon With '?' Possible Cause Failure to reset ink counter when installing new ink tank Try This The ink tank level accompanied by the ink tank icon with the "?" indicates ink tank is not synchronized with its ink counter. Always be - Canon 8107A001 | i70 Quick Start Guide - Page 58
Troubleshooting Cannot Print Properly through Infrared Transmission Problem Cannot Print Properly through Infrared Transmission Possible Cause The required driver is not installed Try This • When using other than Windows 95, Windows 98 or later must have been preinstalled and Microsoft Infrared - Canon 8107A001 | i70 Quick Start Guide - Page 59
Troubleshooting Problem Cannot Print Properly through Infrared Transmission (continued) Possible Cause Try This The selected printer Check the printer port setting. port is wrong 1. Open the printer driver Properties dialog box from the Start menu. 2. Click the Details tab to ensure that the - Canon 8107A001 | i70 Quick Start Guide - Page 60
jammed paper load new media, and press the RESUME/CANCEL button. Printer cover open The print head cover is open. Close the print head cover. No printhead No print head is installed. (The POWER lamp on the printer flashes six times.) Install a print head according to the Easy Setup Instructions - Canon 8107A001 | i70 Quick Start Guide - Page 61
more images can be printed. If this error occurs, disconnect the cable, connect it again, and retry the operation. z Images can be printed directly from Canon "Bubble Jet Direct" compatible digital cameras and digital video camcorders connected to this printer. z A low ink warning is not displayed - Canon 8107A001 | i70 Quick Start Guide - Page 62
1 Turn on your Mac and insert the Setup Software & User's Guide CD-ROM. TURN THE PRINTER ON. 2 Open the Printer Driver folder on the CD-ROM, then double-click the Installer icon. 3 Read the License Agreement and click Accept, if you agree. 4 Click Install. The printer driver will load automatically - Canon 8107A001 | i70 Quick Start Guide - Page 63
the Status of the Printer BJ Status Monitor Functions BJ Print Monitor Troubleshooting Cannot Install Printer Driver Print Quality is Poor Printer Does Not Start or Stops During Print Jobs Paper Does Not Feed Properly or Paper Jams The POWER Lamp Flashes Orange An Error Message is Display on - Canon 8107A001 | i70 Quick Start Guide - Page 64
you purchase the options. „ Canon Portable Kit LK-51 This option is a battery kit that consists of a battery charger and a lithium-ion battery. Use this kit together with the printer in locations where there is no power supply (during business trip, etc.). „ Canon Li-ion Battery LB-51 This option is - Canon 8107A001 | i70 Quick Start Guide - Page 65
: 128 nozzles per each color (600 dpi) Ink Tanks: Capacity (pages): Black (BCI-15 Black) approx. 185*1, approx. 390*2 Color (BCI-15 Color) approx. 100*2 *1 1500 characters per page, normal text, at standard and plain paper mode with Windows XP printer driver *2 Based on printing the ISO JIS-SCID - Canon 8107A001 | i70 Quick Start Guide - Page 66
on which Mac OS X v10.1 or later can operate. (The Setup Software & User's Guide CD-ROM cannot be read in Mac OS X v10.0.x) z 100MB of available hard-disk space for printer driver installation z The following functions are not supported: - Borderless printing (will be supported with Mac OS X v10 - Canon 8107A001 | i70 Quick Start Guide - Page 67
on while cleaning it, you could injure yourself or damage the printer. Do not attempt to disassemble or modify the printer. There are no user serviceable parts inside the printer. The printer contains high-voltage components. Never attempt any maintenance procedure not described in this guide. 65 - Canon 8107A001 | i70 Quick Start Guide - Page 68
(paper clips, staples, etc.) or containers of flammable solvents (alcohol, thinners, etc.) on top of the printer. If any foreign object (mental or liquid) fall into the printer, unplug the power cord and call for service. Print heads and ink tanks For safety reasons store print heads and ink - Canon 8107A001 | i70 Quick Start Guide - Page 69
Information Appendix Color Printer Model: K10222 (i70) This device complies with Part 15 of installed and used in accordance with the instructions, may cause harmful interference to radio communications. However, there is no guarantee that interference will not occur in a particular installation - Canon 8107A001 | i70 Quick Start Guide - Page 70
operate the Product as set forth in the user's manual or other documentation for the Product. (b) Use of parts or supplies (other than those sold by Canon USA) that cause damage to the Product or cause abnormally frequent service calls or service problems. (c) If the Product has had it serial number - Canon 8107A001 | i70 Quick Start Guide - Page 71
Appendix Canon offers a full range of customer technical support* options: • For interactive troubleshooting, e-mail technical support, the latest driver downloads and answers to frequently asked questions (www.canontechsupport.com) • Automated interactive telephone support on most current products
-
 1
1 -
 2
2 -
 3
3 -
 4
4 -
 5
5 -
 6
6 -
 7
7 -
8
-
9
-
10
-
11
-
12
-
13
-
14
-
15
-
16
-
17
-
18
-
19
-
20
-
21
-
22
-
23
-
24
-
25
-
26
-
27
-
28
-
29
-
30
-
31
-
32
-
33
-
34
-
35
-
36
-
37
-
38
-
39
-
40
-
41
-
42
-
43
-
44
-
45
-
46
-
47
-
48
-
49
-
50
-
51
-
52
-
53
-
54
-
55
-
56
-
57
-
58
-
59
-
60
-
61
-
62
-
63
-
64
-
65
-
66
-
67
-
68
-
69
-
70
-
71
 |
 |
Color Bubble Jet Printer
Color Bubble Jet Printer
Color Bubble Jet Printer
Color Bubble Jet Printer
Quick Start Guide
Quick Start Guide
Quick Start Guide
Quick Start Guide