Canon 8120A001 PowerShot G3 Camera User Guide - Page 162
Connecting the Camera to a Computer Via the USB Cable
 |
UPC - 013803019742
View all Canon 8120A001 manuals
Add to My Manuals
Save this manual to your list of manuals |
Page 162 highlights
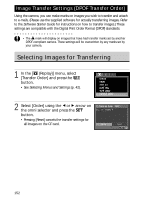
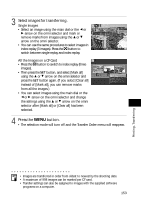
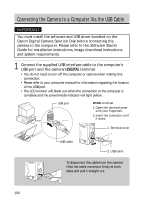
Connecting the Camera to a Computer Via the USB Cable IMPORTANT You must install the software and USB driver bundled on the Canon Digital Camera Solution Disk before connecting the camera to the computer. Please refer to the Software Starter Guide for installation instructions, image download instructions and system requirements. 1 Connect the supplied USB interface cable to the computer's USB port and the camera's terminal. • You do not need to turn off the computer or camera when making this connection. • Please refer to your computer manual for information regarding the location of the USB port. • The LCD monitor will blank out when the connection to the computer is complete and the power/mode indicator will light yellow. USB port terminal 1. Open the terminal cover with your fingernail. 2. Insert the connector until it clicks. 1. Terminal cover USB cable 2. USB cable To disconnect the cable from the camera: Hold the cable connector firmly at both sides and pull it straight out. 156
-
 1
1 -
2
-
3
-
4
-
5
-
6
-
7
-
8
-
9
-
10
-
11
-
12
-
13
-
14
-
15
-
16
-
17
-
18
-
19
-
20
-
21
-
22
-
23
-
24
-
25
-
26
-
27
-
28
-
29
-
30
-
31
-
32
-
33
-
34
-
35
-
36
-
37
-
38
-
39
-
40
-
41
-
42
-
43
-
44
-
45
-
46
-
47
-
48
-
49
-
50
-
51
-
52
-
53
-
54
-
55
-
56
-
57
-
58
-
59
-
60
-
61
-
62
-
63
-
64
-
65
-
66
-
67
-
68
-
69
-
70
-
71
-
72
-
73
-
74
-
75
-
76
-
77
-
78
-
79
-
80
-
81
-
82
-
83
-
84
-
85
-
86
-
87
-
88
-
89
-
90
-
91
-
92
-
93
-
94
-
95
-
96
-
97
-
98
-
99
-
100
-
101
-
102
-
103
-
104
-
105
-
106
-
107
-
108
-
109
-
110
-
111
-
112
-
113
-
114
-
115
-
116
-
117
-
118
-
119
-
120
-
121
-
122
-
123
-
124
-
125
-
126
-
127
-
128
-
129
-
130
-
131
-
132
-
133
-
134
-
135
-
136
-
137
-
138
-
139
-
140
-
141
-
142
-
143
-
144
-
145
-
146
-
147
-
148
-
149
-
150
-
151
-
152
-
153
-
154
-
155
-
156
-
 157
157 -
 158
158 -
 159
159 -
 160
160 -
 161
161 -
 162
162 -
 163
163 -
 164
164 -
 165
165 -
 166
166 -
 167
167 -
168
-
169
-
170
-
171
-
172
-
173
-
174
-
175
-
176
-
177
-
178
-
179
-
180
-
181
-
182
-
183
-
184
-
185
-
186
-
187
-
188
-
189
-
190
-
191
-
192
-
193
-
194
-
195
-
196
-
197
-
198
-
199
-
200
-
201
-
202
-
203
-
204
-
205
-
206
-
207
-
208
-
209
-
210
-
211
-
212
 |
 |